Smart Oil Gauge: The Installation Process

Making sure that your Smart Oil Gauge installation is correct is crucial for its functionality. Depending on your tank, the installation process is different and can sometimes be confusing with all the different adapters! The Duo and Standard models also have slightly different installations. Granby tank installations will end up being different than Roth installations. But before you install the Smart Oil Gauge, you must set it up and connect it to the app first! This will make the install process much easier!

What’s Required for Installation?

When it comes to installing a Smart Oil Gauge on a standard steel Granby tank, there are a couple of things that you need! Firstly, you will obviously need the gauge! Then, you’ll need a pipe wrench and pipe dope. Those can be purchased at Lowe’s, Home Depot, or on Amazon. DO NOT USE TEFLON TAPE! Finally, if you need an adapter, you’ll need that too! Don’t worry, I’ll touch more on that later in this blog.

However, for Granby double-wall tanks and Roth double-wall tanks, you will simply need the Smart Oil Gauge and the Roth adapter! I’ll touch more on those Roth adapters later, but the installation on these is a little bit simpler!

Steel Tank Installations

These types of tanks are the most common. Most homes in the United States that have heating oil will use a standard Granby tank, regardless of if its 275 or 330 gallons. If you don’t have an adapter for the standard Smart Oil Gauge installation, then all you need to use is the pipe wrench and pipe dope. Simply apply a thin layer of pipe dope onto the bottom threads and then hand-thread it into the tank as far as you can. Then, you’ll want to use your pipe wrench and thread it down all the way until you cannot thread it anymore. You can watch our video instructions here.
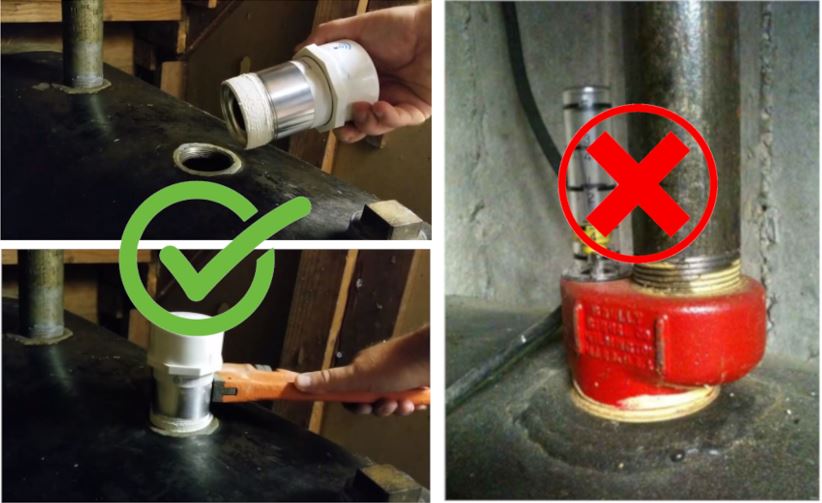
This is an example of installing the gauge onto the tank. You cannot install the Smart Oil Gauge onto a combined fitting with the vent pipe.

However, if you’re using an adapter, then you’ll want to thread the gauge into the adapter WITHOUT pipe dope. Then, put a thin layer of pipe dope on the bottom threads of the adapter. Once you’ve done that, use the pipe wrench to tighten the gauge and adapter onto the tank.

Granby and Roth Double Wall Tanks Installations

I mentioned this briefly, but when installing the Smart Oil Gauge onto a tank that’s either a Roth or Granby double-wall, you will just need the adapter and the device. You CANNOT install the Smart Oil Gauge onto the tank’s fitting that comes with the tank. The reason for this is that the gauge sends its signal in a cone shape, not straight down. The tank’s fitting doesn’t accommodate the gauge’s signal. Without the adapter, the Smart Oil Gauge will only read full.

For this installation, you DO NOT need to use Teflon tape or pipe dope. You can simply hand-thread the gauge into the tank and then remove the existing tank fitting from the tank. Then, put the Smart Oil Gauge and the adapter onto the white fitting in its place. You can watch an installation of this process here.

Smart Oil Gauge Adapter Compatibility

There are a couple of adapters for the Smart Oil Gauges, so it can be a little confusing which one you need for your setup. The standard Smart Oil Gauge has three adapters, while the Duo only has two.

The three adapters for the Standard Smart Oil Gauge are the 1.25″, 1.5″, and Roth adapters. The 1.25″ NPT adapter is used on tanks that have a 1.25″ fitting. This adapter is only usable with the standard Smart Oil Gauge. The Duo is not compatible with a 1.25″ fitting. Each of the adapters have their own SKU. CCF-905 is for the 1.5″ NPT, CCF-906 is for the Roth, and CCF-908 is for the 1.25″ NPT adapter. You can use the graph below to get a better idea of which one you need.
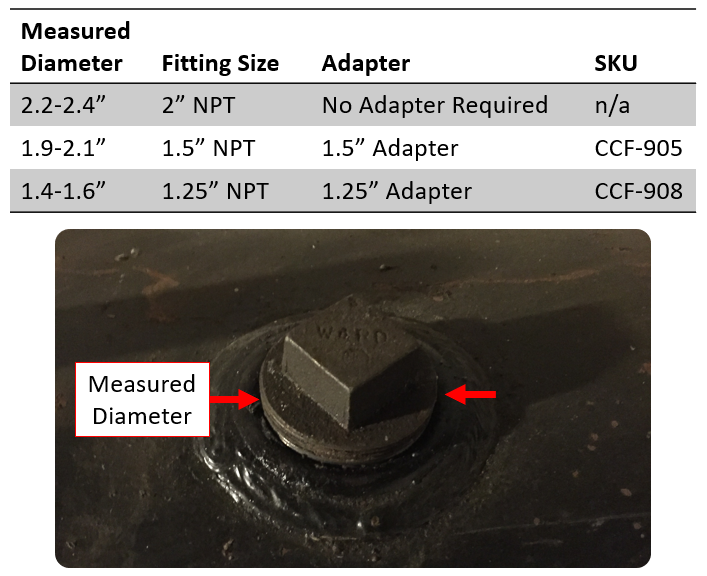
Using the above graph will help you understand which adapter you need!

Now, Smart Oil Gauge Duos only have two adapters. These are the CCF-905DUO and the CCF-906DUO. These are the 1.5″ and the Roth adapters, respectively. The Duo cannot be used on tanks with 1.25″ NPT fittings. This is because these fittings are too small for the sensors of the Duo to fit through the hole. But one thing you need to know about the Roth adapters is that you have to slide the guide cone into the body of the gauge first. Without doing that, the Smart Oil Gauge won’t be able to be read properly.
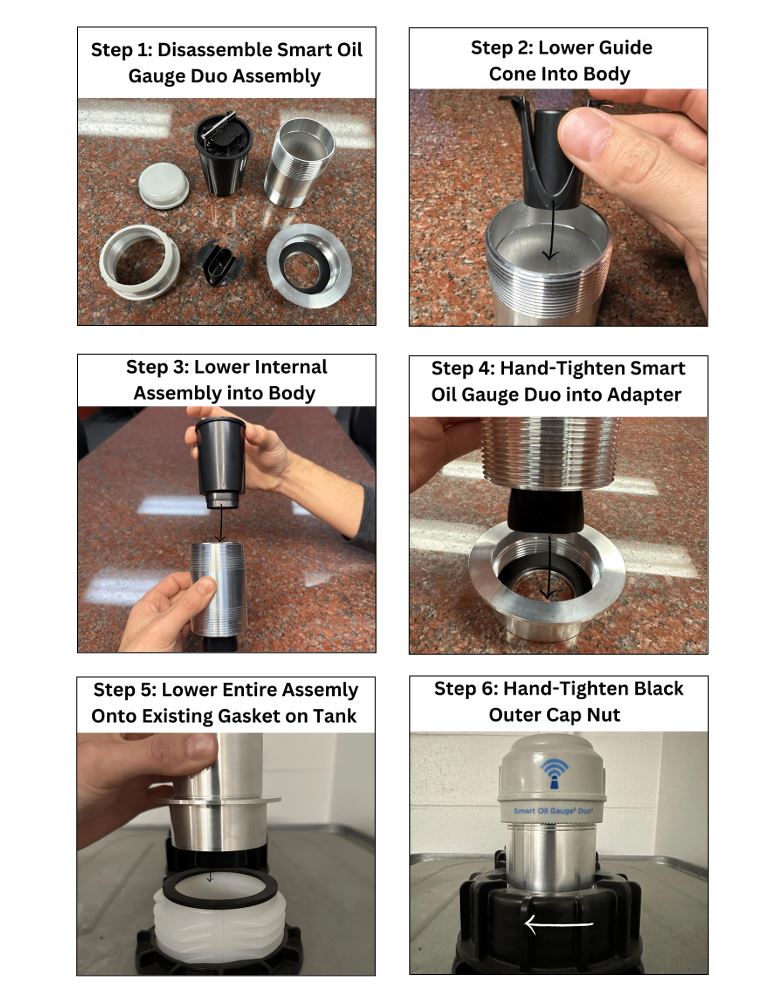
The Smart Oil Gauge installation must look like the one above. This will ensure that the gauge is reading correctly!

Non-Traditional Tank Installations

While Roth tanks are easy and Granby tanks are straightforward, non-traditional tanks will tend to be a little tricky. While most standard tanks are oval-shaped, these tanks tend to be more rectangular, cylindrical, and cube-shaped. However, as long as the tank has a fitting that’s 2″ NPT, you shouldn’t have any trouble installing the gauge onto the tank! These tanks will often have a 2″ NPT fitting, but in rare cases, they don’t. So make sure that your tank has one of these fittings!

However, if your tank fitting is larger than 2″ NPT, then the gauge won’t be able to be installed on this tank size. We don’t sell adapters that are larger than 1.5″ NPT. The Smart Oil Gauge cannot work with any of the off-the-shelf adapters. Standard off-the-shelf adapters don’t accommodate the Smart Oil Gauge’s ultrasonic signal, so the readings might not be accurate. The adapters we provide are specifically made for the gauge and to accommodate its signal. Adapters that are off the shelf do not.

What Can’t the Gauge be Installed onto?

While the Smart Oil Gauge can be installed on most tanks, there are a couple of tanks for which the gauge cannot be installed. The major tanks that the gauge cannot be installed on are Roth 1500L, Underground tanks, and fiberglass tanks. I go a bit more in-depth as to why that is in this article.

The Smart Oil Gauge can’t be installed on fittings that are raised, T-pipes, or extension pipes. Raised fittings will make it harder for the gauge to get the signal beyond the fitting, which will ultimately make the gauge read “Full” all the time. The same can be said for T-pipes and extension pipes. While the extension pipe raises the gauge higher than it should, on T-pipes, the gauge won’t even be able to see the oil!

Conclusion

Depending on your tank size and style, your Smart Oil Gauge installation will be different! Which is perfectly fine! As long as you are following the steps in the gauge’s instructions as well as the tips and tricks in this blog post, you’ll be able to install the gauge without any issues!

Just make sure that when you’re installing the gauge, you have all the necessary tools and equipment! Don’t forget to get the gauge set up in the app first before you go ahead and install it! That’ll make the process so much easier to get it set up and installed!

Happy Heating!

Hunter

Preparing Yourself for Heating Oil Season

If you’ve watched Game of Thrones, you’ll know the iconic phrase “Winter is Coming”. Well, it’s August now, which means Heating Oil Season and Winter are just around the corner! Just like in the show, it’s important to understand that in the Northeast, it’s bad not to be prepared for what’s to come. Winter is peak season for heating oil, and now that it’s August, there’s a lot for you to do before winter is in full swing! Like every winter, you shouldn’t go in unprepared!

Fall and Winter are just around the corner! Which means soon your home will look like this!

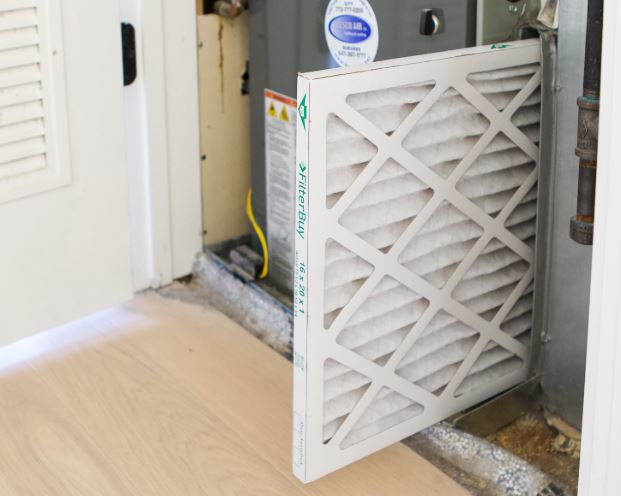
Changing Out Your Air Filters

Forced air is an increasingly popular form of heating. If you use this, then now is the best time for you to change out your air filters. Ideally, these should be changed out every couple of months! However, if you have pets, then these should be changed out more frequently! But during the summer months, especially, they’ll get much dirtier. This is often due to collecting allergens, pet hair, dust, and dander! Changing out these filters is crucial to maintaining a healthy home, especially if you live with people who have allergies!

However, what’s the process for changing them? If you follow the steps below, you’ll understand exactly what you have to do to replace them!

  1. The first thing you should do is turn off the furnace. This is crucial because your furnace might turn on if you’re changing out the filters! You don’t want that to happen!
  2. Then, you’ll want to remove the side door to the furnace to access the filters. After doing this, snap a quick picture of how they’re installed currently. This will help you make sure the new ones are installed correctly after you’ve taken the old filters out!
  3. Find out what size your filters are. If you haven’t done this before or are unsure as to what size filters you have, you’ll want to get this information. The most common size for these filters is 25x20x1. But if you don’t have any replacements, you can stop by the hardware store and pick up some.
  4. Once you have the replacement filters, you’ll need to replace them! The replacements should have arrows showing how they’re installed. Follow those so you can install them properly!
  5. You’re all set! Just close up the furnace door and turn it back on!
Changing out your filters is pretty easy! Just make sure you turn off your furnace when you do it!

Gathering Firewood

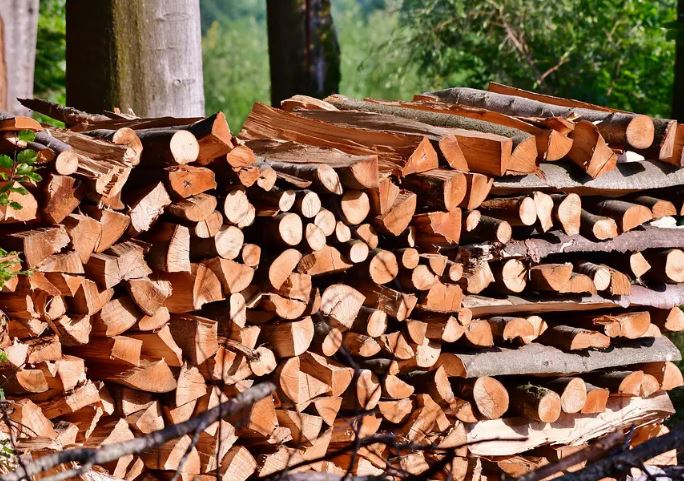
If you’ve got a fireplace or wood-burning stove at home, then you might know that you have to gather firewood. My family and I have a wood-burning stove, so typically we start to gather firewood around May-June. The earlier you gather it, the better, because it gives the wood time to try out before you burn it! But if you start stocking up now, then you’re still on the right track! Sometimes the cold weather doesn’t start until late September, early October anyway!

If you don’t have a lot of time to gather firewood on your own, then buying pre-cut wood is an option! However, it tends to be a little bit more expensive. You’ll be able to find them at places such as Home Depot, Lowe’s, Tractor Supply, and even some gas stations! But if you’re like my family and have been doing this for a while, you’ll have a log splitter! This speeds up the process of cutting up wood! Rather than relying on an axe. These machines streamline the process!

But if you have the time, gathering and splitting your own wood will save you so much money! Some woods, however, will tend to burn better than others. Oak, for example, is the most popular for burning. It’s not messy, and it takes some time to burn. However, pine is very sappy and can take a bit longer to dry out. Birch, on the other hand, burns quickly, and it doesn’t last very long. However, this makes it an excellent fire starter!

Stocking up on firewood is a great way to prepare your furnace and wood burning stove for the long winter ahead! This’ll also lower your heating oil usage if you have both!

Heating Oil Tank Inspection

As the years go by, your heating oil tank will get older. This often makes it susceptible to general aging over time. The tank itself will experience wear and tear as it gets older. For this reason, regular tank inspections are important for your tank. While this process doesn’t take a long time, it’s crucial for your system’s functionality and your safety.

In this section, I’ll be covering a brief explanation of what’s involved in a tank inspection. But if you want a more in-depth explanation, check out this article here.

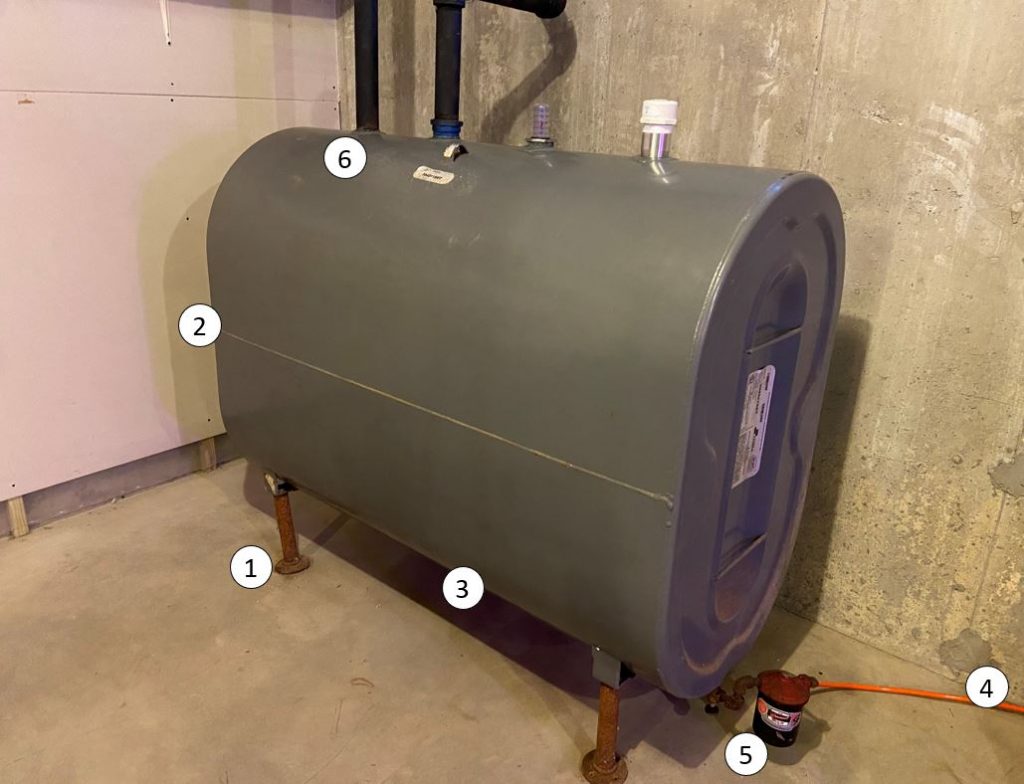
  1. Inspect the Legs to make sure that they’re sturdy. Also, make sure that there’s leaks in the tank.
  2. Make sure there’s no rust on the seams of the tank.
  3. Check the bottom and sides of the tank for any signs of leaking oil.
  4. Make sure that the oil lines have no leaks.
  5. Check the oil filter to ensure it’s not leaking.
  6. Check the top of the tank and fittings for any damage, rust, or cracks.
These are the key points you’ll need to look at when getting a tank inspection!

System Tune-Up

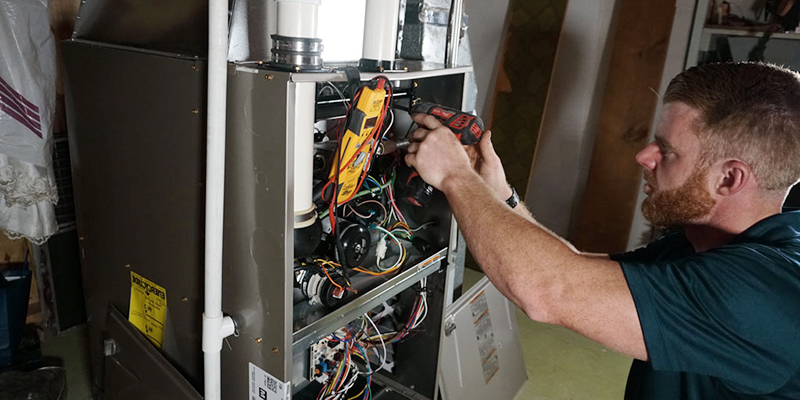
Annual system maintenance is important for your heating oil system to function as intended. Making sure your system is properly maintained is a requirement to ensure that the system itself doesn’t shut down when you need it. If it’s been a while since your last system service, or you need one, contact your local HVAC technician. They’ll be able to do all the required service and maintenance to make sure that your system is in tip-top shape! But keep in mind the price. Usually, system maintenance will cost around $300-$400 on average.

System tune-ups are crucial for your system. They ensure your system is working as it should!

However, when you contact your HVAC company, see if they offer a maintenance contract. These service/maintenance contracts will help you stay on top of your system’s maintenance. This’ll ensure that your system is in good shape for when you need it. Some HVAC companies will actually give you a discount when you sign up with them! It’s a good thing to ask!

Fill-Up Your Heating Oil Tank

Now that it’s getting to the end of summer, it’s a good time to fill your oil tank. Making sure that you have a full tank of oil will be very helpful when winter comes. Filling up your tank of heating oil will make sure your tank is ready to go when the temperatures start dropping! If you’re getting low now or are sitting at around half a tank, now’s a good time as any to order oil. It’s always a good idea to go into heating oil season with a full tank!

Your tank gauge is another important tool for you when it comes to monitoring heating oil usage and level. Most tanks come with a float gauge. However, the Smart Oil Gauge is another useful tool to track your data. You’ll have access to everything that you need at the touch of your fingers! You’ll even be able to order oil with our FuelSnap integration. FuelSnap lets you get the best selection of dealers and prices in your area!

Getting a fill-up now of all times is a great idea! This’ll make sure that you’re all ready for heating oil season!

Closing Thoughts

There are plenty of things that you need to do before heating oil season arrives. If you have the above-mentioned available to you, you’ll be fully prepared for the winter! Make sure you’re prepared when going into heating oil season and winter! You won’t want to be blind sided by a snowstorm or cold weather and not be prepared. If you’ve got a wood-burning stove or fireplace, stock up on firewood. If you’ve got a heating oil system, make sure that you get your tank filled and your system serviced!

As temperatures get lower and lower, we’re going to slowly start turning on our systems. Winter is around the corner, which means we’ll need to be warm for the cold months to come! Do not be un-prepared for what’s to come!

Happy Heating!

Hunter

How Long Does a Tank of Heating Oil Last

It’s currently late July, which means that we’re in an awkward spot where you’re not burning heating oil. However, heating oil season is just over the horizon! During this time of year, you’ll likely only be using heating oil for hot water, if at all! But even though it’s currently summertime, it’s important to understand that heating oil season is getting closer and closer. So it’s time to start preparing! There are a lot of different factors in how long your heating oil tank will last you. Here’s what you need to know!

The Size of the Tank

It seems like a no-brainer, but the size of your tank will determine how long a full tank will last you! In the modern age, the most common tank sizes are the 275, 330, and Roth 1000L tanks. Now, something to note with these tanks is that while their maximum capacity is 275 and 330, their true capacity tends to be 250 & 300 gallons. The reason for this is that the oil companies will leave the top couple of inches of the tank open for airflow. This prevents the tank from leaking and overflowing when you receive a fill-up. It’s also important that your tank has a working vent alarm. This’ll help indicate when the driver will need to stop pumping.

An uncommon but effective way to store heating oil is with a dual tank system. Dual-tank systems utilize two tanks in tandem. One tank receives the fill, and oil pushes into the tank that’s vented. This pushes air out of the system that builds up when the tank is being filled. The benefit to these systems is that your capacity is twice the size and you don’t have to order oil as frequently. However, you’ll have to order in larger amounts. These tanks will also always be level with each other! The tanks will drain in tandem and then equalize with each other to ensure both tanks have the same amount of oil.

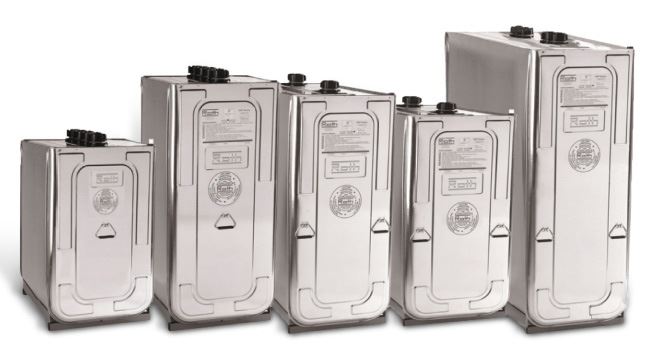
These are the different Roth tanks. They have an array of different sizes. Commonly, anywhere from 110-400 gallon tanks!

But if you have an underground tank, the capacity tends to be 500 gallons. Although they can get to sizes up to 2000 gallons in some cases! However, that’s very rare, especially nowadays! Underground tanks that are older than thirty years tend to be removed often. This is because underground tanks can now be environmental hazards!

How Your Home Effects Usage

Your home plays a major role in how long a full tank of heating oil is going to last you. I’ve compiled a list of all the major effects that your home has on your oil consumption.

Size of the House: Homes with an average square footage of 1500ft, you can see themselves burning around 500 gallons of oil annually. On larger homes, say 3500 square feet, they will easily burn around 1500 gallons every year!

Your Home’s Insulation: Homes that are well insulated will burn significantly less oil than those that aren’t. For example, a 2500 square foot home that has good insulation might only burn 600 gallons annually. However, if that same-sized home isn’t well insulated, you could see that home burning up to 1200 gallons of oil a year!

System Age: A home that has a system that is up-to-date and well-maintained will use less oil than a system that isn’t. Systems that are well taken care of and maintained can last upwards of thirty years! The newer the system, the less overall oil you’ll have to burn! This means the full oil tank you have will last you much longer! You might see your oil usage reduce by upwards of 30%!

Inside and Outside Temperatures: Both the temperature in the home and outside the home will determine how much oil you’re using. During the summer, you likely won’t burn much oil because it’s hot out. Meanwhile, during the winter, it’ll be much colder out. So you’ll tend to burn more oil during this time!

Daily Usage

Daily usage is an important part of your overall consumption! I mentioned this briefly in the previous section, but usage, at its core, is based on temperature. Both indoors and outdoors!

On a warm summer day, you’re likely not going to turn on your heat! So during this time of year, you’ll only use heat for hot water. That is, if you don’t have electric heat! During the summer, you’ll likely be burning less than a gallon a day. So during this time, your usage is at a minimum.

However, during the winter it’s different. This time of year is much colder than the summer, so you’ll often have your furnace turned on to burn oil to heat the home. If you don’t have a secondary form of heating, then you can see yourself burning anywhere from 5-7 gallons a day, at least!

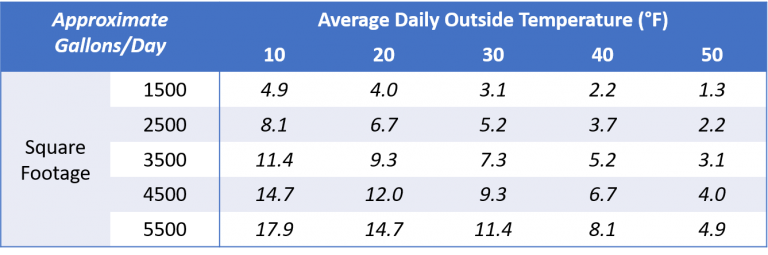
Average daily usage for CT in the winter can change drastically. But this is a rough average.

When Do I need to order Oil?

A lot of homeowners ask themselves this question. Now, while everyone has a different system and consumption, I have an answer. At FuelSnap, we recommend ordering oil at around a quarter tank. On a 275-gallon tank, that’s about when there are only 75 gallons of oil in the tank. This is the perfect time to order oil! When you’re at a quarter, you’ll have enough oil to hold you over until your next delivery. But this will also allow you to order oil at a reasonable price for a fill-up! Most dealers will offer a lower price per gallon once you order a certain amount.

However, if you let your heating oil tank run out, then you’re going to want to order as soon as possible! Running out of oil can be dangerous for your system. When the tank runs out of oil, this can cause sludge to get caught in the feed lines. When sludge gets in the feed lines, it can clog your system and prevent oil from being drawn into the boiler or furnace! If you run out, you’ll have to have an HVAC technician prime your system.

Checking Your Tank Gauge

It’s important to check your heating oil tank gauge often! Checking your tank gauge will help you get a better idea of what your current tank level is. Checking it frequently also helps you monitor your usage and helps you estimate how much you’re using daily. But two different types of tank gauges are commonly seen today.

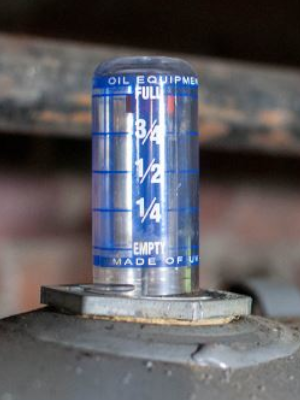
The float gauge is the most common. It comes with all heating oil tanks, and while some might look different from others, they function the same way. In short, they function based on a cork bobber on the end of a metal rod. That metal rod connects to a colorful disc in a plastic cylinder. The disc lines up with writing on the cylinder, with level displays. The disc will display 3/4, 1/2, 1/4, and more.

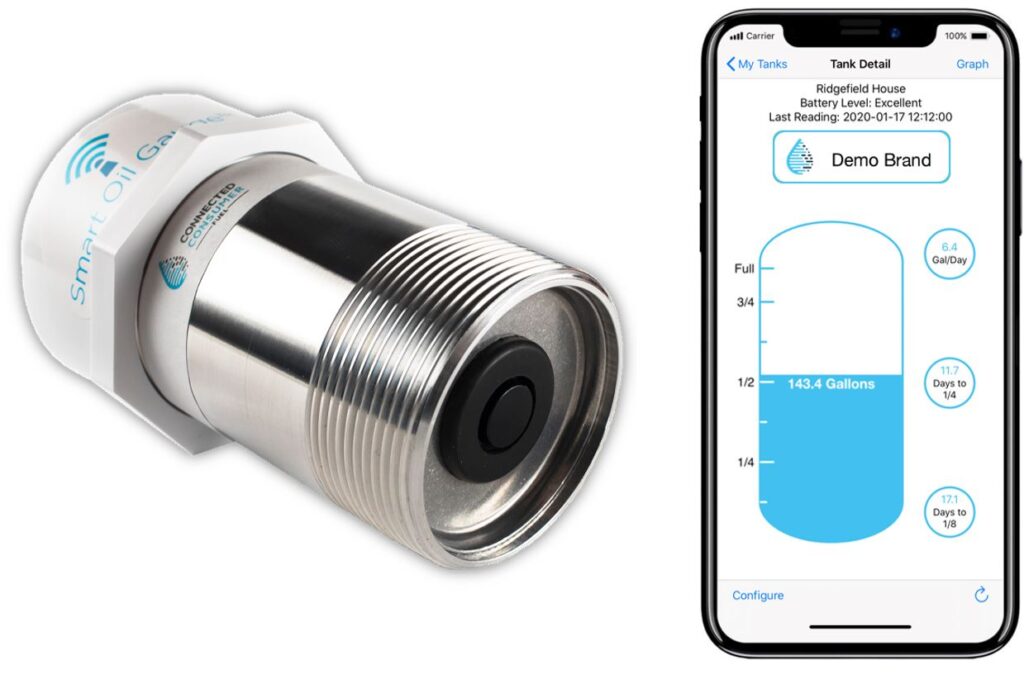
The Smart Oil Gauge is a wireless tank gauge that reads off an ultrasonic signal. This gauge sends its signal down to the oil level, where it then reports back to the app. You’ll then be able to see what it transmits on your phone! All you need is your smartphone and a WIFI connection! Once you have the Smart Oil Gauge set up and linked to the app, you’ll get usage data and level readings at the touch of your fingertips!

The Smart Oil Gauge is the perfect tool to be able to monitor oil level and use data! Simply connect it to your WIFI, get the app set up, and you’re good to go!

Conclusion

There are a lot of factors when it comes to how long your oil will last. This is combined with usage, level data, tank size, and house size. All of these contribute to how much oil you’re going to be burning daily. Your daily usage is the major contributor that determines how long a tank of oil will last you.

Ensuring your home has good insulation will determine how much oil your system is burning. If your home is well insulated, then you won’t have to worry about burning a lot of oil! Plus, the larger the tank, the larger the oil capacity is. The more tanks you have and the larger they are, will make or break how often you’ll need to order oil.

Happy Heating!

Hunter

How Long Will Five Gallons of Heating Oil Last?

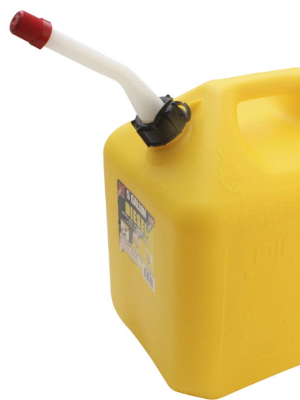
diesel can

During the colder months, you’ll know how important heating oil is. It has a variety of different uses. But, the most common use is for heating your home. You will need to purchase heating oil. But this begs the question, “How long will 5 gallons of heating oil last me?”

If you are running low on oil, stopping at your nearby gas station and buying a few gallons of diesel is a good temporary alternative until you get your delivery. However, this should be done sparingly because diesel is not a permenant solution.

There are a lot of different variables that can determine the answer to that question. During the winter months, 5 gallons of heating oil might not even last you a day. While during the summer, 5 gallons of oil, could last you a few days. It’s still important to ask yourself the following questions to ensure that you do not run out of heating oil.

            What do you use heating oil for?

            What size house do you have?

            Does your home have proper insulation?

            Do you have any drafty areas of the house?

            How warm do you like to keep your house?

            What is the weather and temperature like outside?

            What’s the condition of your boiler?

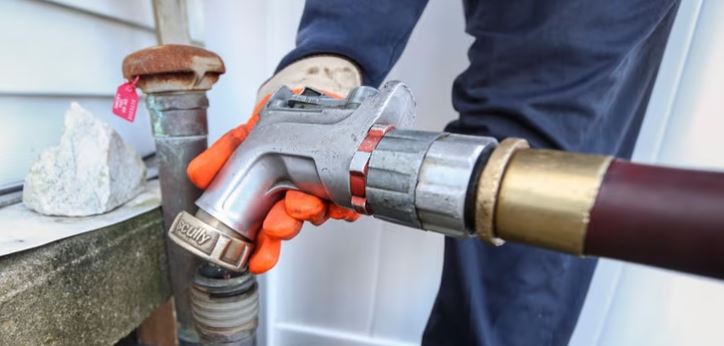
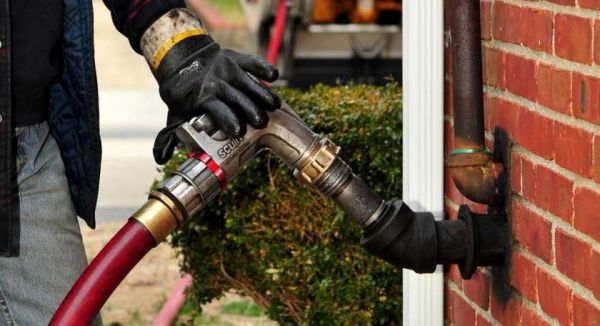
Home heating oil is delivered directly to a fill pipe on the side of a home.

Increasing Insulation

Insolation is a key factor in oil consumption. Insolation retains heat and keeps your house warm. Ensuring that your house has proper insolation, will help you get the most out of the heating oil you’ve purchased. With the correct amount of insolation, you’ll be able to maintain the heat that your boiler is producing for longer, reducing oil consumption.

Seal Up Drafty Windows to Reduce Oil Consumption

It might sound odd, but the types of windows that you have can affect your oil consumption. When your boiler burns oil, heat will spread throughout your house. As the heat spreads throughout the house, it will escape through the drafty windows. As a result, you will start to burn more oil. This can lead to higher-than-normal oil consumption which will quickly deplete the oil in your tank. However, if you have newer double-paned windows, the air becomes trapped between the two panes of glass. This is similar to insulation and will prevent the heat from escaping.

While that is a great solution, it isn’t cheap to replace windows. Using a thin plastic sheet, is a great way to seal up drafty windows. Apply the sheets to the window with double sided tame to make sure that they’re tight and secured. After the sheets are in place, go over it with a hairdryer to clean up any wrinkles. This will allow for another layer of insulation.

Heating oil consumption depends on outside temperature. A 2500 square foot home will use approximately 4-7 gallons per day on a typical winter day in New England.

Heating Your Home With Heating Oil

During the colder months of the year, where heating oil is most sought after, you will often be burning more oil than you would during the warmer months. This is because, as you are heating your house, the cold air outside is continuously drawing the heat outside through your walls. When this happens, your boiler will work harder to keep the house warm. This often results in an increased consumption of oil.

When heating up your home, your daily consumption will change depending on both the size of your home, as well as the outside temperature. During a warmer day during winter, you might at most use only around 2 gallons. While during the summer months, you might be even using less than half a gallon a day!

How Does Outside Temperature Affect My Heating Oil Usage?

In the state of Connecticut, the outside temperature can average anywhere from 30-35 degrees Fahrenheit. For the average sized home of 2000 square feet, the average consumption of oil is anywhere from 5-6 gallons of heating oil daily. Outside temperature is a huge contributor for increased oil consumption. It greatly impacts how much oil you are burning on a daily basis.

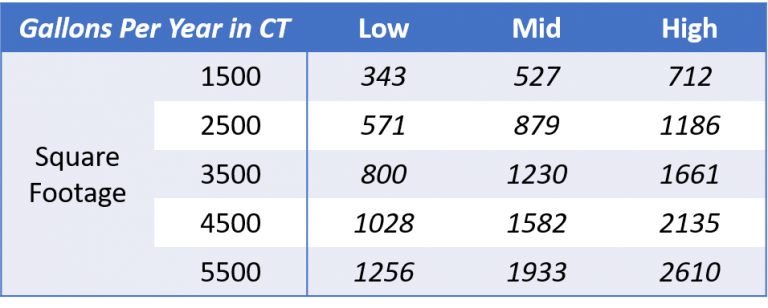
The typical house in CT will use about 880 gallons of heating oil per year.

Your graph will look different if you have an alternative form of heating. If you do, it is possible that you will be burning less oil and have a lower than the average home. But that begs the question, “How much oil am I burning in a year?”. Similar to the graph above, we have created a graph of estimated gallons burned per year in the state of Connecticut.

Program Your Thermostat to Reduce Oil Consumption

During the winter months, you’ve most likely heard your parents tell you, “Don’t touch the thermostat!”. The average home can get away with setting their thermostat to around 70 degrees Fahrenheit. This should be a decent temperature to remain comfortable in your home without needing to adjust the temperature of your thermostat.

You may be asking yourselves “Should I leave the heat on while I am not home?”. This could greatly effect the amount of oil you’re burning if you decide to do so. If you have a boiler with radiators in your house, then it can take some time for the temperature in the house to raise several degrees. By doing so, you might actually burn more oil at the end of the day, if you decide to keep your heat on when you aren’t home. However, your home might a have a furnace with air ducts scattered around the house. That is an example of “Forced Hot Air”. If you have any pets at home, you will likely want to keep the heat on, to keep them warm.

If you own a Smart Oil Gauge, you will be able to keep an eye on your hourly oil usage while you are not home. It is a fantastic tool that will help notify you if your usage is too high. This applies the same if you are home and just want to monitor your usage to see if you’re burning an excess amount of oil.

Maintaining a constant supply of heating oil means staying warm on cold winter days.

Is Your Boiler, Burner or Furnace Running in Top Shape?

A well insulated home won’t do you any good if your furnace isn’t running properly. It is very important that you have your system checked and adjusted to ensure that it is running as efficiently as it can. An average oil burner will last around 30 years, sometimes even more. As the years go by and the systems get older, you might end up using more oil than the previous year if not properly maintained. Even buying a new heating oil system can help decrease the amount of oil you are burning. However, we recommend getting your .


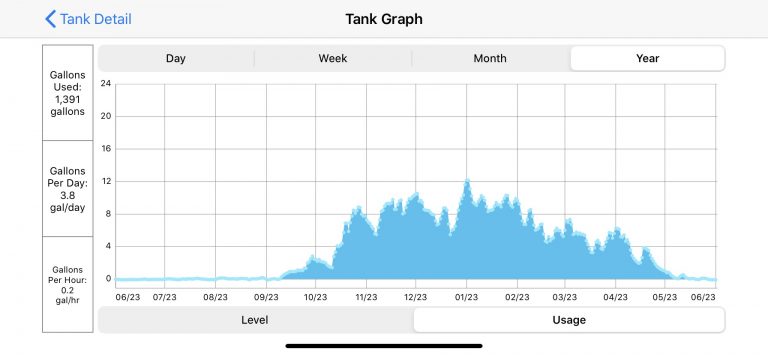
Every bit of information we have provided should provide you with a good idea of how long 5 gallons of heating oil will last you. But, the best way to see how long it will last you is to accurately measure it! The best way to do that is with the Smart Oil Gauge! The Smart Oil Gauge will send soundwaves down to the oil level that then bounce off of the oil’s surface and back up to the sensor! This ensures precise accuracy on what your oil level is sitting at, at the current moment! You’ll even be able to check oil consumption by day, week, month and year! In the photo below, you can see what the average usage will look like during the winter and during the summer!

A Smart Oil Gauge will allow you to closely monitor your heating oil consumption throughout the day.

The Smart Oil Gauge will be a worthwhile investment to keep track of how much oil you have and to ensure that you are getting the most out of your heating oil! It will also help to make sure that you will not run out of oil or get low on oil so that you won’t run out of oil! The gauge will also help you see the changes you’ve made using the tips described in this article.

Happy Heating,

Hunter