
If you’re an owner of the Smart Oil Gauge, then you’ll know how important it is for it to have a stable WIFI connection. However, in the off chance that you change your WIFI password, SSID, or router, then you’re going to have to go through updating the WIFI information. But how exactly do you do this? Well, there are a few ways, and by going through one of them successfully, you’ll be able to get the Smart Oil Gauge back online! Just be sure to follow the steps in this article!
Updating your WIFI Information: Why it’s Important
When you make any change to your WIFI, things will be different. The Smart Oil Gauge saves information on the internal computer. This information is typically your SSID and your WIFI password. But changing either one of these invalidates what the gauge has, so you’ll need to update them on the gauge. You won’t have to do this very often, but only when you change your WIFI password, router, or SSID. Please note that even if the router was changed and you keep the SSID and password the same, you will still need to update the credentials on the gauge.
The App Process
Going through the process in the Smart Oil Gauge app is one of the easiest ways to get the gauge reconnected to the WIFI. First, you’re going to want to open the app. When you open up the app, click on the gear on the bottom left (IOS) or the three dots and “Configure” on the top right. Then select “My Tank” under sensors. You’ll be brought to the sensor settings where there’s an option labeled “Reconnect WIFI”. From here, you’ll be brought to the screen that says “Before You Begin” at the top. Press Continue after you’ve gathered your WIFI password and have access to the sensor.
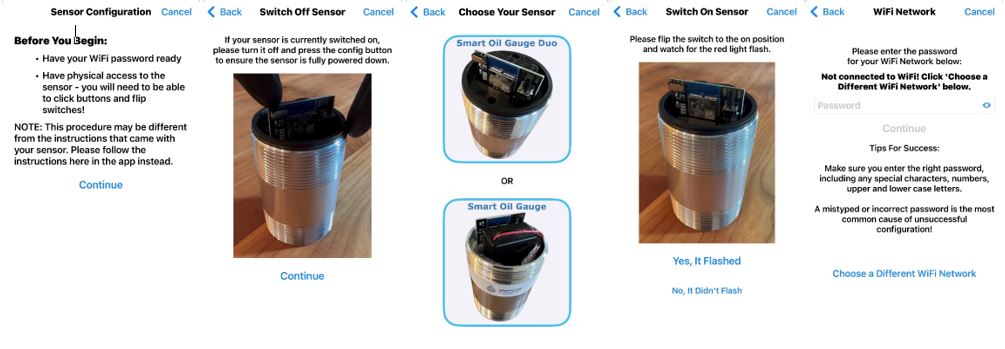
From here, make sure that your phone is connected to the WIFI that you want to connect the Smart Oil Gauge to. Type in your WIFI password and then hit Continue. Then, follow the steps as shown in the GIFs on the “Enter Config Mode” and “Confirm Config Mode” screens.
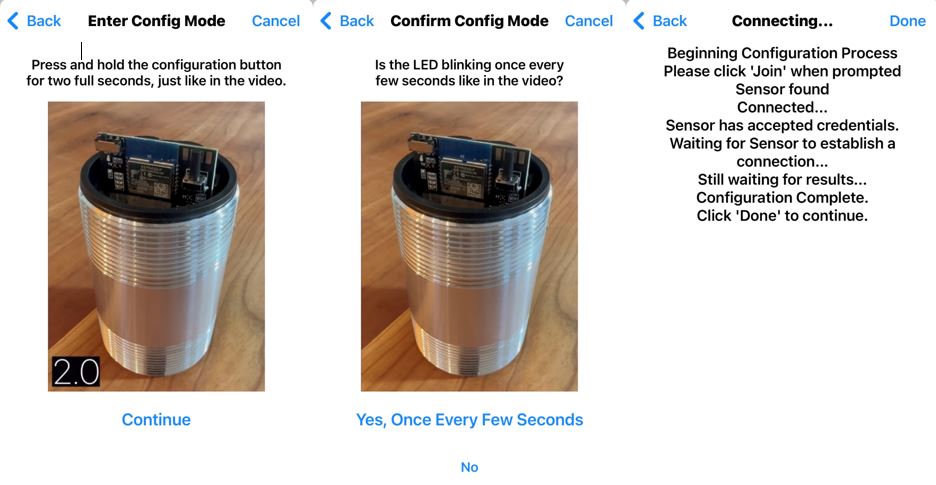
From here, simply join the CCF network when it pops up and allow the gauge to connect to your WIFI! The gauge should connect properly, and once you’re done with this process, the gauge should have reconnected to the WIFI!
Alternative Process
If the app process is unsuccessful, then you’re going to want to go through the alternate process. This process is a little bit different than the app process. It takes you through the WIFI settings on your phone rather than through the app.
First, you’re going to want to make sure that the Smart Oil Gauge is turned on. If it’s turned on, press and hold the button on the top right for two seconds (one-one thousand, two-one thousand) before letting go. The light on the gauge should be blinking once per second now.
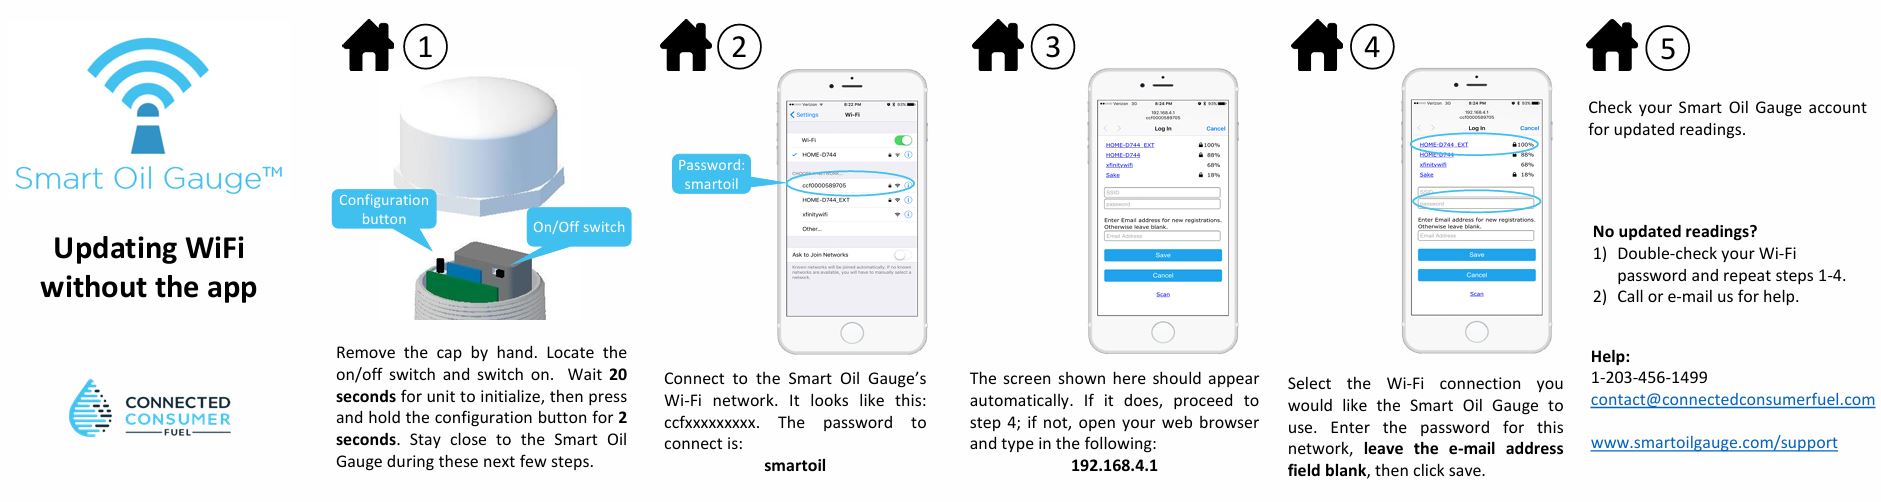
You should now see a network that shows up named “CCF########”. This is the Smart Oil Gauge. You can connect to it by typing in the password “smartoil”. From here, you’ll be brought to a screen that says “Captive WIFI,” and that’s asking for your SSID, password, and email address. If it doesn’t take you to this screen, go to your web browser and type in 192.168.4.1 to get there. Don’t worry, even if your phone says you don’t have internet, you’re still going to be able to connect to this IP address.
Once you’re on the login screen, select your WIFI and it’ll auto-fill the SSID box. From here, type in your WIFI password. Make sure you hit the ” show password button to make sure your password is correct! Once you’ve verified everything is correct, go ahead and hit the save button! The gauge should connect to your WIFI and upload a reading!
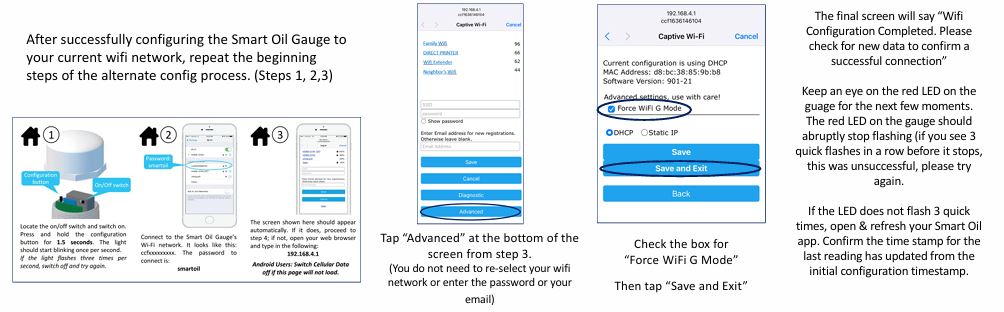
Force WIFI G
Now, this is an important setting to know about. If your WIFI network is both 2.4ghz and 5ghz, then there’s a setting you’re going to want to enable called “Force WIFI G”. This setting should be applied to networks with the “Smart WIFI” network setting. In short, Smart WIFI moves devices between 2.4ghz and 5ghz to improve performance. However, the Smart Oil Gauge isn’t compatible with 5ghz, so it’ll disconnect. This setting prevents the gauge from switching to 5ghz.
The WPS Process
WPS stands for WIFI Protected Setup. In short, this is a process that establishes a secure connection between the router and whatever device you’re going to connect it to. This is the last method you can try when attempting to update your WIFI information. Notably, this process doesn’t require using a cell phone or going through the app. Simply go over to the router and look for a button that says WPS or looks like a lock or link. Press the button, and the router should start flashing. Then, press and hold the config button on the gauge for three seconds (count one-one thousand, two-one thousand, three-one thousand). The gauge should then start flashing three times a second quickly. After about thirty seconds, the gauge should stop flashing, and it’ll connect to your router! I go a bit more in-depth on this process in this blog post here.
Final Thoughts
If you’ve made a change to your WIFI network at all, then you must go through one of these processes for updating your WIFI! Don’t worry, though; they’re all simple to go through and easy to follow! Just follow this guide step-by-step to get the gauge reconnected to your WIFI and to get it back online!
But if you’re having trouble going through these processes, please do not hesitate to reach out! I’m always happy to help if you call our support line, and we’ll be able to go through the process together to get the gauge back online! I can be reached at 203-456-1499, option 3, from 8 a.m.- 5 p.m. EST, Monday through Friday.
Happy Heating!
Hunter