
The Best Ways to Save on Heating Oil Costs

Winter is slowly creeping up on us! Which means oil prices are going to go up as the weather gets colder and more people need heating oil! During the winter, heating oil prices tend to be at their most expensive. Winter also brings the need to order more frequently, which hurts your wallet! But you’re here to save on heating oil costs! So in today’s blog, I’ll make sure you’re prepared for what’s to come by giving you a list of things that you can do to save some money on heating oil!
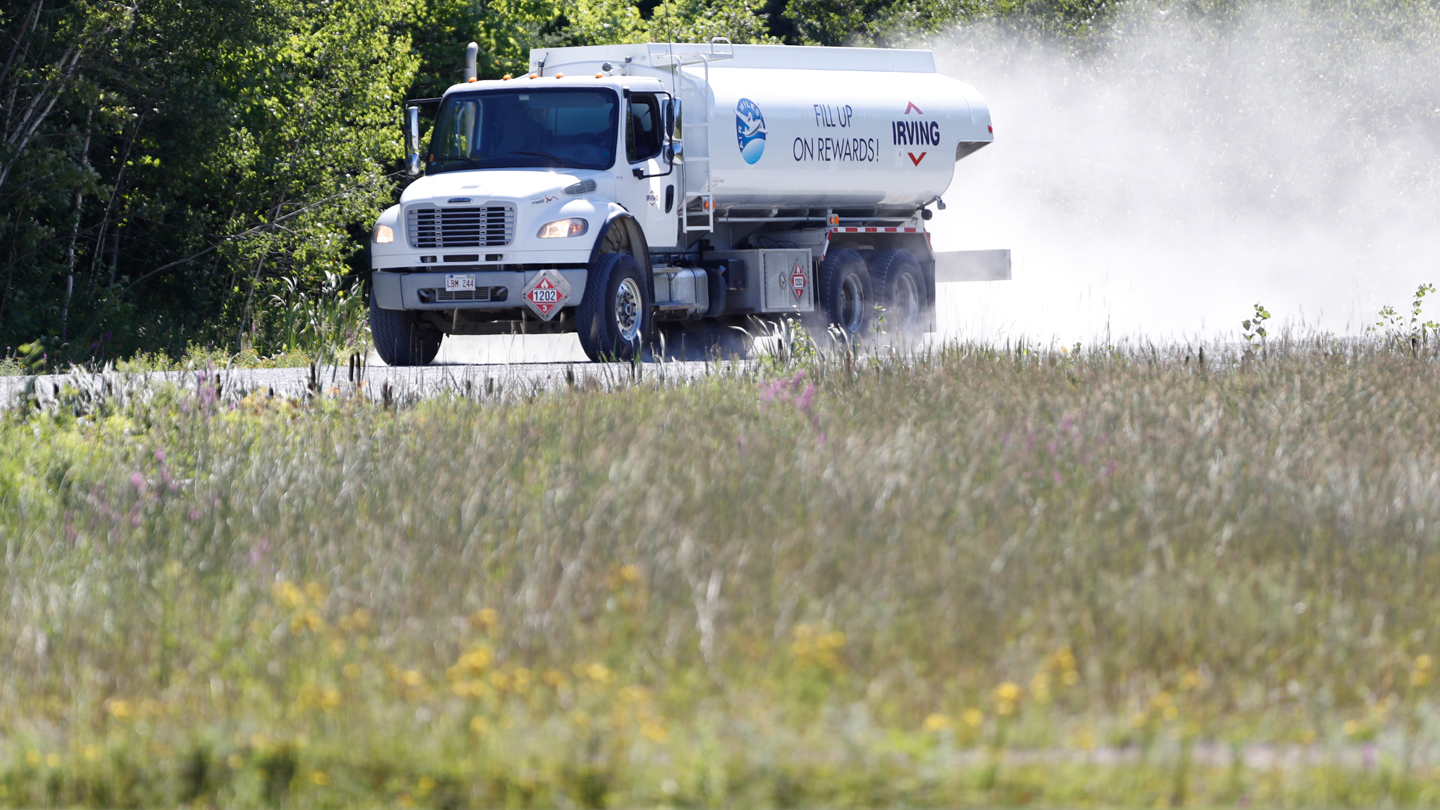
Heating Oil trucks will come out and deliver frequently in the winter! However, make sure that you’ve got an order on the schedule first!
  1. Canceling Your Automatic Delivery Plan: This might sound strange at first. But the reason for this actually makes complete sense! While it might not seem like it, Automatic Delivery is actually costing you more money in the long run! When it comes to automatic delivery, dealers will tend to charge more per gallon. On average, canceling your automatic delivery plan will save you roughly 50 cents per gallon! This can save you hundreds of dollars every year! Call-by delivery is much cheaper. You can go through the dealer directly, or you can order on our FuelSnap website!
  2. Covering Up Drafty Windows and Doors: Drafty doors and windows are a primary cause of high energy use. These can be really bothersome when it comes to the amount of oil you burn. Drafts will let out the heat that your system is working so hard to create! Covering them up with draft stoppers or plastic wrap on windows will help prevent the hot air from leaving your home!
  3. Fill Up Your Tank During the Summer: This is actually the ideal time to fill up your heating oil tank. During the summer, heating oil prices are at an all-time low. So be sure to take advantage of the low prices! You’ll be able to fill up your tank for much less than you would during the winter! However, you can keep an eye on your level and usage with a Smart Oil Gauge!
  4. Avoid Ordering During the Holiday Season: You should avoid ordering oil during Christmas and New Year’s. The reason for this is that this is when oil is in the highest demand. Prices are high, and delivery availability is low. You should order and fill your tank before the Christmas season! Family gatherings and holiday parties are the number one reason for ordering during this time frame!
  5. Make Sure Your Home Is Well Insulated: Ensuring your home is well insulated is crucial for being able to have a warm home during the summer. Insulation helps the house maintain the heat inside it. This’ll result in lower usage, as the house is better able to maintain the heat.
  6. Getting a WIFI Thermostat: Wi-Fi thermostats are incredibly useful and are an amazing tool to be able to lower your heating oil usage. They’re incredibly useful and will help you be able to better manage your home’s temperature. Most of these thermostats have apps that allow you to control them. This means that you can lower the temperature when you’re away to prevent unnecessary oil usage or raise the heat wirelessly! With one of these, you’ll be able to control your heating oil usage!
  7. Upgrade Your System: This might not apply to everyone, but if your system is old and hasn’t been updated, then it’s a good time to upgrade it! Making sure that your system is up to date is great because it’ll help ensure that your system is functioning properly! Plus, newer systems are more efficient! Which means that it takes less oil to heat the home! You can contact a local HVAC company and see what they recommend for a system upgrade!
  8. When You’re Not Home, Turn Off Your Thermostat: Turning off the thermostat when you’re not home is a great way to lower heating oil costs. The reason being you won’t be burning unnecessary oil when nobody is home! However, if you have pets, then this won’t be an option for you! They’ve got to stay warm too!
  9. Disable the Heat in Rooms that are Unoccupied or Empty: Turning off the heat in rooms that aren’t occupied or rooms that aren’t currently being used is a great way to save on heating oil costs! Make sure that when doing this, you close any vents or radiators in these rooms. Heat won’t be able to enter the room when this is done!
  10. Set up and install a Smart Oil Gauge: Smart Oil Gauges are one of the best tools that you can have on your heating oil tank! They can track usage and level data to ensure that you won’t run out of oil! This is all at the touch of your fingertips through our mobile app! You can also receive alerts when the tank is low and when you get a fill-up! You can purchase one on our website here.
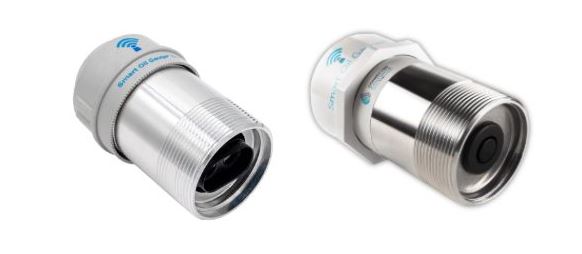
These are the two types of Smart Oil Gauge! The one on the left is the Duo, and the one on the right is the standard model. They both work great to track your heating oil usage and level information!

Concluding Thoughts

Heating oil can be expensive, especially during the winter! But if you follow these ten steps, you’ll become a master at getting the most out of your heating oil! You’ll know the ins and outs of how to prevent your oil from escaping through those drafty windows or burning more than you need to!

Ordering during the summer is especially useful with the lower prices! Canceling your automatic delivery plan is great, too, because it gives you the freedom to order from whoever and wherever you want!

But don’t forget, this is all up to you! If you like having your automatic delivery plan, then don’t cancel it. However, what you choose to do with your heating system is in your hands!

Happy Heating!

Hunter

Smart Oil Gauge: Updating the WIFI Information

If you’re an owner of the Smart Oil Gauge, then you’ll know how important it is for it to have a stable WIFI connection. However, in the off chance that you change your WIFI password, SSID, or router, then you’re going to have to go through updating the WIFI information. But how exactly do you do this? Well, there are a few ways, and by going through one of them successfully, you’ll be able to get the Smart Oil Gauge back online! Just be sure to follow the steps in this article!

Updating your WIFI Information: Why it’s Important

When you make any change to your WIFI, things will be different. The Smart Oil Gauge saves information on the internal computer. This information is typically your SSID and your WIFI password. But changing either one of these invalidates what the gauge has, so you’ll need to update them on the gauge. You won’t have to do this very often, but only when you change your WIFI password, router, or SSID. Please note that even if the router was changed and you keep the SSID and password the same, you will still need to update the credentials on the gauge.

The App Process

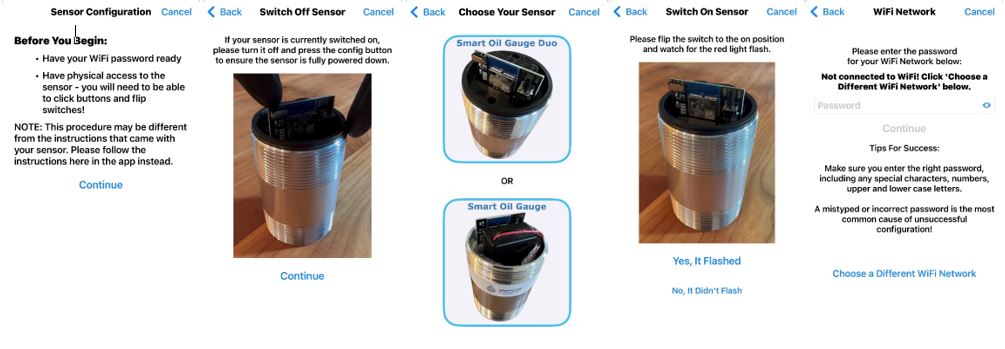
Going through the process in the Smart Oil Gauge app is one of the easiest ways to get the gauge reconnected to the WIFI. First, you’re going to want to open the app. When you open up the app, click on the gear on the bottom left (IOS) or the three dots and “Configure” on the top right. Then select “My Tank” under sensors. You’ll be brought to the sensor settings where there’s an option labeled “Reconnect WIFI”. From here, you’ll be brought to the screen that says “Before You Begin” at the top. Press Continue after you’ve gathered your WIFI password and have access to the sensor.

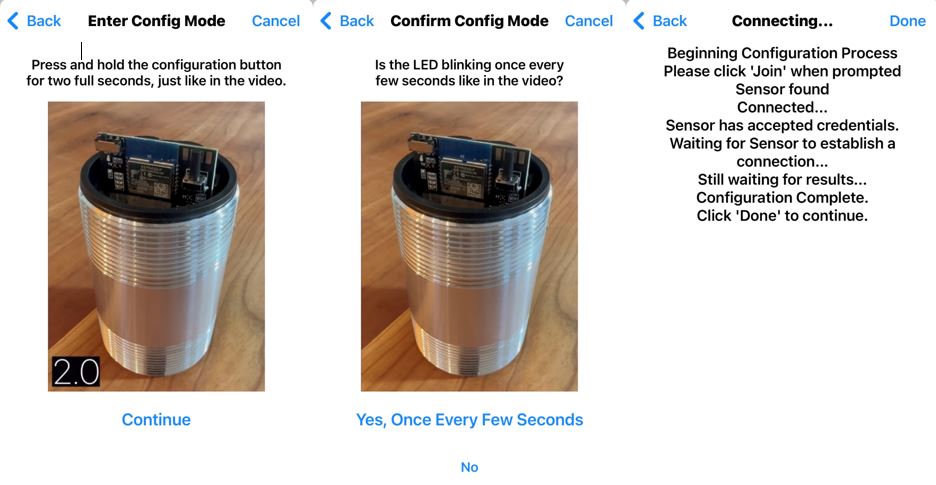
From here, make sure that your phone is connected to the WIFI that you want to connect the Smart Oil Gauge to. Type in your WIFI password and then hit Continue. Then, follow the steps as shown in the GIFs on the “Enter Config Mode” and “Confirm Config Mode” screens.

From here, simply join the CCF network when it pops up and allow the gauge to connect to your WIFI! The gauge should connect properly, and once you’re done with this process, the gauge should have reconnected to the WIFI!

Alternative Process

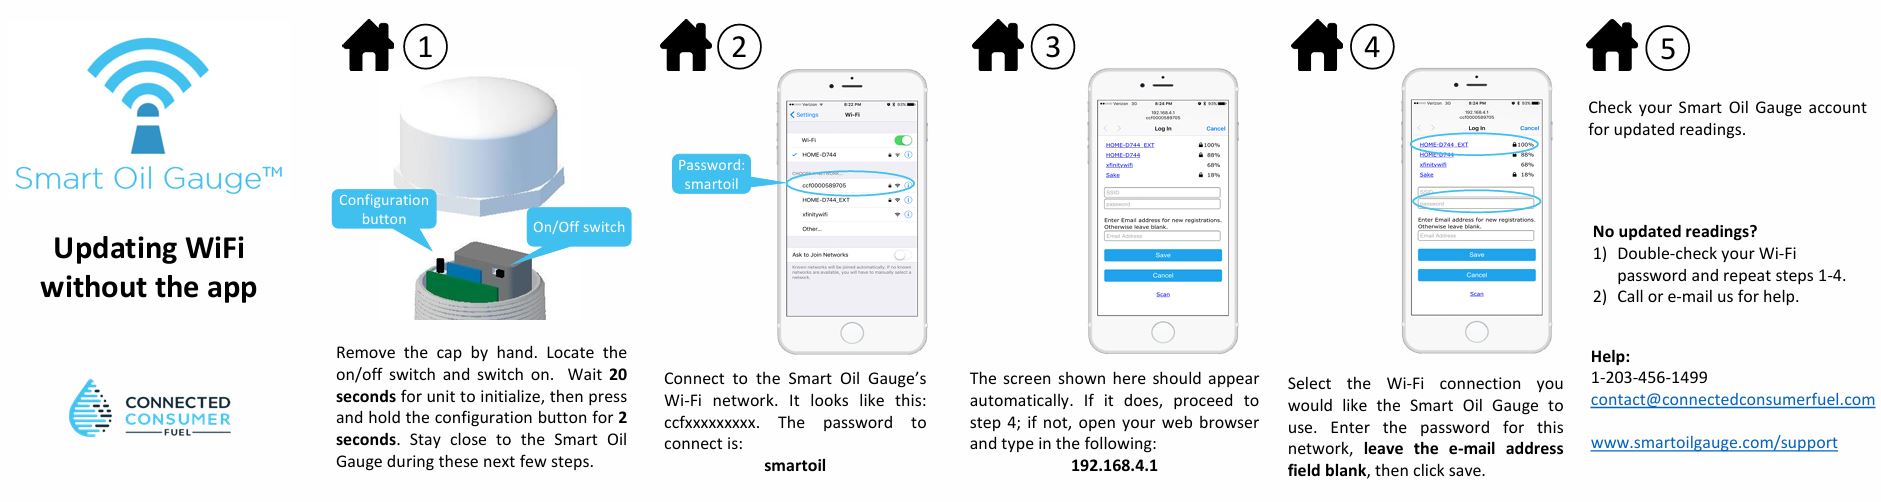
If the app process is unsuccessful, then you’re going to want to go through the alternate process. This process is a little bit different than the app process. It takes you through the WIFI settings on your phone rather than through the app.

First, you’re going to want to make sure that the Smart Oil Gauge is turned on. If it’s turned on, press and hold the button on the top right for two seconds (one-one thousand, two-one thousand) before letting go. The light on the gauge should be blinking once per second now.

Updating the WIFI information can be done through the alternate process. But unlike the alternate setup, you can leave the email blank and then click Save.

You should now see a network that shows up named “CCF########”. This is the Smart Oil Gauge. You can connect to it by typing in the password “smartoil”. From here, you’ll be brought to a screen that says “Captive WIFI,” and that’s asking for your SSID, password, and email address. If it doesn’t take you to this screen, go to your web browser and type in 192.168.4.1 to get there. Don’t worry, even if your phone says you don’t have internet, you’re still going to be able to connect to this IP address.

Once you’re on the login screen, select your WIFI and it’ll auto-fill the SSID box. From here, type in your WIFI password. Make sure you hit the ” show password button to make sure your password is correct! Once you’ve verified everything is correct, go ahead and hit the save button! The gauge should connect to your WIFI and upload a reading!

Force WIFI G

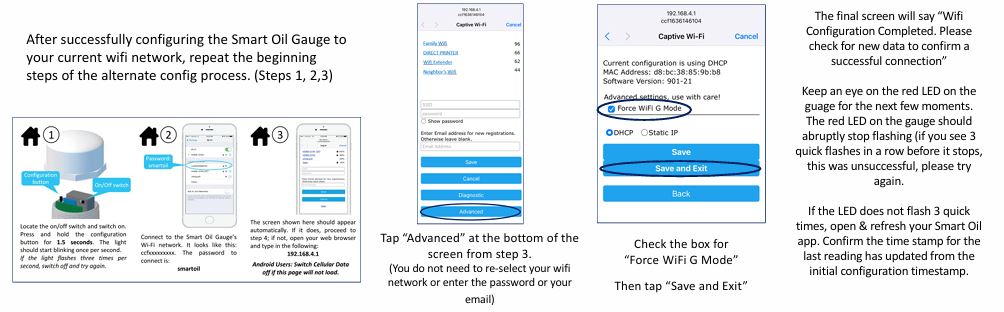
Now, this is an important setting to know about. If your WIFI network is both 2.4ghz and 5ghz, then there’s a setting you’re going to want to enable called “Force WIFI G”. This setting should be applied to networks with the “Smart WIFI” network setting. In short, Smart WIFI moves devices between 2.4ghz and 5ghz to improve performance. However, the Smart Oil Gauge isn’t compatible with 5ghz, so it’ll disconnect. This setting prevents the gauge from switching to 5ghz.

The Force WIFI G setting can only be enabled from the alternate process. You cannot do this in the app.

The WPS Process

WPS stands for WIFI Protected Setup. In short, this is a process that establishes a secure connection between the router and whatever device you’re going to connect it to. This is the last method you can try when attempting to update your WIFI information. Notably, this process doesn’t require using a cell phone or going through the app. Simply go over to the router and look for a button that says WPS or looks like a lock or link. Press the button, and the router should start flashing. Then, press and hold the config button on the gauge for three seconds (count one-one thousand, two-one thousand, three-one thousand). The gauge should then start flashing three times a second quickly. After about thirty seconds, the gauge should stop flashing, and it’ll connect to your router! I go a bit more in-depth on this process in this blog post here.

Final Thoughts

If you’ve made a change to your WIFI network at all, then you must go through one of these processes for updating your WIFI! Don’t worry, though; they’re all simple to go through and easy to follow! Just follow this guide step-by-step to get the gauge reconnected to your WIFI and to get it back online!

But if you’re having trouble going through these processes, please do not hesitate to reach out! I’m always happy to help if you call our support line, and we’ll be able to go through the process together to get the gauge back online! I can be reached at 203-456-1499, option 3, from 8 a.m.- 5 p.m. EST, Monday through Friday.

Happy Heating!

Hunter

Heating Oil Vs Propane: What You Should Know

In the Northeast United States, heating options are quite limited. However, natural gas is increasing in popularity. It’s cost-effective and reliable, making it an excellent choice to heat with! However, unlike the two titans of the industry, Heating Oil and Propane, it can’t be installed in a pre-existing home or neighborhood. This makes it unavailable to most of the general public.

But in small apartments, condos, and places with mild winters, you’ll see electric heat and heat pumps being more common. Electric heat can be expensive, but in places where winters are milder or with smaller spaces, it won’t be as bad. Otherwise, your options are left to Heating Oil and Propane.

Heating oil and Propane are the most popular forms of heating across the East Coast. They’re both fuels that get delivered to your home in a liquid state before it’s converted to heat and pushed throughout your home. Despite these two having some similarities, there are some differences. But what are they exactly? I’ll be covering exactly what you need to know below!

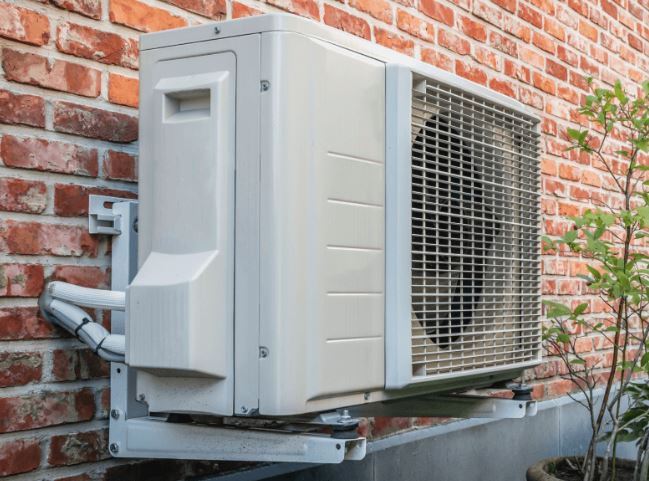
Outdoor heat pumps look like this! They’re increasing in popularity and are cost-effective!

Switching: When you Should Make it

When it comes to making the switch to either Heating Oil or Propane, it boils down to when your home needs a new boiler or furnace. The most expensive component tends to be the system. When changing out your current system for the other, here are some things that you’ll need to know.

  • Tank: The tank is the most important component of your system. Regardless of whether you own it or are renting it, you should know where it is and what its capacity is.
  • BTUs per Gallon and System Efficiency: Knowing the difference between the two fuels, BTUs and System Efficiency, is important for functionality. For example, propane tends to be more efficient. However, it produces fewer BTUs per gallon than heating oil.
  • Shopping Flexibility: If you like to be in control of when you receive your delivery, then this is important. You don’t want to run out while waiting for a delivery!

What are the Differences?

The biggest difference between the two types of tanks is the cost. Propane tanks are often much more expensive than heating oil tanks if you buy them outright. At the time of writing, you can buy a standard heating oil tank at Home Depot for around $1k, depending on the model. However, propane tanks tend to be a bit pricier at $1.5k for an average tank. While the prices are similar, a heating oil tank is the cheaper option.

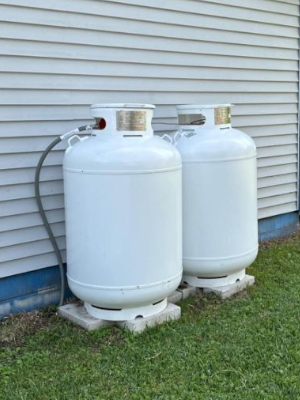
How they’re stored is another major difference. Heating oil tanks can be placed indoors or outdoors. They also tend to be more compact, preventing them from taking up a lot of room. However, propane tanks tend to be big and bulky. Plus, if you’re renting them, then you’re required to have them installed above ground, outside. But if you own them, you can install them underground without posing a threat to the environment.

Propane tanks will tend to look like this. They’re installed above ground outside if they’re rented by an oil company.

The Owner of the Tank

Tank ownership is a big part of owning a heating oil or propane tank. When it comes to heating oil, you’ll typically own your tank. Meanwhile, with propane, the provider tends to own it. This means that they’re in control of when you get a delivery!

When making the switch from heating oil to propane, the provider will tell you that it’ll save you money, but that’s just not true! Renting the tank from the provider will prevent you from ordering from anyone else! You’ll have no freedom when it comes to ordering! In most states, it’s illegal to fill another provider’s tank. This means in an emergency situation, you won’t be able to order from someone else if you need to! If you want to change providers, you’ll either have to buy out your tank, buy your own, or contact another provider to put their tank in!

However, when it comes to heating oil, you’ll always own your tank! You can buy it directly from the manufacturer or a storefront such as Home Depot or Lowe’s. But you get the added benefit of having the freedom to order from whoever you want! So it’s best to own your tank regardless of whether you heat with heating oil or propane!

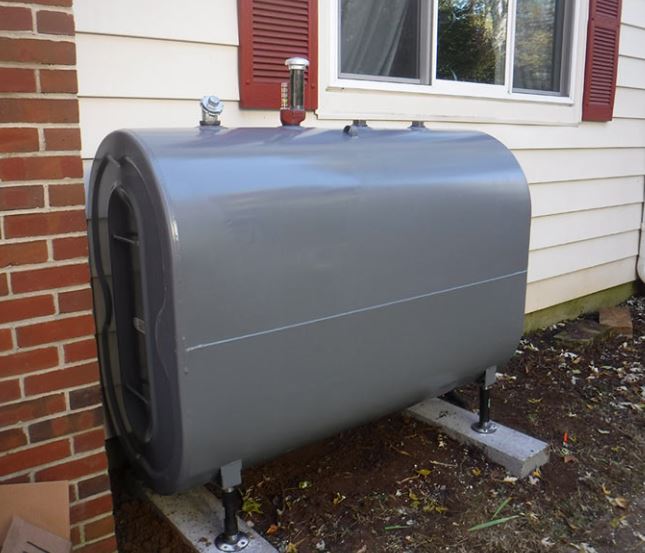
Standard oil tanks will look like this. Typically mounted on the side of the house, in the basement, or in the garage.

Which is More Efficient?

With how current prices are for heating oil, it might seem that propane is the better option to go with. However, just by looking at the price per gallon, you’re omitting two of the most important factors. These factors are BTUs (British Thermal Units) and Efficiency. BTUs determine how much heat is produced by a gallon of the desired fuel. For example, heating oil produces 138,000 BTUs per gallon! However, propane will only produce 91,000 BTUs per gallon. That is significantly less than what heating oil produces!

While BTUs are a major factor when it comes to heating, efficiency is important as well. Most modern-day boilers and furnaces tend to be 95% more efficient when compared to older furnaces. Propane furnaces will convert 95% of the propane into heat. Meanwhile, heating oil will only produce 85-90% heat from the boiler/furnace. Using 85% in our calculation below, we’ll get the following:

Propane: 91,000 x .85 = 77,350 Effective BTUs per gallon

Heating Oil: 117,300 x .85 = 117,300 BTUs per gallon

If we’re doing a comparison side by side, you’ll want to take a look at how many gallons of propane it takes to produce the same amount of heat as heating oil. This will be based on one gallon of heating oil. Heating oil produces 117, 300 effective BTUs per gallon, while propane only produces 77,350 effective BTUs per gallon. Using the following, you’ll be able to determine how many gallons of propane it takes to produce the same amount of BTUs as a gallon of heating oil.

117,300 / 77,350 =1.51 gallons of propane

As you can see, heating oil produces more BTUs per gallon than one gallon of propane! You’ll need a gallon and a half of propane to match the amount of heat that Heating Oil Produces!

Flexibility to Order From Who You Want

The nice thing about heating oil is that you have the freedom to order from whom and where you want to. Signing up for automatic delivery is a start. However, note that when you sign up for automatic delivery, you’ll end up paying a premium price per gallon. Call-by is much better in terms of placing orders. There are no hidden fees, and using reliable websites such as FuelSnap, you’ll end up getting some great prices!

Price shopping when it comes to propane is VERY hard. This is because most of the time, a propane tank is going to be rented from the provider. There’s a small percentage of propane tank owners who own their tanks. If you’re one of them, congratulations! But unfortunately, you won’t be able to do much shopping around.

However, with heating oil, the market is much more competitive. Due to this, prices tend to be a bit more sporadic than with propane. Dealers are constantly competing with each other to get customers on their schedule, so it’s advantageous to have the best price in the area. This gets them more orders and more new customers! Heating Oil tanks also get the bonus of utilizing the Smart Oil Gauge!

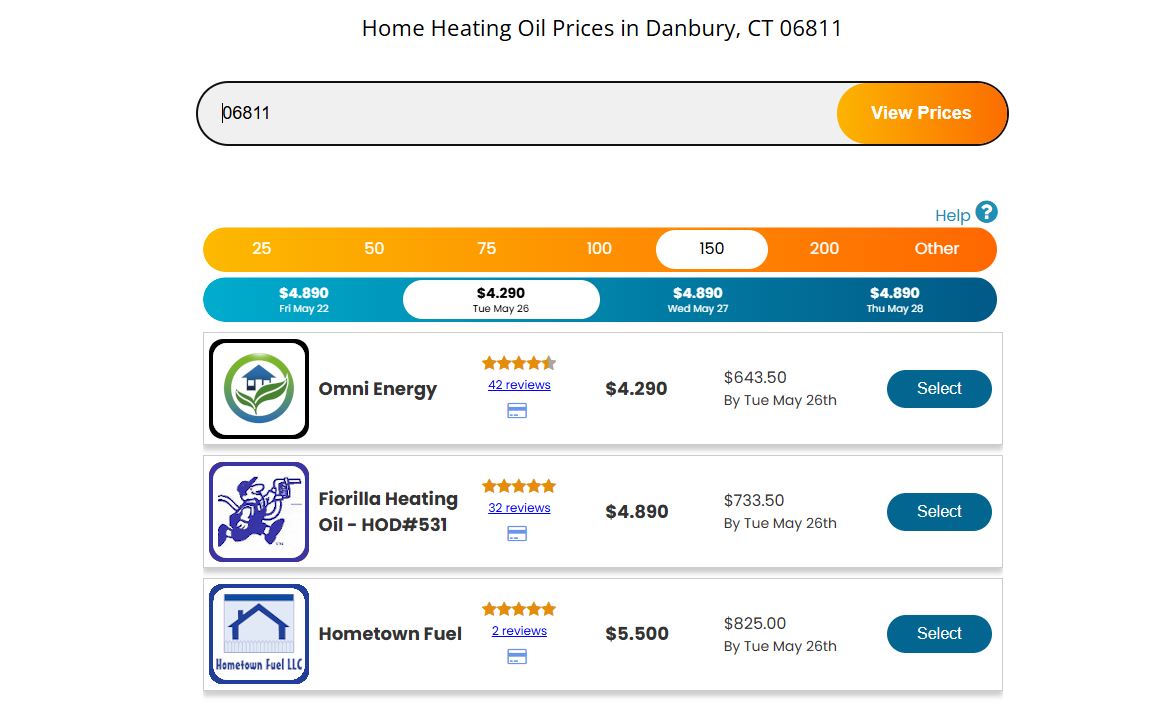
At the time of writing, these are the current oil prices in Danbury.

The Bottom Line

When it comes to which is better, heating oil is the clear answer. It burns much hotter, and you own your tank, which makes shopping around a breeze! Plus, with cheaper tanks and competitive pricing, you’ll be able to get a fill-up for a good price and not be restricted by the dealer!

However, that’s not to say that propane is without its merits. It’s versatile and is often used for more than just heating! If you find yourself needing to use propane for cooking, electric, and more, then this is your answer! Just be aware that you’ll likely have to rent from your provider!

At the end of the day, which you choose to use to heat with is up to you. They both have their positives and negatives and will both provide you with ample warmth and will be effective long-term heating solutions.

Happy Heating!

Hunter

Preparing Yourself for Heating Oil Season

It’s officially August! Which means Heating Oil Season and Winter are just around the corner! Winter is peak season for heating oil, and now that it’s August, there’s a lot for you to do before winter is in full swing! Like every winter, you shouldn’t go in unprepared!

Fall and Winter are just around the corner! Which means soon your home will look like this!

Changing Out Your Air Filters

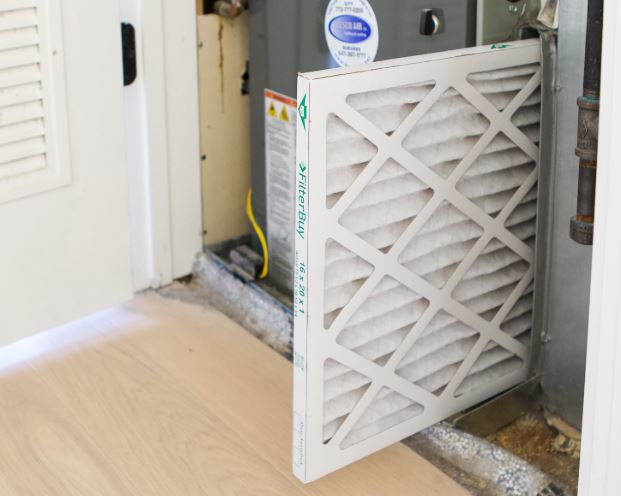
Forced air is an increasingly popular form of heating. If you use this, then now is the best time for you to change out your air filters. Ideally, these should be changed out every couple of months! However, if you have pets, then these should be changed out more frequently! But during the summer months, especially, they’ll get much dirtier. This is often due to collecting allergens, pet hair, dust, and dander! Changing out these filters is crucial to maintaining a healthy home, especially if you live with people who have allergies!

However, what’s the process for changing them? If you follow the steps below, you’ll understand exactly what you have to do to replace them!

  1. The first thing you should do is turn off the furnace. This is crucial because your furnace might turn on if you’re changing out the filters! You don’t want that to happen!
  2. Then, you’ll want to remove the side door to the furnace to access the filters. After doing this, snap a quick picture of how they’re installed currently. This will help you make sure the new ones are installed correctly after you’ve taken the old filters out!
  3. Find out what size your filters are. If you haven’t done this before or are unsure as to what size filters you have, you’ll want to get this information. The most common size for these filters is 25x20x1. But if you don’t have any replacements, you can stop by the hardware store and pick up some.
  4. Once you have the replacement filters, you’ll need to replace them! The replacements should have arrows showing how they’re installed. Follow those so you can install them properly!
  5. You’re all set! Just close up the furnace door and turn it back on!
Changing out your filters is pretty easy! Just make sure you turn off your furnace when you do it!

Gathering Firewood

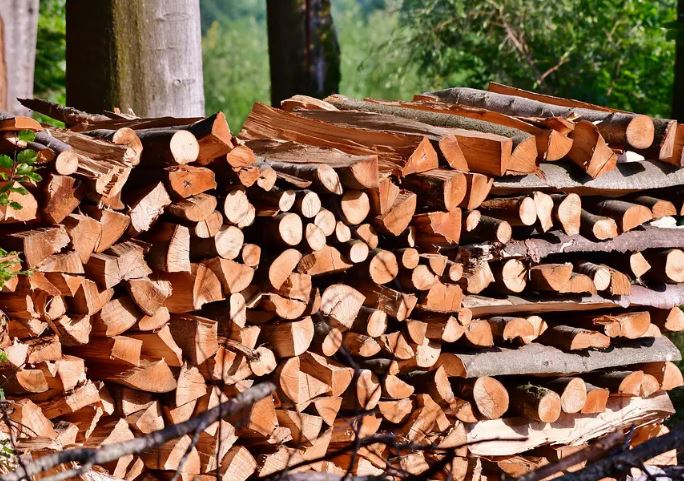
If you’ve got a fireplace or wood-burning stove at home, then you might know that you have to gather firewood. My family and I have a wood-burning stove, so typically we start to gather firewood around May-June. The earlier you gather it, the better, because it gives the wood time to try out before you burn it! But if you start stocking up now, then you’re still on the right track! Sometimes the cold weather doesn’t start until late September, early October anyway!

If you don’t have a lot of time to gather firewood on your own, then buying pre-cut wood is an option! However, it tends to be a little bit more expensive. You’ll be able to find them at places such as Home Depot, Lowe’s, Tractor Supply, and even some gas stations! But if you’re like my family and have been doing this for a while, you’ll have a log splitter! This speeds up the process of cutting up wood! Rather than relying on an axe. These machines streamline the process!

But if you have the time, gathering and splitting your own wood will save you so much money! Some woods, however, will tend to burn better than others. Oak, for example, is the most popular for burning. It’s not messy, and it takes some time to burn. However, pine is very sappy and can take a bit longer to dry out. Birch, on the other hand, burns quickly, and it doesn’t last very long. However, this makes it an excellent fire starter!

Stocking up on firewood is a great way to prepare your furnace and wood burning stove for the long winter ahead! This’ll also lower your heating oil usage if you have both!

Heating Oil Tank Inspection

As the years go by, your heating oil tank will get older. This often makes it susceptible to general aging over time. The tank itself will experience wear and tear as it gets older. For this reason, regular tank inspections are important for your tank. While this process doesn’t take a long time, it’s crucial for your system’s functionality and your safety.

In this section, I’ll be covering a brief explanation of what’s involved in a tank inspection. But if you want a more in-depth explanation, check out this article here.

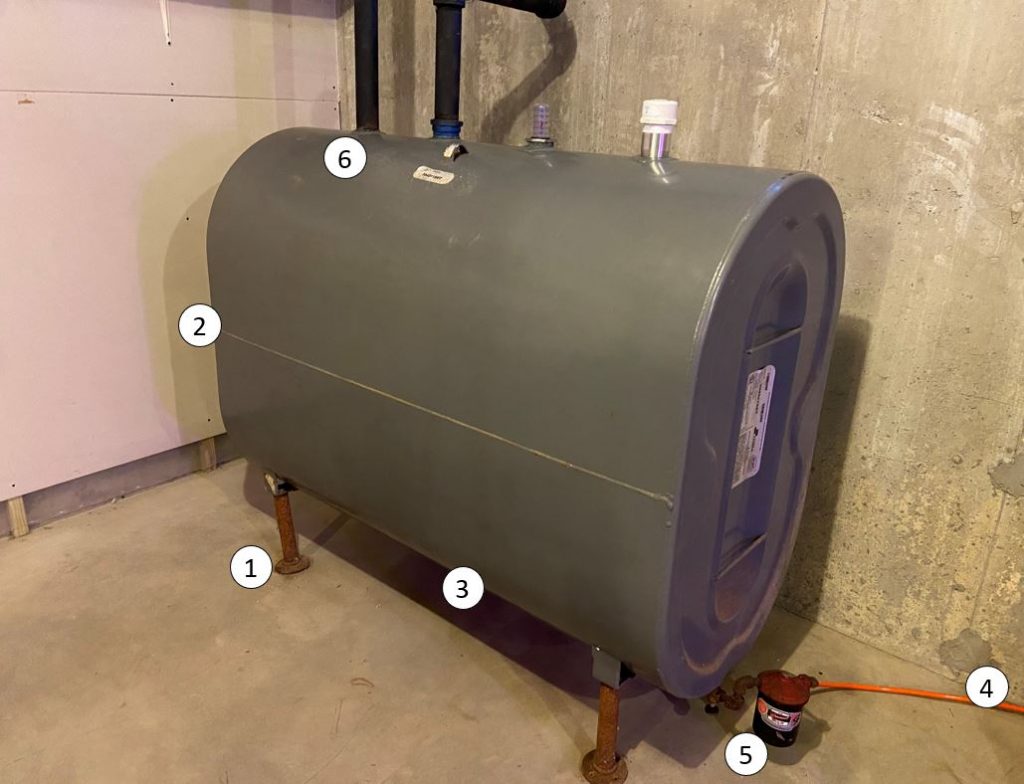
  1. Inspect the Legs to make sure that they’re sturdy. Also, make sure that there’s leaks in the tank.
  2. Make sure there’s no rust on the seams of the tank.
  3. Check the bottom and sides of the tank for any signs of leaking oil.
  4. Make sure that the oil lines have no leaks.
  5. Check the oil filter to ensure it’s not leaking.
  6. Check the top of the tank and fittings for any damage, rust, or cracks.
These are the key points you’ll need to look at when getting a tank inspection!

System Tune-Up

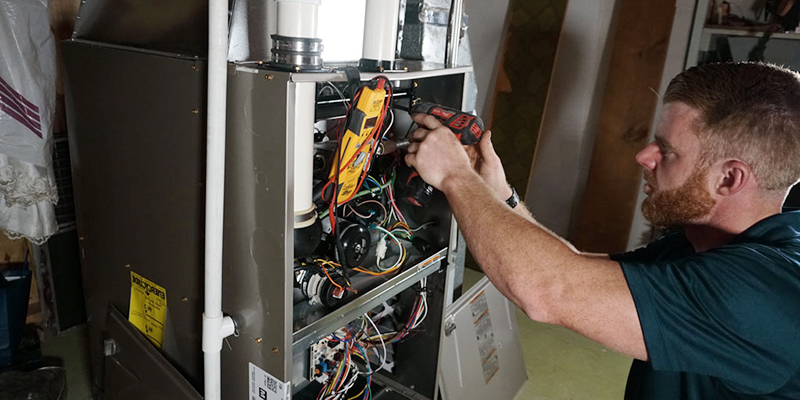
Annual system maintenance is important for your heating oil system to function as intended. Making sure your system is properly maintained is a requirement to ensure that the system itself doesn’t shut down when you need it. If it’s been a while since your last system service, or you need one, contact your local HVAC technician. They’ll be able to do all the required service and maintenance to make sure that your system is in tip-top shape! But keep in mind the price. Usually, system maintenance will cost around $300-$400 on average.

System tune-ups are crucial for your system. They ensure your system is working as it should!

However, when you contact your HVAC company, see if they offer a maintenance contract. These service/maintenance contracts will help you stay on top of your system’s maintenance. This’ll ensure that your system is in good shape for when you need it. Some HVAC companies will actually give you a discount when you sign up with them! It’s a good thing to ask!

Fill-Up Your Heating Oil Tank

Now that it’s getting to the end of summer, it’s a good time to fill your oil tank. Making sure that you have a full tank of oil will be very helpful when winter comes. Filling up your tank of heating oil will make sure your tank is ready to go when the temperatures start dropping! If you’re getting low now or are sitting at around half a tank, now’s a good time as any to order oil. It’s always a good idea to go into heating oil season with a full tank!

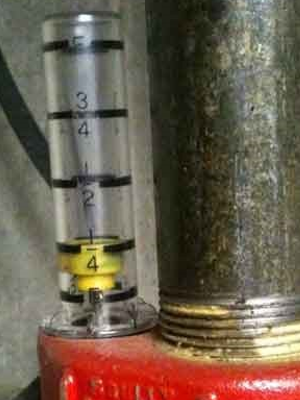
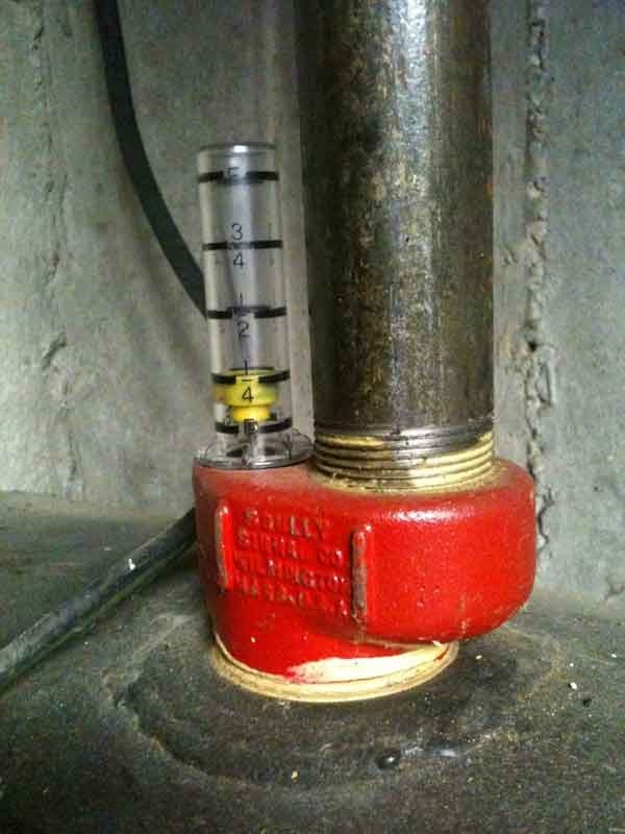
Your tank gauge is another important tool for you when it comes to monitoring heating oil usage and level. Most tanks come with a float gauge. However, the Smart Oil Gauge is another useful tool to track your data. You’ll have access to everything that you need at the touch of your fingers! You’ll even be able to order oil with our FuelSnap integration. FuelSnap lets you get the best selection of dealers and prices in your area!

Getting a fill-up now of all times is a great idea! This’ll make sure that you’re all ready for heating oil season!

Closing Thoughts

There are plenty of things that you need to do before heating oil season arrives. If you have the above-mentioned available to you, you’ll be fully prepared for the winter! Make sure you’re prepared when going into heating oil season and winter! You won’t want to be blind sided by a snowstorm or cold weather and not be prepared. If you’ve got a wood-burning stove or fireplace, stock up on firewood. If you’ve got a heating oil system, make sure that you get your tank filled and your system serviced!

As temperatures get lower and lower, we’re going to slowly start turning on our systems. Winter is around the corner, which means we’ll need to be warm for the cold months to come! Do not be un-prepared for what’s to come!

Happy Heating!

Hunter
How to Buy Heating Oil Online

Empty Home Heating Oil Gauge

Looking to get the best deal on your heating oil? There are a few considerations that you want to make sure you keep in mind – we’ll talk about them here.

How to Buy Heating Oil Online

It’s that time of year again when the temperature has dropped, the leaves have fallen, and the heat is on. You go down to the basement and check the old heating oil tank and realize it’s time to order oil. You know there are lots of local heating oil dealers out there – you see the trucks every day. But you’re thinking to yourself, what’s the best way to compare all the home heating oil companies in my area and make sure I’m getting a great price for oil? The most important considerations when shopping for heating oil online are: 

  • Heating Oil Dealer Reputation
  • Available Delivery Dates
  • Methods of Payment
  • Prices Per Gallon

Heating Oil Company Reputation

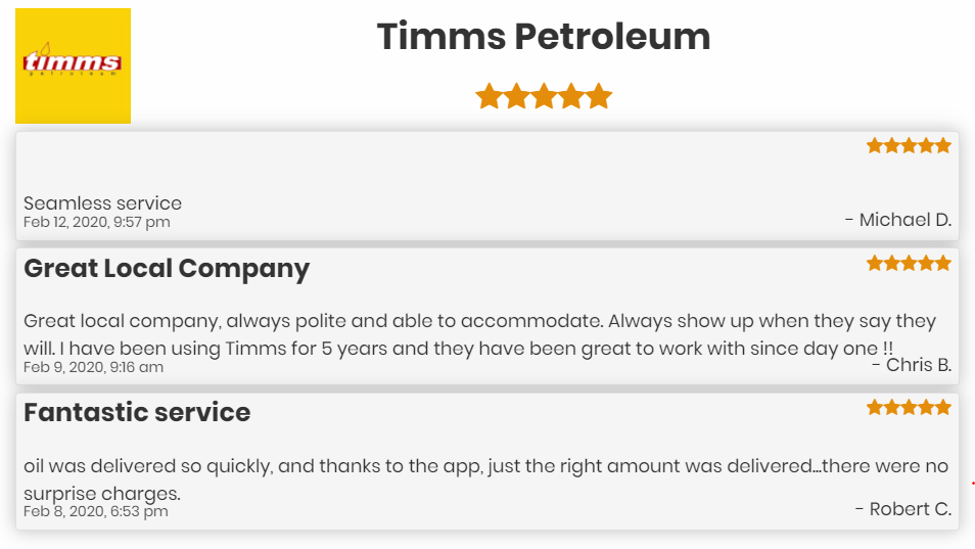
When ordering heating oil, it is important not to leave the delivery to some anonymous dealer you found online. Instead, find a heating oil source that allows you to not only see dealers’ names, but also read reviews. You’ll want to see the experiences others have had dealing with that heating oil company. Make sure the dealer shows up when promised, delivers the amount ordered, and the driver is respectful of your property. If you got a good price, but the driver ran over your garden, then maybe it was not the best deal after all.

Available Delivery Dates

The next consideration is when you need oil. A general rule of thumb is to “reorder at a quarter”. This means you should order heating oil when your tank is around ¼ full. This gives you at least a few days to have oil delivered without worrying about running out. It also allows you to check heating oil prices for several days out to ensure you’re getting the best price on a particular day. If it’s a Saturday morning and you’re out of oil, you’ll obviously not want to wait until next week so you’ll need to find a dealer that delivers over the weekend.

Fortunately, with sites like FuelSnap, you can see exactly when each particular dealer delivers heating oil to your town. Keep in mind though: a same-day delivery may result in a slightly higher price per gallon, so schedule a delivery for the next day, or a couple days out to get the best price if you don’t need heating oil right away. You might also consider a Smart Oil Gauge for your tank, which not only tells you how much oil you have, but also how many days it will be before you’re at a quarter or an eighth of a tank.  

Methods of Payment

Before you pick your home heating oil company, it’s also important to ensure they take payment via credit card. Credit card payments give you a layer of security that cash and checks do not. Besides, who wants to leave an envelope of cash or a blank check at the house when you’re not home? Make sure you order from a heating oil company online that captures the payment up front.

DO NOT give your credit card number over the phone to the dealer, as this allows them to charge whatever they want to your card, regardless of what was delivered (trust me, I know from experience!). When you buy heating oil online, you know exactly what you’re ordering, and the maximum that your card will be charged for. If your oil tank ends up taking fewer gallons than you ordered, then you’ll receive a refund for the difference. The most important thing is that your card will not be charged MORE after the delivery. 

Home Heating Oil Price Per Gallon

Now that you’ve read the reviews on your dealer, chosen when you want to have your oil delivered, and found a dealer that takes credit cards securely online, you’re ready to choose the delivery amount. With many dealers – although not all – the price per gallon varies with the amount of heating oil ordered. For instance, while oil may be $2.35 per gallon if you order 100 gallons, it may be $2.30 if you order 150, and even $2.25 if you order 200. For many folks, it makes sense to order 200 gallons to get the best rate. Keep in mind, however, that if your tank cannot hold the full 200 gallons, you may end up paying the higher price per gallon on your order.

If you want to know how much your heating oil tank holds, refer to this guide here: how much heating oil is in my tank, and how much can I have delivered. A typical rule of thumb is that a 275 gallon oil tanks holds about 250 gallons when full (there is an air space at the top of the tank). You can use a tank chart to see how many gallons are in your tank already.  

Placing the Order

Now that you know what to consider when shopping for heating oil, it’s time to get started. Fortunately, with sites like FuelSnap, you can choose from reputable local heating oil dealers and read reviews before ordering. You see exactly when you can have your oil delivered, and pay securely ahead of time with a credit card. This eliminates any surprises, and allows you to choose the best price per gallon. You’ve got all the information needed right at your fingertips, so go ahead and order with confidence! 

Happy heating, 

Steve