Saving Heating Oil with an Older Home

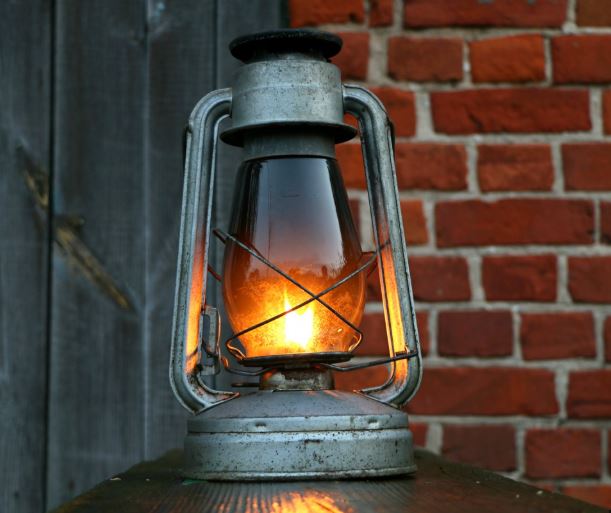
If you’re living in an older home, winter is likely a dreadful time for you. This is often a rough time for homeowners with older homes. Drafty windows and less insulation in the house can make you burn through more heating oil than you might think, which makes it harder to heat the home and keep it warm! So how exactly do you counteract this? Well, in this article, I’m going to go through tips and tricks on what to do!

What You Should Focus On?

In parts of New York and Connecticut, there are plenty of older homes! While older homes can sound appealing, they’re not without their downsides! For example, a home that was built during the 1900s will likely still have windows from the 1900s. These older windows might not always be properly sealed, so if it’s windy, you might catch a bit of a draft! These drafty windows can cause heat to leave the home, which makes it harder to keep the house warm, but also makes the heating bills very expensive.

However, not all is lost. I’ve spoken with some friends and family members of mine who have older homes, and they’ve given me some tips and tricks to keep the house warmer! I’ve even got a couple of things to share from my experience as well! But you should focus on the following areas first.

  • Finding out where the heat is escaping from, also known as Heat Loss
  • Ensuring that your burner is in good shape and that it’s efficient
  • Keeping track of your consumption and adjusting your thermostat as needed.
While this house looks beautiful, it’s a major money sink when it comes to heating oil.

Loss of Heat – Where’s It Going?

To find out where your loss of heat is coming from, monitoring your boiler and furnace would be a great place to start. Typically, as the warm air in your home escapes, it’s replaced by cold air. This’ll tend to lower the overall air temperature of your home. But, these are typically the key places where heat escapes:

  • Doors
  • Windows
  • Walls
  • Ducts

Doors

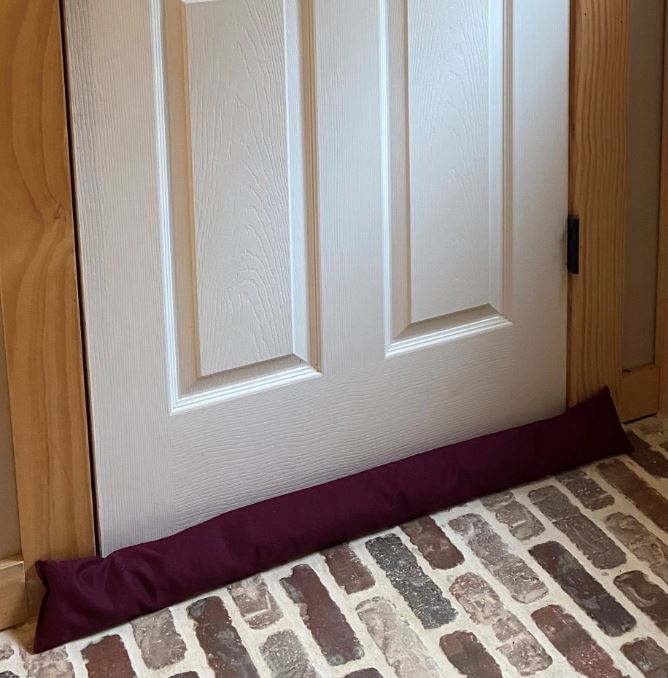
This is by far the most common way for heat to escape the home. If you have a busy house, then the doors constantly being opened and closed will give heat in the home an opportunity to escape. It’s very rare that doors are properly sealed to be perfectly shut. This is often because the doors will need to be frequently opened and closed for members of the home to go in and out.

However, even when the door is closed, the bottom of the door might have a little bit of a draft. This is common, especially in older homes. However, you can put down a draft blocker or a door sweep in front of the bottom of the door. This will prevent the hot air from escaping and the cold air from entering! We use one of these on the front door of my house!

This is a draft blocker. It can be laid on a door or window and it helps catch the draft of the cold air. My family uses these and they’re super helpful!

Windows

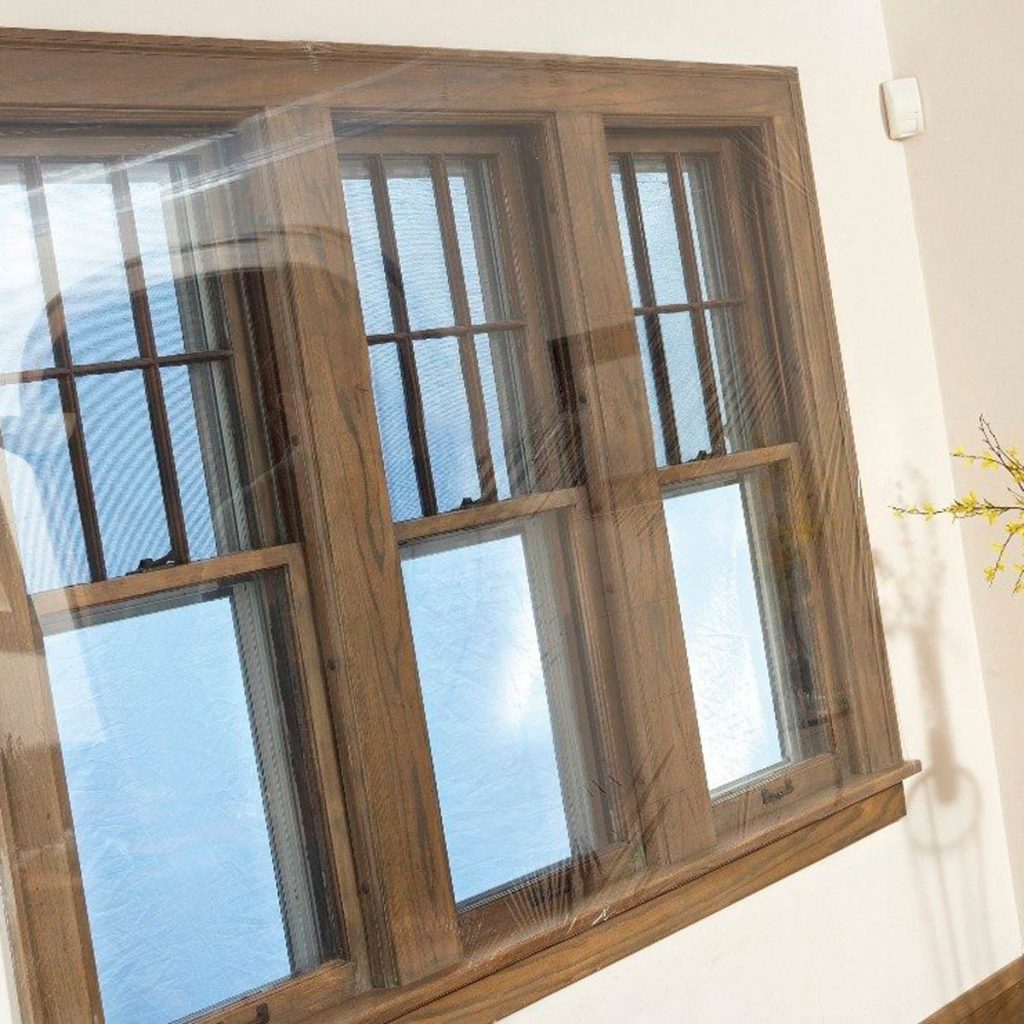
In older homes, single-pane windows were the more appealing option during construction. However, in terms of keeping the heat in, they leave much to be desired. In modern homes, two-pane windows tend to be more common and offer an airspace between them. That small airspace acts similarly to insulation and does a better job of keeping the heat in the home. However, on single-pane windows, there’s a way to counteract this. You can tend to apply a thin layer of plastic film around the window. Doing this will create a makeshift insulation on the single-pane window, keeping the heat in. Cutting it to size and holding it down with some tape will keep it secure until you’re able to put a hair dryer to it. Using a hair dryer will tend to wrap it in place. Doing this will ensure the home is more comfortable and will help keep the heat in!

This is what the wrapping around the door tends to look like. It looks a little goofy, but trust me, it works well!

Walls

Walls are surprisingly another way that heat tends to escape the house. Some walls might not be as well insulated as others, which can cause the heat to escape through the thin insulation. You can also blow in your own insulation, which tends to be more cost-effective. However, you will also need to subsidize it through energy auditing from the state. But once you’ve managed to add more insulation, you’ll see that your usage drops significantly almost immediately.

Ducts

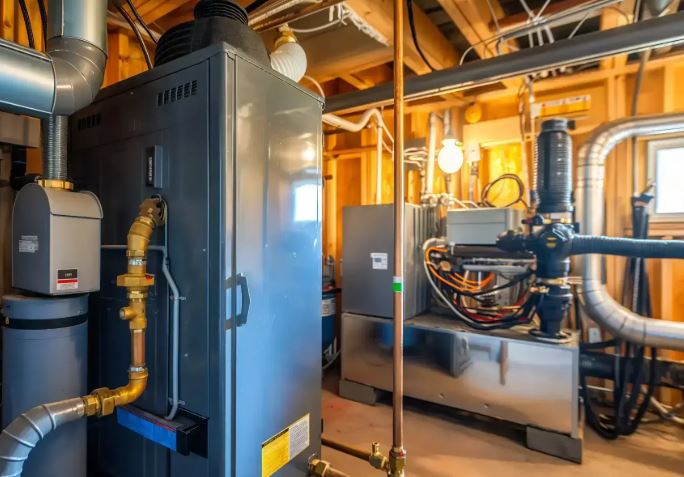
This one can actually be a little surprising. But it’s very important to know that ductwork in the home is very important. You might notice that on a lot of older homes, “Forced Hot Air” is a primary source of heating. With a Forced Hot Air setup, your furnace will often use what’s called a “Heat Exchanger”. These are used to push hot air through ducts in your home after the air has been heated by the furnace. These ducts will also suck in air from the “return vents” that are throughout the home. Due to this, the furnace won’t have to heat the cold air from the outside!

However, some basements can tend to be VERY cold and sometimes unheated. This tends to mean that a lot of these basements will have cold air cooling the ducts. This can cause your furnace to unintentionally work much harder to try to heat your basement. But, you can also wrap the insulation to keep the heat headed in the right direction to make it where it really needs to go. This’ll also keep the returning air from cooling, to ensure that it returns to the furnace as it left. Insulating the ducts will also seal any leaks that would allow hot air to escape.

Generating Heat

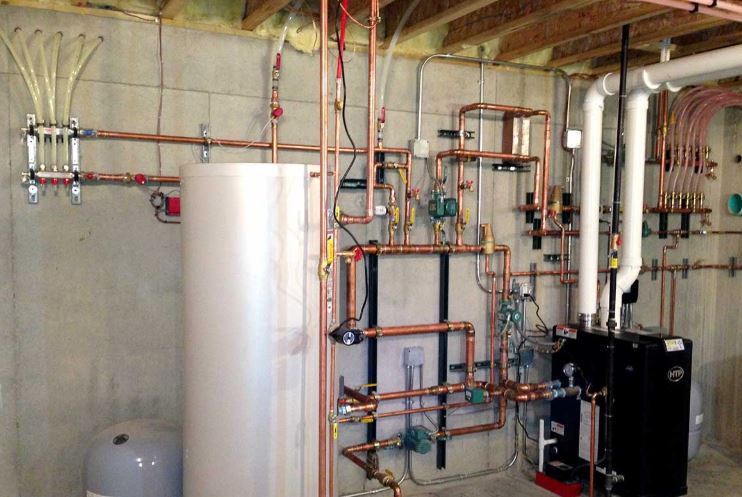
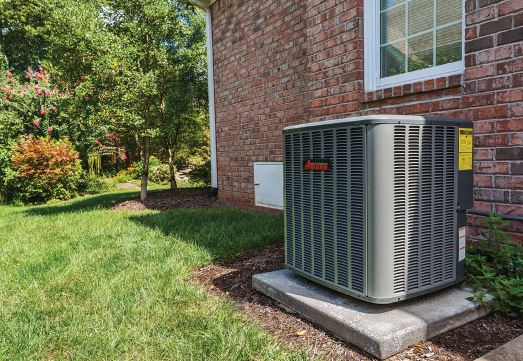
While it might not seem like it, your home’s boiler or furnace is similar to the engine of a car. It produces heat so that you can stay warm! You know how you’re supposed to change your car’s oil regularly? Well, it’s important to get your burner serviced regularly! Annual clean-ups and tune-ups will help HVAC technicians see any issues or problems before they happen! Like a car, you should stay ahead of the game for anything that could be problematic for your system! This will help prevent any problems from arising during the cold winter months!

It’s important that you do regular annual maintenance at least once every year.

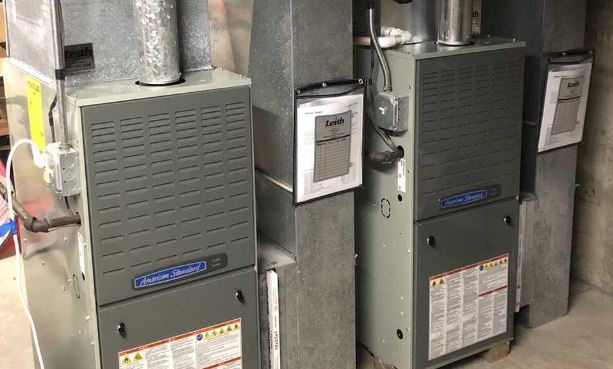
If you don’t get an annual tune-up, then this can lead to dangerous and even fatal issues. This could be something like a crack in the heat exchanger, for example. Failure to get this done can lead to a carbon monoxide leak, which can be lethal if inhaled! If this happens, then you’ll have no choice but to replace the furnace. Especially on an old home, it’s important to get your system checked regularly!

Most furnaces are quite durable and will tend to last anywhere from 20 to 30 years. But if your system is at least 20 years old and hasn’t been updated or replaced, then I strongly recommend replacing your furnace. New systems will often tend to be more efficient, quieter, and tend to output more heat compared to an older system.

A new heating oil system will tend to look like this. These systems will save you a lot of money in the long term. They tend to also give you the ability to program the temperatures in the home! That tends to result in lower usage!

Monitoring Consumption

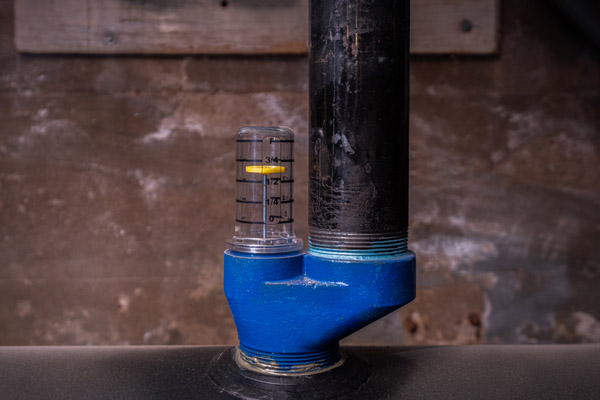
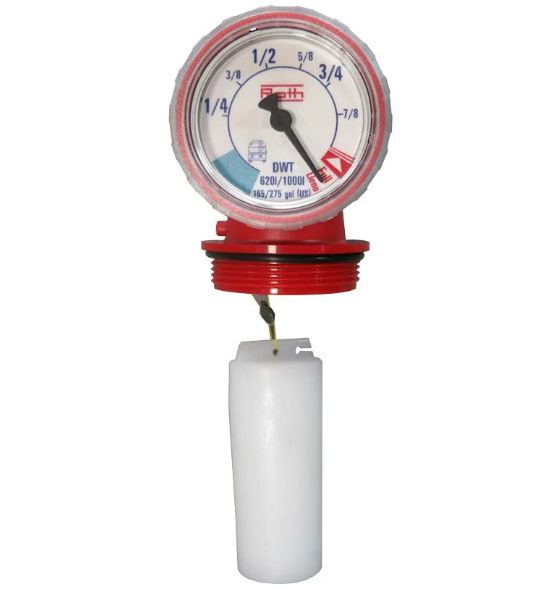
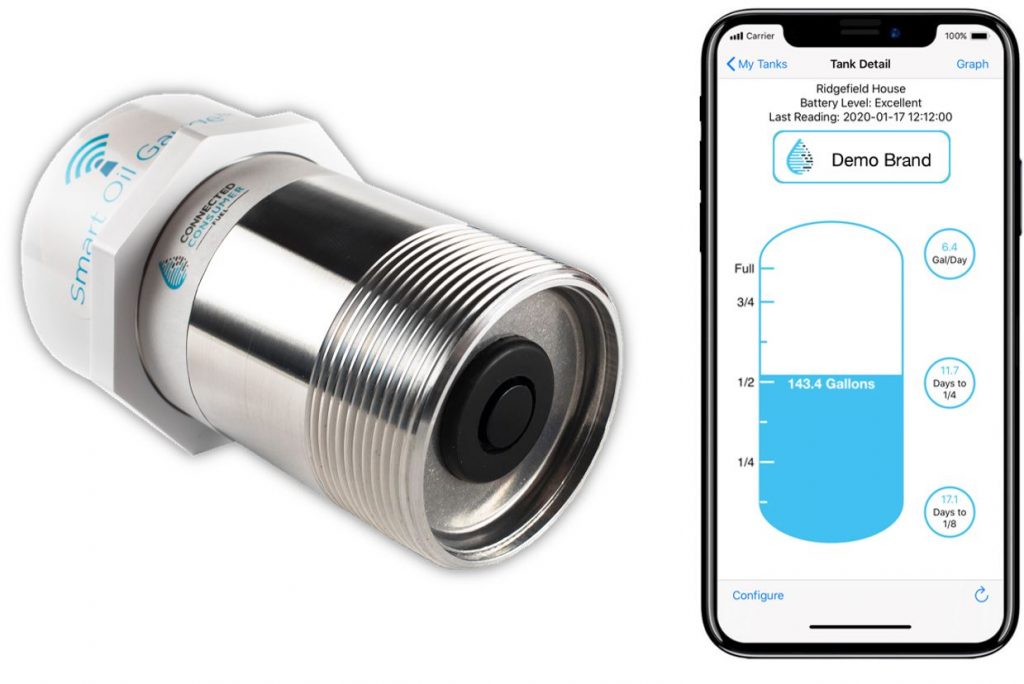
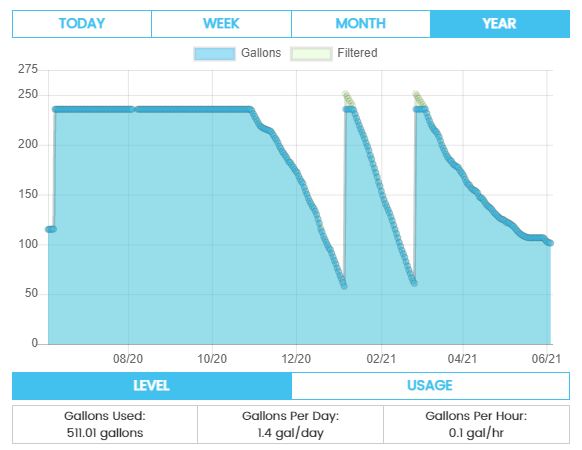
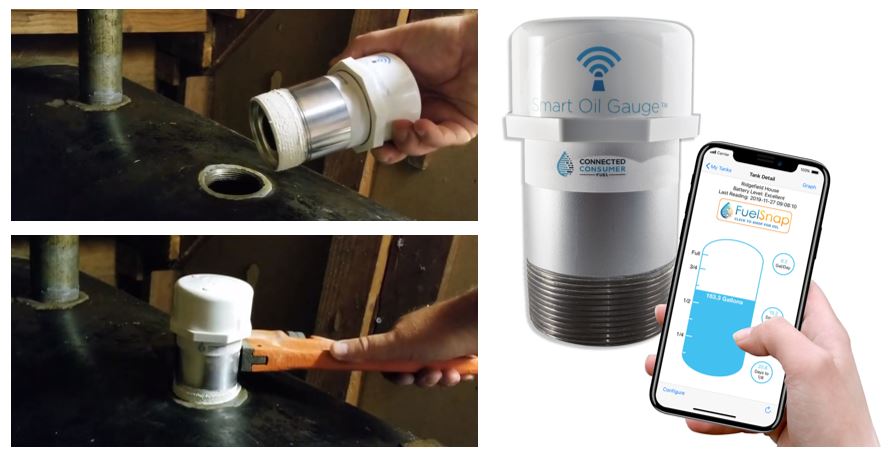
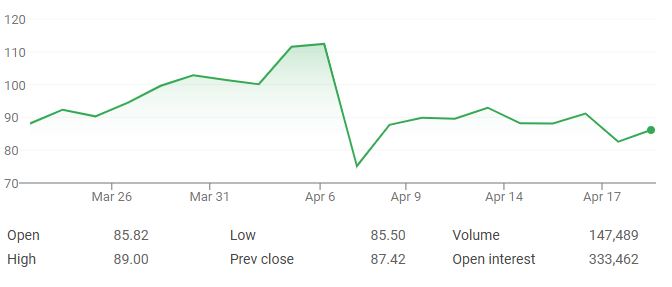
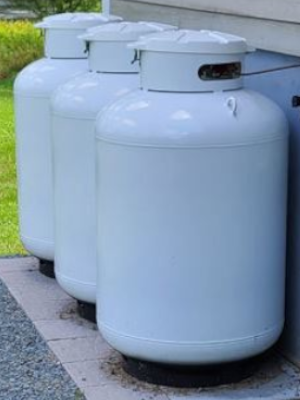
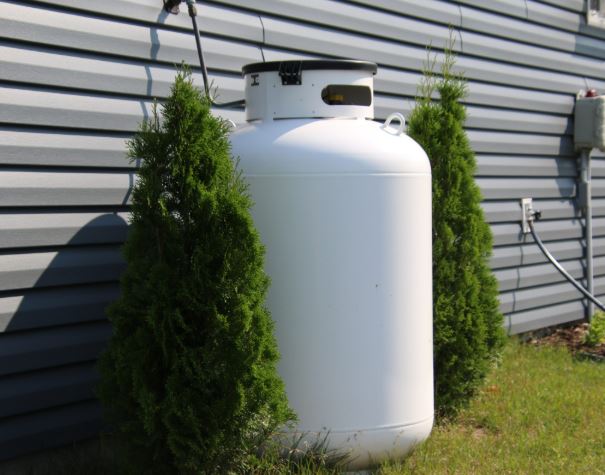
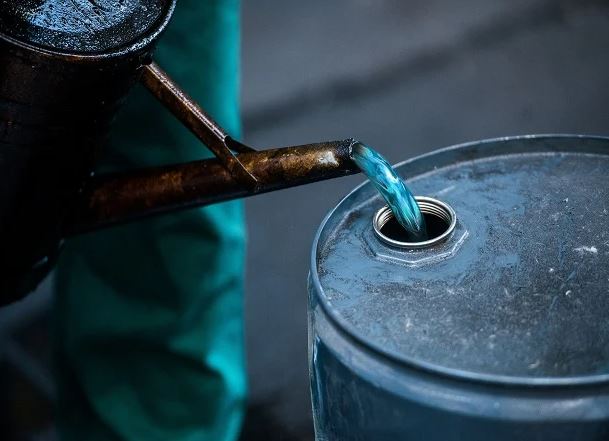
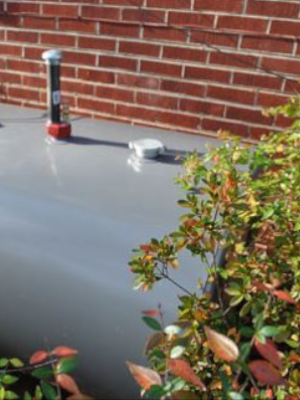
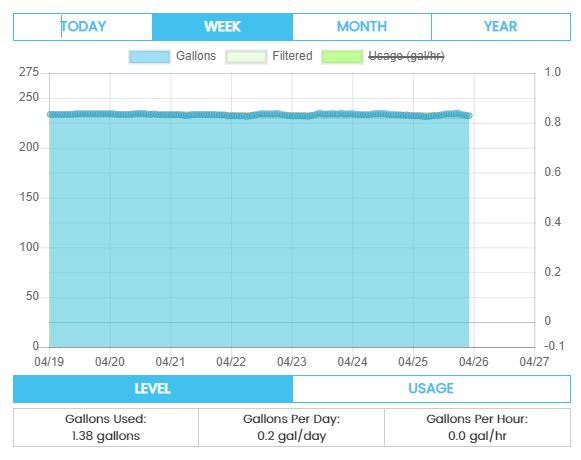
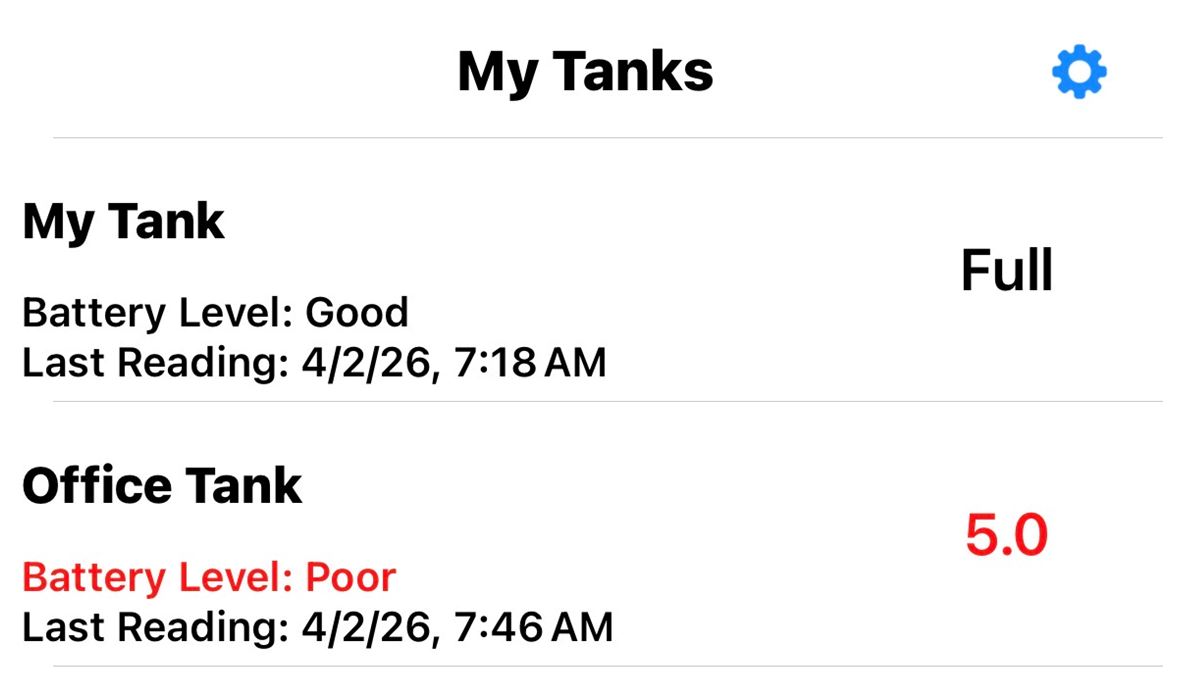
While you can manually track your consumption by looking at your float gauge and doing the math, that’s a little bit more time-consuming. Especially if you’re busy, you won’t want to spend the time figuring out your oil usage. That’s why the Smart Oil Gauge is a great tool to have on your tank! It gives you the ability to monitor your system’s usage and what your oil level is at. By simply being installed onto the tank, the Smart Oil Gauge will keep track of your level and your usage all through its ultrasonic sensor. The Smart Oil Gauge can also be used in combination with a programmable thermostat! Your usage data will reflect that on the Smart Oil Gauge as well!

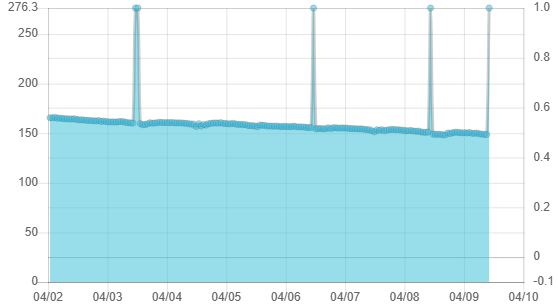
Homes that have radiators and boilers will tend to take a little bit longer to have the home reheat. The Smart Oil Gauge will be able to show you your usage for the day, week, month, and year. If you leave your thermostat on the same temperature for a day or so, the Smart Oil Gauge will reflect that with low usage. Your usage will be even lower if your home has good insulation.

Another thing that you can do with the Smart Oil Gauge is compare the previous year’s data to this year’s. However, you cannot do this through the app. You’ll need to log in to the website, click on the three grey lines, and click on “Export”. From here, simply choose a range of dates, and you’ll be able to export that data into a Microsoft Excel Sheet!

What’s your K-Factor?

Essentially, your K-factor is the number of days that your heating oil will last you. To completely understand this, you will need to know your degree days. Degree days are a representation of your demand to heat the home. This helps track outdoor temperatures that will determine how much oil you’ll burn on a specific day. The way to calculate this is easy. Simply take the outside temperature and subtract that from the average indoor temperature, and you’ll have your degree days!

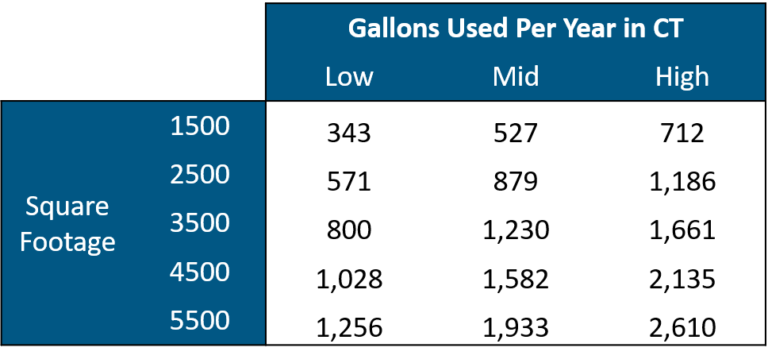
As an example, if the outdoor temperature is 15 degrees, and the inside temperature is 60 degrees. You’ll want to put them into the following equation (60-15= 45 degree days). In the entire state of Connecticut, we’ll see around 6,000 degree days over the course of a whole year.

Comparisons Between Your Old and New Furnace

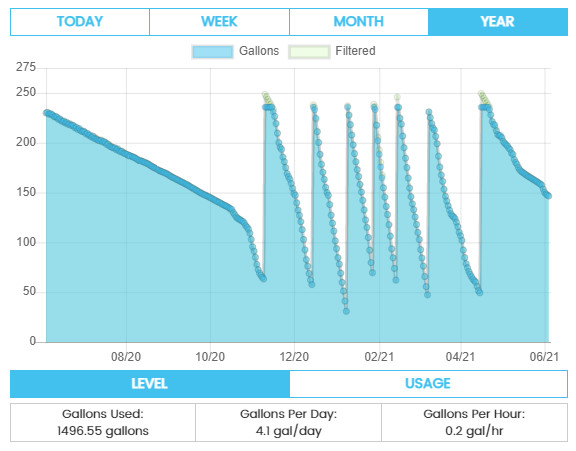
If you’ve used the “Export” option on our Smart Oil Gauge website, then you can use last year’s usage data and compare it to this year’s. First, you’ll want to determine your K-Factor by using your average amount of oil burned throughout last year. Depending on where you live in the US, this will be different. However, starting off with your overall yearly usage will help you start to understand what your K-Factor is.

The Smart Oil Gauge will track your hourly usage and level as it takes readings and uploads. On the left, you’ll see data from an older furnace. While on the right is for a newer furnace.

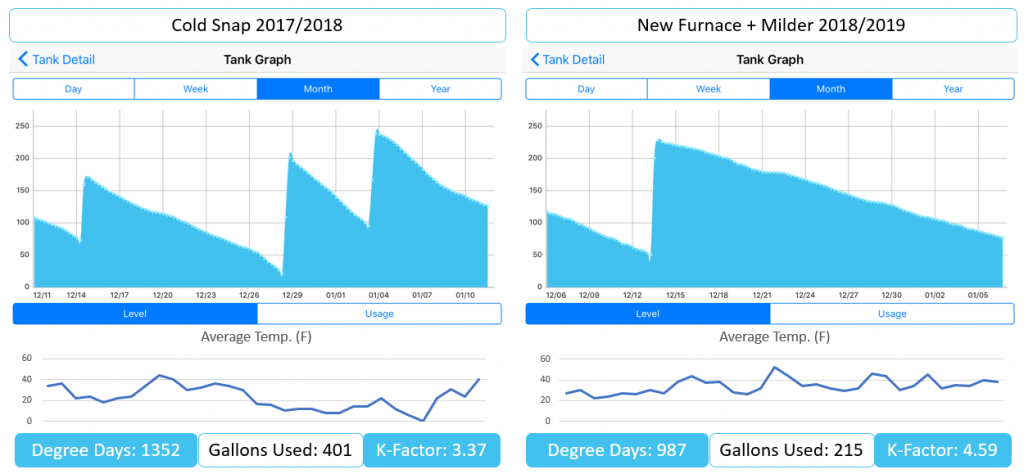
When you have a new furnace, your K-factor will most likely be increased. This means that you’ll end up using a significantly smaller amount of oil than on your old furnace. This is because, over time, your old furnace becomes less efficient, which means you’re going to be using more oil overall.

Conclusion: An Older Home’s Heating Oil

When it comes to heating oil in an old home, you might be asking yourself, “How?” How can you save the most on oil? The best way to go about it would be to get a new furnace. A new furnace would burn less oil and result in more money saved due to its better efficiency. However, replacing a furnace is expensive. Doing so will easily cost you several thousand dollars. So if you’re on a budget and don’t exactly have the funds, and your furnace isn’t that old, you can get away with it. But if your furnace is at least 20 years old, you should definitely get it replaced!

Getting an idea of your daily, weekly, and monthly consumption will also help you have a better idea of how much you’re going to burn moving forward! Installing a Smart Oil Gauge is going to be a major asset for you! Adding this to your system will help you manage your usage and give you a better idea of when you’ll need to order oil!

Happy Heating!

Hunter

Using Amazon Alexa with your Smart Oil Gauge

If you’re a smart device advocate, then you’ll be excited to hear that the Smart Oil Gauge is compatible with Amazon Alexa! The Amazon family of devices is a set of devices that allows for smart home integration! We have an Alexa skill that’ll allow the Smart Oil Gauge to connect with your Amazon account, allowing the two to communicate. Once you’ve eventually connected the two, you’ll be able to ask Alexa a variety of questions regarding your Smart Oil Gauge. But what exactly do you have to do? In this blog, I’ll give you instructions on what to do!

This is an Amazon Echo. One of the many Amazon home devices that are compatible with the Smart Oil Gauge.

Linking Alexa to Smart Oil Gauge

The process to link your Amazon account to your Smart Oil Gauge account is very simple and easy to do. However, you must first enable the Smart Oil Gauge skill in the Alexa app. There are two ways you can do it.

The first way is to simply ask Alexa! You can say to Alexa, “Alexa, enable the Smart Oil Gauge Skill,” and she should be able to enable the skill for you on your Amazon home device.

The second way you can do it is by going to the app and searching for the skill and enabling it! The following steps will give you brief instructions on what to do:

  1. Open the Alexa App on your phone
  2. Click on the three lines on the bottom
  3. Select Skills and Games
  4. Search for ‘Smart Oil Gauge‘ and download it
  5. Log into your Smart Oil Gauge Account

After you’ve downloaded the skill, go ahead and log in to your account. Once you’ve done that, the Smart Oil Gauge will be able to communicate with Alexa! You can now start asking her all kinds of questions!

What Can you Ask Alexa?

To make sure that Alexa is properly communicating with the Smart Oil Gauge, you’ll want to say a specific command. Start by saying “Alexa, talk to Smart Oil Gauge”! This will trigger the Smart Oil Gauge skill to communicate. From here, you’ll be able to ask a variety of different questions!

Here are some questions that you can ask Alexa:

“Alexa, how much oil is in my tank?”

“When do I need to order oil?”

“How many days do I have until I run out of oil?”

Asking Alexa these questions will give you an idea of how much oil you’ll need to order and when! Having Alexa connected to the Smart Oil Gauge app is a great way to know how much oil you need! You won’t even have to open up the app! Just be sure to ask her regularly!

Utilizing Alexa and the Smart Oil Gauge will give you so much convenience and piece of mind!

Google Home Compatibility

If you have a Google Home device instead of an Amazon Alexa, then you might be wondering about home compatibility. The Smart Oil Gauge did have Google Home compatibility at one point. However, in May of 2023, Google decided to discontinue conversational-based actions on their Google Home devices. This rendered the Smart Oil Gauge incompatible with Google Home Devices.

Utilizing Smart Oil Gauge with Alexa

Combining the Smart Oil Gauge and Alexa is a great way to be in control of your oil usage and level! Being able to ask Alexa how much oil you have without finding the need to open up the app is incredibly useful! You won’t even have to walk down to the basement either!

With the added benefit of our FuelSnap integration, you’ll be able to quickly and effectively be able to order oil when you need it! You’ll be able to get the best prices available to you at the press of a button on your phone!

Happy Heating!

Hunter

Monitoring Your Oil Level with Heating Oil Gauges

On heating oil tanks, there are a couple of different ways to monitor your fuel, mostly through a variety of fuel gauges that are installed on the tank. However, there are some more traditional ways to keep track of your heating oil level. While heating oil gauges are the primary way to monitor your level, dipsticks are also common as well. In this article, I’ll be covering all the different ways to monitor your fuel oil level!

Float Gauges

These types of gauges are the most common that you’ll see. They are typically mounted on most steel tanks. They function with a metal arm that tends to move up and down inside the tank. At the end of this arm is a little cork bobber. This bobber floats on the top of the oil level. The end of the arm connects to a plastic cylinder with a colorful disc on the top of the tank. The disc will line up with marks to indicate the level of the oil. This tends to range from full, 3/4, 1/2, empty, and more!

Float gauges will tend to look like this. Sometimes by themselves or like shown above! They typically come included with your steel tank.

However, these gauges do have one flaw. That tends to be the arm and float itself. As the gauge itself gets older, the bobber can get covered in sludge and oil. This sludge and oil can cause the float to get coated in sludge, which will cause the float gauge to be less accurate over time. This arm can also break and occasionally get caught on the side of the tank, which can make it stuck.

Roth tanks have a float gauge similar to the standard. However, theirs tends to look like a meter with a string and a plastic bobber on the end. Where the plastic bobber sits will determine where the float’s needle points to determine the oil level.

This is a Roth Float Gauge! This is also known as a string gauge!

Smart Oil Gauge

Another type of gauge that can read your level is the Smart Oil Gauge! This gauge is a wireless tank monitor that will keep track of your usage data and your tank level! All you need is a stable WIFI connection for the gauge to work! This gauge works off of a 2.4ghz WIFI connection, and uses an ultrasonic signal to determine how much oil is in the tank!

The Smart Oi Gauge comes in two different models. There’s the standard Smart Oil Gauge and the Duo Smart Oil Gauge! The Duo is our more accurate device and is a dual-sensor device. The dual sensor structure gives it a larger operating range of 0-72″. This gauge can be used on almost any tank. So long as it doesn’t have a raised fitting or a 1.25″ NPT fitting. The Standard Smart Oil Gauge is only a single sensor device and has an operating range of 8″-72″. This means that the sensor has a little bit of sensitivity at the top of the tank when it’s full. But the standard model can be installed on tanks with fittings of 1.25″ NPT. You can read about all the differences between the two here.

The Smart Oil Gauge is a useful tool that tells you all the information you need about your level and usage through our app!

Stick Measurements

Using a stick to measure your tank is uncommon nowadays. But it’s not completely unheard of! While it’s not a heating oil gauge, using a stick for measuring oil level is a requirement on underground tanks. Unlike standard above-ground tanks, underground tanks can’t have a float gauge or a Smart Oil Gauge installed on them. This is because the pipes that stick up out of the ground are too tall, which will prevent the float gauge and the Smart Oil Gauge from reading correctly!

On underground tanks, the best thing to do is to use a stick measurement. This can be either a yardstick or a tape measure. This will help you get an idea of how much oil is in the tank itself. Sticking these tanks will also help you plan to order oil accordingly, depending on what the sick measurement reads.

Yard sticks are some of the best ways to measure your oil in your tanks! But on underground tanks, it’s more of a requirement!

Conclusion

There are a multitude of different ways to monitor your heating oil level! While the Smart Oil Gauge gives you usage data as well, float gauges and sticking the tanks are still reliable! The nice thing about the Smart Oil Gauge is that you can use it alongside the float gauge! You’ll be able to monitor your level with the classic float gauge and have the level and usage data at the tip of your fingertips!

While you cannot use heating oil gauges on underground tanks, in dire situations, you can use the stick to measure the level of oil in the standard tank. If the Smart Oil Gauge is offline or the float is broken, you can always stick to measuring the tank to get an idea of how much oil is in the tank, so that you know when to order!

Happy Heating!

Hunter

Heating Oil Usage During the Summer

Summer is on the horizon! Which means not only warm, sunny weather but also low oil usage and prices! This makes it a perfect time to discuss heating oil usage this summer! During the summer, you’re probably not going to be thinking too much about heating oil. However, summer doesn’t last forever, so it’s important to have home heating in the back of your mind. During the summer, you might see yourself not using any oil at all, or just for hot water. If you use oil during this time, keep reading, because I’m going to go over what you need to know about heating oil this summer!

Hot Water Usage

In the United States, there are four major ways to heat your home. Those are heating oil, propane, natural gas, and electricity. While they are all different in one aspect, they do have one similarity. That’s being able to provide hot water to the home. If your home uses just one of these to heat the house, then you’re in luck because you can double up and use one of these four to heat hot water! Some homes might have heating oil as their main way to heat the home. However, some homes will also have electric or propane to heat their water! This is a bit more uncommon as most homes will have their main heat source do both, but it’s not unheard of!

This is an example of using heating oil in the summer and for hot water. As you can, usage is very minimal and even non-existent.

During the summer, if you’re only using heating oil for hot water, then you don’t really need to pay too close attention to your usage. Once the summer weather starts to kick in around mid-late May, your oil level doesn’t become of concern. Your usage will tend to be much lower during the summer. An average-sized home will burn less than a gallon of oil a day for just hot water, and most of the time, the amount you’re burning is minimal.

However, around late September to early October is the time when heaters start to come back on. This’ll mean that the cool fall weather is starting to show up. Most homes will then start to turn on their heaters in preparation for the cold temperatures. But until then, you don’t have to worry about high usage.

Usage for Heat and Hot Water

If your home uses it for both hot water and heat, then I strongly suggest you monitor your yearly usage. You’re going to be burning more oil than you think, and getting a tool like a Smart Oil Gauge will help you track usage and level data more accurately. Using a Smart Oil Gauge gives you an extra layer of protection from running out and unexpected changes to your usage. You can even enable alerts to notify you of a fill-up or when you’re running low! With the Smart Oil Gauge, you don’t have to fear running out!

The Smart Oil Gauge is a useful tool to help you monitor your tank level and usage! Simply install it and the gauge itself will be able to read everything through the app!

When you use heating oil for both heat and hot water, you’re going to end up burning much more oil than you normally would if you were using it for just hot water. But during the summer, your usage is going to be low. Summer temperatures in Danbury tend to range from the high 70s to the low 80s. During that time, you won’t be running your heat, but hot water is something that you might use. I mentioned this previously, but you’re likely to burn less than a gallon of oil just for hot water. However, if you live in a household with multiple people and everyone is taking regular showers and baths, then you’re likely going to be burning closer to a gallon per day.

Unlike the previous example, this is an example of oil being used for both heat and hot water during summer and winter. You can see that usage is much higher!

When Should You Order Oil?

If you burn oil during the summer for hot water, you might see yourself having minimal usage. However, if you turn off your furnace, then you won’t have any usage at all! This means that you can fill up your tank at the end of the season when prices are lower, so that you can be prepared for the next season!

Oil prices tend to drop significantly during the summer months, which usually makes prices cheaper. However, with the Iran War, prices are currently uncertain. Regardless, ordering a fill-up around 1/4 tank is the best thing to do when you need a fill-up! Using our FuelSnap website will help you prepare for your next delivery and get the lowest price possible!

Happy Heating,

Hunter

How to Budget with Heating Oil

With summer just around the corner, it’s a good idea to start planning your heating oil budget for this upcoming winter! This past winter was definitely an intense one, so hopefully this next one isn’t as bad! But, I imagine with the warm weather we’ve been having and the nice weather on the horizon, heating oil is the last thing on your mind!

Plus, with high prices at the time of writing, creating a budget plan will help you be prepared! Prices are currently ranging from around 4.50 to 4.79 per gallon in Danbury! They’ve been erratic since the start of the war with Iran. But now’s a good time as any for you to start budgeting because of the high prices!

Your Annual Usage

If you’ve been following FuelSnap for a while, you’ll know I’ve covered this topic before. To keep it short, your annual usage is determined by two major factors. These factors are the size of your house and daily usage. The bigger your house is, the more you’re going to be burning. But if your daily usage is low or non-existent, then you might find yourself burning much less annually! Your home’s insulation also plays a major role in this as well! Well-insulated homes will tend to hold heat better than homes that aren’t, which tends to result in low usage. But, if your boiler is heating oil-based, then it’s best to be aware that you might see yourself burning upwards of at least 100 gallons extra a year.

Keeping that all in mind, the average home will burn roughly at least 900 gallons of oil a year. But if your home is bigger and/or older, then your annual usage will be different. What your usage will be daily, weekly, monthly, and annually is important to know. Which is why getting a Smart Oil Gauge is incredibly useful. Using a Smart Oil Gauge will help you keep track of your usage and oil level! Otherwise, you can keep track of your deliveries and use that to calculate your usage between fill-ups.

This is an example of a yearly graph for annual usage in CT based on home size. The Larger homes will tend to burn more oil in the long run.

Budgeting by Price

Heating Oil Prices have had a lot of fluctuation over the past couple of years. Especially in 2022, when Russia invaded Ukraine, and now with the war with Iran, prices are all over the place! This has caused oil prices to not have stable prices or consistency. While before the war with Iran, prices wouldn’t normally get above $4, that’s not the case anymore. Average prices right now are around $4.50 a gallon! Some dealers are even charging upwards of around $5 per gallon or more! If you fill your standard 275-gallon oil tank, a complete fill-up might cost you over $1200!

Due to these high prices, it might be a better idea not to do as many fill-ups. With the current prices, ordering less oil would be the best thing to do when budgeting. When the tank gets to around half a tank of oil, ordering 100 gallons could help you save money and ensure that you have oil on the way. It’s currently spring, so you might not need to order as frequently or as much as you would in the winter. But at over $4 a gallon, ordering 100 gallons at around half a tank will help you save on costs. On a standard 275-gallon tank, ordering 100 gallons will only cost you $450. This is much cheaper than a complete fill.

Making a Savings Plan

If you’re not burning oil now, then it’s the perfect time to order oil and save some money. If you’ve filled up your tank before this spring season, then you won’t need to worry about ordering oil to top off your tank! However, coming up with a savings plan for the winter is something that you should consider! Putting a set amount of money aside with each paycheck will be very helpful for you long-term! Doing this will help give you a set of funds that’s only used for heating oil! I tend to do this when planning a vacation or major event. It’s a great way to budget and prepare yourself!

You can determine how much you’ll need by comparing your last season’s usage data. If you burned a lot of oil last season, then you might need to put more aside than you initially thought. For example, if you get paid biweekly, setting aside $100 a paycheck over the course of spring or summer will mean that you’ll have $1200-$1400 saved by the time heating oil season starts in early to late October. If prices are back to normal by then, you should be able to get a couple of deliveries out of that much money.

This is the current price per barrel of crude oil. It peaked in early April, but had a steady drop shortly after the Strait of Hormuz was reopened.

Conclusion

How you budget for heating oil season is completely up to you. However, it’s always a good idea to start saving money for heating oil season. I would strongly suggest starting to put money aside for the next heating oil season. Having this extra money aside strictly for heating oil will be very beneficial.

However, with the current prices of heating oil on the rise, ordering less oil for now is a smart idea. While typically we recommend ordering at a quarter tank, with how prices are now, ordering at half a tank is a better decision financially.

Happy Heating!

Hunter

Propane: Owning or Renting? Which is Best?

Are you moving into a house with propane heating, or thinking about making the switch to propane? If you are, then you might’ve been asked by a provider if you want to buy your tank outright or rent it. Unlike heating oil tanks, where you own the tank most of the time, it’s not that simple with propane. There are a couple of other things that you might need to know. But don’t worry, I’ll be covering everything that you need to know, including the pros and cons!

What are the Differences and Similarities?

Propane is very different from heating oil. But they do have some similarities. For example, while most forms of heating nowadays don’t require a delivery, heating oil and propane still do. While it’s not necessary for forms of heat such as electric and natural gas, you must get a fill-up to heat the home when using either propane or heating oil. Additionally, they also need to be stored in tanks. While heating oil tanks tend to have a variety of tank sizes and styles, propane tanks tend to have one tank size. They tend to look like long, round capsules. Heating oil and propane are also both stored as liquids and are turned into a gaseous state when heated/released.

One of the biggest differences between the two is the ownership of the tanks. Typically, with heating oil, the homeowner will own the tank. Most of the time, you’re even able to buy the tanks from Home Depot or Lowe’s. However, when it comes to propane tanks, you usually rent them from the provider. But the downside to this is that you can only order from the dealer that you’re renting the tank from. Due to state propane laws, it’s often illegal to fill another provider’s tank. However, it is possible to own your propane tank! You can tend to buy smaller ones from Home Depot or Lowe’s, but these tend to be for outdoor grills. For larger capacity propane tanks, you’ll need to contact a dealer.

This is an example of a medium sized propane tank. You can both buy and rent these sizes.

The Positives and Negatives of Owning a Propane Tank

The Pros

Freedom to Order: Owning your propane tank will give you the flexibility to shop around. This’ll allow you to get the best prices available to you and check out multiple dealers to see what their prices are.

No Consumption Minimum: Most propane providers will often have a minimum amount of propane that you have to consume to be a customer of theirs. Most companies do enforce this, but if you own your tank, you don’t have to worry about that consumption minimum.

Underground Installations: When renting a propane tank, you usually have to make it visible on your property. However, if you own it, you can install it underground! This will stay hidden, and unlike underground steel tanks, it won’t be a problem for the environment as it gets older!

The Cons

Expensive Upfront Cost: When you’re buying your propane tank, you’re buying it outright. This often means that you’re paying the full price of the tank. Which will tend to be a bit more expensive at first. These tanks tend to be around $1,000 at least!

You’re Responsible for Tank Maintenance: When you own something, whether it be electronics, equipment, or a home, maintenance is your responsibility. This is true as well for propane tanks. You might need to hire a propane service to help maintain the tank if you own it.

The Positives and Negatives of Renting a Propane Tank

The Pros

No Fees Upfront: When you own the tank and buy it outright, you’ll typically have fees upfront. However, when you rent the tank, there are no upfront fees! The dealer will also come and install it, free of charge!

Maintenance Falls on the Dealer: When you’re renting your tank, maintenance isn’t something that you have to worry about! If your tank needs to be repaired or replaced, your dealer is responsible for that! They’ll also service the tank when necessary.

The Cons

Overall Cost: As time goes on, renting a tank becomes much more expensive. This is usually because your dealer owns the tank. You won’t be able to shop around for lower prices and must adhere to the dealer’s prices. In most states, it’s illegal to fill another propane dealer’s tank. Even if it’s legal, out of courtesy for the other dealer, most providers won’t fill someone else’s tank.

Annual Usage Minimum: Most providers tend to have high prices and rental fees. But they give you an option to avoid this. Typically, this tends to be counteracted by an annual usage minimum. This requires you to burn a certain amount of propane a year to get those “benefits”. But I’m using the word benefits loosely here.

No Price Flexibility: If another provider has a gallon of propane cheaper than yours, you won’t be able to buy from them. When renting from a provider, you’re locked into ordering from them. This doesn’t give you control of prices and where you can buy from.

Propane will be delivered to the home in a truck like this.

What Should you Go With?

When choosing between buying your tank outright and renting it, there are a couple of questions that you have to ask yourself. I’ve listed the necessary questions to ask yourself before making this decision.

Are You Staying at this home for a long time? If you’ve lived in your current home for a long time already and have no intention of moving, or you plan on making this home your long-term residence, then buying your propane tank makes the most sense. This will help save on costs throughout the years.

How Much Propane Will You Be Using? If you plan on using the propane tank for just heat and cooking, then it doesn’t make sense to buy the tank outright. It would make more sense to rent the propane tank. However, if you plan on using it for heat as well, then buying the tank would be a good idea!

Are There A lot of Suppliers in your Area? If you have access to multiple suppliers in your area, then yes, buying your tank is a good idea. This is because you’ll have multiple dealers in your area to order from and will have the freedom of choice. But if you don’t have many providers in your area, renting the tank is the best option.

Ultimately, deciding to rent or buy your tank is completely up to you. Your circumstances will be the determining factor for buying or renting. If your home came with an underground propane tank, then you’re in luck because you’re at an advantage. But the decision is up to you and will be determined by the availability of dealers, location, and personal preference.

Happy Heating!

Hunter

Kerosene Heating: What You Need to Know

John D Rockefeller is a name that might ring a bell. He was the nation’s first billionaire and the founder of the Standard Oil Company. It was a dominating force in the American oil industry and became one of the first big trusts in the nation. During this time, he was a very big advocate for Kerosene oil. Not only did he personally use it, but he also revolutionized the oil industry by pushing for Kerosene during the early 1900s.

But why do I bring this up? Nowadays, kerosene isn’t as popular as heating oil. However, it’s still used today not only as a way of heating, but also for jet fuel, as it derives from crude oil. In this article, I’ll be going over what you need to know about it, such as the basics and what’s important.

What Exactly is Kerosene?

Like all fuels, Kerosene is a combustible liquid that is used for heating. It’s got a flashpoint of 100-150 degrees Fahrenheit. But it will also gel when the temperature gets around or below -40 degrees. This is vastly different from heating oil that’ll usually start to gel around 16 degrees Fahrenheit. Unlike heating oil, you can store it in much colder environments than you would with heating oil.

Back in the 1900s, kerosene lamps were commonly used as a source of light.

There are, however, different grades of kerosene. The two most common grades are 1-K and 2-K grades. They have a few differences and will burn somewhat differently. 1-K, for example, is often known to be cleaner and often has fewer toxins and deposits. This makes it more suitable for usage in lanterns. However, this tends to be a more premium form of Kerosene. However, 2-K grade is considered the standard, and is the form that’s often used for heating with indoor heating and stoves.

What Do You Use Kerosene For?

In the 1800s, Kerosene was used as a form of powering light fixtures. Back then, it was very popular; however, once heating oil entered the market, prices for kerosene eventually dropped as heating oil became more popular. Another killer for kerosene was the introduction of electric heating. As it became more common, the use of kerosene lamps dwindled due to their need for fuel, which electric lamps didn’t need.

In today’s day and age, kerosene is most commonly used for heating and jet fuel. Particularly, high-grade kerosene is the most important ingredient. In the US, we rarely use it as a source of heating. However, some low- and middle-income countries still use it for cooking and electricity.

What Makes Kerosene Different from Other Forms of Heating?

Heating Oil and Kerosene do have their similarities. They’re both used for heat, and they derive from crude oil. However, there are some very important differences between these two types of oil that you must be aware of. Firstly, you cannot switch between the two. This is because their respective systems are not fit to be able to burn the other fuel. Additionally, they’re stored differently and have different storage requirements.

Their different storage requirements stem from their different flashpoints. Heating Oil’s flashpoint is a little higher than kerosene, which makes it safer to use. The flash point of heating oil sits at 150 degrees Fahrenheit. This makes it much safer to use, especially outside. However, kerosene’s flashpoint is 100 degrees Fahrenheit. This means that kerosene is actually much more dangerous to use than heating oil!

However, kerosene stands out compared to other forms of heating with its lower freezing point. The lower freeze point makes it harder for the oil itself to freeze and gel. Heating oil has a higher freeze point at 16 degrees Fahrenheit. This makes it more suited for colder environments.

Can Heating Oil Tanks Use Kerosene?

When it comes to what you can and can’t do with kerosene, there’s a very thin line that you have to work with. While heating oil is similar enough to kerosene to be able to be mixed with it, you’re not going to be able to replace heating oil in your system with kerosene. If your heating oil tank is full, and you throw a little bit of it into the tank, then that’s fine. However, filling up an empty heating oil tank with kerosene will damage your system in the long-term.

Kerosene is typically stored in fuel canisters that are blue. This helps differentiate it between gasoline and diesel.

While adding kerosene to your heating oil tank might sound odd, it’s used as a sort of cleanser. This will help clean out any sludge or anything in the lines that could be hindering usage. Adding it to your heating oil also helps as a way to prevent the oil from gelling, as its freeze point is much lower than that of heating oil! Mixing it in is a great way to help your oil maintain its liquid state in the cold weather.

However, if you ever run out of oil, NEVER put Kerosene into your tank. If this does happen, I would strongly suggest going to your local gas station and grab around 5-10 gallons of diesel. This’ll hold you over until your next delivery arrives.

Switching from Heating Oil to Kerosene

Making the switch to kerosene from heating oil is difficult. If you want to make the switch, then you’ll need to have an entire system overhaul. This includes swapping out all the parts in your system from heating oil parts to kerosene-specific parts. This not only costs money, but also significant time. If you live in a cold environment such as Alaska, then this is strongly recommended! The cold temperatures up there are ideal for storing kerosene. This is often due to its low freeze point and slightly lower flash point than heating oil!

Most importantly, it’s not as readily available as heating oil, especially in the northeast. Making the switch to kerosene from heating oil is very uncommon. If you plan on making the switch, then it’s important to know if you have a supplier in your area to warrant making the switch. But if you have it near you, it’s better as an additive.

Conclusion

Kerosene was very popular in the early 1900s. However, it’s been outshone by heating oil and electric heat as the years have gone on. While it has a lower freeze point, it’s more dangerous to use due to its lower flash point compared to heating oil. Its scarcity also makes it harder to come by, which makes it difficult as a long-term heating solution.

However, it still finds its uses in colder environments such as Alaska, and it is used primarily as an ingredient in jet fuel. If you live in the northeast or somewhere with hot summers, it’s best to avoid using it as a source of heat. But, it’s completely safe to use as an additive! If you wish to make the switch, make sure that you have a local supplier that you’re able to order from!

Happy Heating

Hunter

Outdoor Smart Oil Gauge Installations

If you’ve been a long-time Smart Oil Gauge user, then you might know about our outdoor models. Using a Smart Oil Gauge on an outdoor tank is a little bit different from using it on an indoor tank installation. While the installation process is the same for both indoor and outdoor installations, there are still important things to know. Keep reading because I’ll be going over everything that you’ll need to know!

The Outdoor Model Smart Oil Gauge

Tanks that are located outdoors will often be exposed to the elements of fluctuating temperature and weather. For this, we have an outdoor model of Smart Oil Gauge. This only comes in the Duo. The duo has a stronger seal than the standard model, which makes it harder for moisture to get inside the device. But you’re probably wondering what makes it an outdoor unit. The outdoor model uses a special sealant that makes the device more suitable for outdoor use.

This is an example of an outdoor 275 gallon tank. They come in all shapes and sizes, but tend to look like this and have a similar layout.

If you plan on using the Smart Oil Gauge on an outdoor tank, you MUST buy the outdoor model. Especially with the standard model, its seal is not as strong as the outdoor duo. We’ve since discontinued the standard outdoor Smart Oil Gauges because the outdoor duo gauges are just that much more effective. But if you still have a standard outdoor model, then simply applying Teflon tape around those top threads will be much more beneficial and provide a better seal for the standard device. You can buy the outdoor model on our website here.

Underground Tanks

It’s important to understand that the gauge is not compatible with underground tanks. Notably, this is because the gauge sends its signal in a cone shape and not straight down. Most underground tanks have two pipes sticking out of the ground. Installing the Smart Oil Gauge on one of these pipes sounds good on paper. But, because of how the gauge sends the signal, this won’t work. The cone-shaped signal will bounce off the sides of the pipes, resulting in only full readings. These pipes that stick out of the ground are too far from the tank itself. So the Smart Oil Gauge will not be able to properly send the signal into the tank itself.

Condensation and Temperature-Related Spikes

When installing the gauge outside, you might sometimes get some moisture on the sensor itself. This is produced when the temperature outside fluctuates, causing the oil in the tank to warm up. When the oil starts to warm up, it’ll cause moisture to be produced and build up on the sensor. This will cause the sensor to have trouble sending out the ultrasonic signal properly. This happens semi-often, so it’s a good idea to check the bottom sensors for moisture at least once a month. This will help the gauge be able to read accurately.

The temperature outside can also play a major role in the readings that the Smart Oil Gauge provides! Most commonly on outdoor tanks, when the temperature reaches below 20 degrees Fahrenheit, the gauge might give a fill alert and a spike in reading. This is because long-term exposure to cold temperatures can cause electronics to not function as normal. This is not just for the Smart Oil Gauge, but most electronics that have long-term exposure to the cold will have performance issues. So, on outdoor tanks, be aware that during long-term cold temperatures, you’ll see spikes in level due to these cold temperatures.

This is an example of temperature related spikes. You can see that they shoot up to the maximum reading. This is often due to the cold outdoor temperatures.

However, if you live in an area where cold temperatures are the norm, such as Alaska, you might see yourself having a hard time with the readings. This is because in certain parts of Alaska, temperatures below 20 degrees are normal, especially during the winter. Those consistent cold temperatures might cause the gauge to not read properly.

Outdoor Tank Readings

Another thing with outdoor tanks is that their readings can be a little odd. This tends to be caused by the temperature outside. I mentioned in the previous section about the oil in the tank fluctuating due to the temperature. This also affects the readings. On outdoor tanks, you might notice the level will tend to fluctuate, and you’ll see what looks like a “wavy” effect on the graph. This won’t affect your overall usage data, but it can be a little off to see on your graph at first. Plus, if you have no idea what it is, then it can definitely cause some concern. But don’t stress! This is completely normal!

This is an example of what the waviness looks like on the tank graph. As mentioned above, this won’t affect your usage data.

Distance from the Router

Now, the Smart Oil Gauge needs to have a strong connection to the WIFI to be able to upload to the app. But on some outdoor tanks, the gauge can have trouble connecting and uploading. This is often due to the distance from the router. The farther the gauge is from the router, the harder time the gauge will have connecting to the WIFI. The home’s outer wall also dulls the WIFI signal, the farther it is from the router. If you have an outdoor Roth tank, sometimes the metal hood will make connecting to the WIFI a lot harder for the gauge. The steel cover adds another surface that the WIFI signal has to go through.

The best thing to do to ensure that the Smart Oil Gauge has a strong signal to the WIFI from outside is to have an access point as close to the gauge as possible. However, if the router or closest access point is a floor above or far away, your next best bet would be to get a WIFI range extender. You can get a good one on Amazon for $15. We recommend this extender in particular. It’s easy to set up and reliable.

Batteries on Outdoor Smart Oil Gauges

Like all models of Smart Oil Gauge, the batteries do need to be changed. However, it’s important to know that the batteries on outdoor units don’t always last as long. This is because the weather and temperature outside affect the battery life. This can often be because the batteries will need to be replaced more frequently. Due to the outside temperature and weather, the batteries will need to be changed roughly every 6-12 months on average. You can buy the required batteries on our website here.

Concluding Thoughts

The Smart Oil Gauge is an amazing tool to have on your outside heating oil tank! However, there are some minor differences compared to installing on an indoor tank. Outdoor installations are often more exposed to the elements and fluctuating temperatures. But, you’ll still be able to look at the gauge on your phone’s app just as you would with an indoor model! Those extra things that you needed to know are important for gauge functionality and being able to navigate the gauge on the app.

There are a couple of additional things that you need to know when you’re planning on installing the Smart Oil Gauge on an outdoor tank. They’re all listed in this blog post here, so if you ever need to come back to this and reread it or review it!

Happy Heating!

Hunter

What are the Different Types of Heating Methods?

In 2026, there are a lot of different heating systems that you can use to heat your home! Now that Spring’s here, it’s the perfect time to research heating systems! While some of these systems cannot be added to your home, you might have some of these already and just aren’t utilizing them! Otherwise, if you’re looking to move and are house hunting, here are some different heating systems to keep an eye out for!

Boiler Systems

These are the most common types of systems for homes in the United States. The only other form of heating that matches the popularity of a boiler system is a Furnace System. This is Hydronic Heat. When using Hydronic Heat, it’ll be through the use of liquid or gaseous water.

For a boiler to properly heat, the hot water and steam usually go from the boiler into the home using baseboard radiators. Your system will draw oil from the tank into the furnace. The furnace heats the water using the oil, which then gets sent into your home through the use of radiators.

This is a water boiler system. Steam systems tend to be more complex.

However, two types of boilers tend to exist. They are water and steam boilers. They function virtually the same. However, steam boilers will tend to run a bit hotter than water boilers. But on the flip side, they tend to be less reliable and efficient. They also tend to be much larger than water systems.

Like furnaces, boilers are designed with specific types of fuel in mind. For example, there are different types of boilers for heating oil, propane, and natural gas. You can interchange them, but it’s usually harder to change from one to the other. Natural gas furnaces are also typically more expensive than heating oil and propane furnaces.

Furnace Systems

Similar to boilers, these systems are some of the most popular systems to heat your home in the United States. But, Furnaces do have a couple of differences from Boiler Systems. The major difference is that a furnace will heat air and not water. Once the air heats, it pushes through the air ducts in the home. That then results in heat.

Due to furnaces heating with air, they’ll often have a flue pipe that pushes air through the chimney of your home. But, you should make sure that this flue pipe is cleaned annually when you have your system maintenance. Neglecting to clean it annually can become hazardous.

Newer furnace systems will often look like this. It’s very important that these are regularly maintained.

Furnace systems will often operate with the use of convection currents. The heated air will pass through the ducts in the many rooms of your home. Plus, there are also return ducts. These return ducts will draw cold air back into the furnace to go through the heating process again.

Heat Pump Systems

These are a bit more uncommon than Boilers and Furnaces. However, they are getting more and more popular! But unlike the above-mentioned systems, heat pumps don’t require a fuel to be able to heat the home. Heat pumps will pull air from outside and extract the heat from it. The pump will then push the air into your home. It functions similarly to air conditioning.

But the nice thing about heat pumps is that during the summer and spring months, you can actually use them as an air conditioner! When using it as an air conditioner, it does the opposite of what it does in the winter months. It’ll extract the cold air from outside and push it into your home, cooling the house!

This is an air source heat pump. You’ll see this type more often than ground source pumps.

Unlike most heating systems, where there’s only one functional style to it, heat pumps have two different styles to them. These are known as air-source and ground-source heat pumps. Air source systems will tend to sit outside as a single unit, while ground source systems will be a network of pipes underground. These units will tend to take hot air from the outside air. But ground source heat pumps will gather the hot air from underground.

Radiant Heating Systems

Unlike the previously mentioned methods of heating, radiant heating is more unique. Unlike being a system in the basement or garage, radiant heating is a network of pipes installed when the house is built. These pipes are typically installed under the floorboards and in the walls. However, this isn’t easy to implement or install into a pre-built home.

With the use of electricity, radiant heat systems will transmit heat from the floor using its system of pipes. Due to this, you’ll get the ability to “zone” how the system distributes the heat. This’ll allow you to set specific rooms to be warmer than others. This gives you the option to provide more heat to rooms in the house that tend to be colder.

You can see in the above picture that the system is being installed before the floorboards are put on.

While this is a fantastic way to heat the home, maintenance for these systems can be a little tricky. Having one of these systems serviced is very difficult! The complexity of the system itself makes it hard for the average HVAC technician to service the system. You’d need to get a specially certified technician to be able to service this particular system.

Solar Paneling

This is another form of heating that’s also growing in popularity. Solar panels will absorb the heat from the rays of the sun and transfer it directly into a space where it’s stored for use later. What’s interesting about solar panels is that if solar panels can produce enough heat to be stored, there’s a backup system that’s used to provide additional heat to the panels that they can’t normally produce.

Solar heating can also distribute the heat in a multitude of different ways. Radiant Flooring, air ducts, radiators, and hot water baseboards are all ways to distribute the heat around your home! While you don’t get to choose how it’s distributed, it is based on your current or previous systems.

This is an example of where you’ll find solar paneling. Usually it’s on the roof of your home.

But maintenance can vary based on a few different variables. The installation site, overall design, and installation all have an effect on maintenance. This is due to the fact that specific systems need to be maintained a certain way. Solar panel systems need to be properly maintained to avoid breaking down and ensure that the solar panels are working as they should be.

Wood-Burning Stoves & Fireplaces

Now these are a little bit more old-school. But they’re very useful, especially as a secondary heat source. These are typically installed in the home when it’s being built. They also tend to be installed either in the basement or the living room areas. They both run on burning wood.

Gathering wood for these can be either expensive or time-consuming. While you can tend to buy wood in locations such as gas stations, Lowes or Home Depot, you can also manually gather firewood. However, if you’re not in an area with a lot of forests, then gathering wood might not be an option for you.

Average fireplace will often look like this. The stone surrounding is designed to catch ash and char and prevent it from hitting the wood floor and starting a fire!

But wood-burning stoves and fireplaces will burn HOT and will be able to provide an ample amount of heat for your home. If you have cats or dogs, you might notice that they like to curl up by the fire often. My dogs sure love curling up by the warm fire during the winter!

What is the Best System to Use?

Which system is best is completely up to you! Depending on what you already have at home, it might limit your options. But based on reliability and maintenance, boiler and furnace systems are clearly the best. Most HVAC technicians will be able to service these systems without issue. These tend to be the most well-known systems out there in the United States.

But that doesn’t mean that radiant heat, solar paneling, heat pumps, or fireplaces aren’t reliable systems. I’ve had personal experiences with a wood-burning stove, and it’s great! It always keeps the house warm, especially when you stock up on wood during the summer! All of these systems are great and will effortlessly be able to heat your homes!

Happy Heating,

Hunter

Smart Oil Gauge: Battery Replacements

Replacing the batteries in your Smart Oil Gauge is important for its functionality. The Smart Oil Gauge requires two 3.6V SAFT LS14500 batteries. Most wireless devices need some sort of battery to power the device. However, unlike your cellphone and portable gaming consoles, the Smart Oil Gauge doesn’t have a rechargeable internal battery. These batteries in the Smart Oil Gauge need to be replaced semi-often. But it’ll ultimately depend on how often your gauge uploads.

When to Replace

The Smart Oil Gauge has four stages for the battery life. These are Excellent“, “Good“, “Fair” and “Poor“. You should start planning to replace them once they start reading “Fair” on the app. However, even with a reading of Fair, the gauge still can last a couple of months before they reach “Poor”. Once they reach poor, you’ll want to replace them. I would suggest ordering a replacement set around the time they read “Fair”, so you can put a replacement set in when they start reading “Poor”! We sell them on both our Smart Oil Gauge and FuelSnap websites.

This is what you’ll see on your app when you need to change batteries. Looks like the office tank needs new batteries!

However, even if they say “Poor,” you’ll still have a good couple of months on them before they die completely. That’s why it’s good to have an extra set on hand! This makes the whole process of replacing them much easier and seamless. The SAFT batteries also have a ten-year shelf life. So even buying an extra set to have on hand will be helpful as well, and you won’t have to worry about them going bad!

Battery Compatibility

As I mentioned previously, the Smart Oil Gauge uses SAFT LS14500 3.6V batteries. We do sell these on our website, but you can also get them at a local battery store if you have one nearby. We’ve had the most success with these batteries in particular. However, other brands such as EEMB and Elexjar don’t work as well and have caused issues for our users in the past. For that reason, I would avoid those batteries altogether.

These are the required SAFT batteries that the gauge uses.

It’s also very important to know that the gauge cannot use standard AA batteries from Duracell, Energizer, or Rayovac. This is because these batteries are only 1.5 volts and will not be able to power the unit, but will be able to power the LED light. So when the gauge stops uploading, and you try to troubleshoot this, you’ll tend to only get one flash, and the gauge won’t be able to enter any of the config modes.

How to Replace the Batteries

Replacing the batteries in the Smart Oil Gauge is easy. Think of it like replacing the batteries on a TV remote. For the standard model, all you have to do is slowly take out the battery box. Then, you’ll want to locate the three ridges and the battery warning sticker on the back. Once you’ve found those, you’re going to want to push down on the ridges and push forward. This will cause the battery box to slide open, and you’ll be able to take out the batteries in there and replace them with new ones. Then, after replacing the batteries, close up the battery box and turn the gauge back on. You’ll then see an updated reading on the app! If you want to watch video instructions on how to replace the batteries, you can check it out here.

But, on the Smart Oil Gauge Duo, it’s significantly easier. All you have to do to replace the batteries on the duo is to unscrew the cap and press the little battery top. It should pop right open, and you can swap out the old batteries with the new ones. Afterwards, simply put the batteries back in, close it up, and it’ll come online with a new, up-to-date reading!

The Battery Life

While this doesn’t always happen, sometimes it can take 24-48 hours for the battery life to update on the app. This is because when you change the batteries on the gauge, you’re changing them on the gauge itself. However, the gauge hasn’t connected to our servers to upload the information of the batteries changing. It does this every 24-48 hours. So sometimes it can take 24-48 hours for the battery life to completely update on the app. The batteries on indoor units will tend to last 1-3 years on average.

Now, the battery life can get a little bit funky on outdoor tanks. This is because the outside temperature can cause the battery life to fluctuate a lot on the app. If your tank is outside, then you’ll see that there’s going to be a little bit of battery level fluctuation. Due to this, you’ll see the batteries fluctuate between “Good”, “Excellent”, “Fair” & “Poor”. Now, don’t worry about them being bad. On outdoor tanks, this is normal due to the temperature outside. I suggest always having a set on hand in case the gauge stops uploading. If that’s the case, they might’ve died, and you’ll simply have to replace them. This also means that the batteries on outdoor devices won’t last as long. They’ll likely last anywhere from 6 months to a year.

Modifying the Gauge

The Smart Oil Gauge is designed to be completely wireless. We do not have plans to make a wired device at this time. DO NOT modify the gauge’s battery compartment in any shape or form. Not only does this void the warranty, but it can also damage the components of the Smart Oil Gauge. If you connect a wired AC adapter to the Smart Oil Gauge’s battery and plug it in, this puts the gauge at risk of short-circuiting during a power outage or a brownout.

Additionally, modifying the gauge in any way will make it harder to troubleshoot the device. In instances like this, if the internal components are modified, not only will it affect our troubleshooting procedures, but if the device is ever sent back to us for us to look at, we will not be able to work on it in our offices.

Conclusion

Replacing the batteries on the Smart Oil Gauge is simple to do! Replacing the batteries will only tend to take a couple of minutes to get your gauge back to normal! By following not only the instructions in this article, but also on our YouTube channel, you’ll be able to replace the batteries with no problem!

Plus, with the additional information I’ve given you on the batteries, not only will you know the nitty-gritty details about the batteries, but you’ll also be able to know what to do and what not to do when replacing the batteries!

Happy Heating!

Hunter