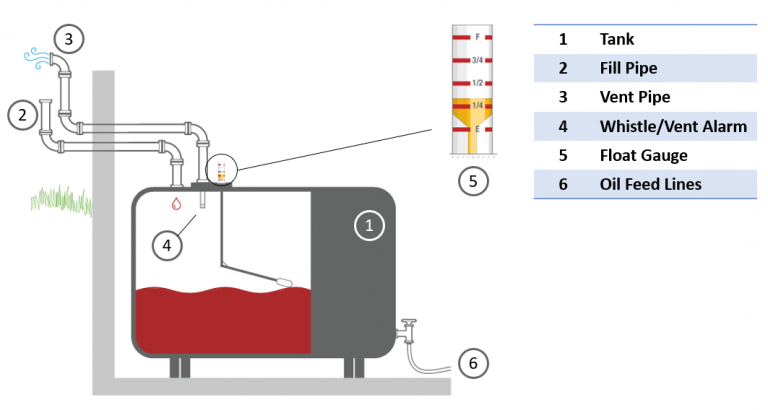
If you use heating oil as your source of home heating, then you’ll know that your heating oil tank comes equipped with a tank gauge. This is also known as a float gauge. It is a metal arm that comes equipped onto your tank with a little bobber at the end. This bobber will be able to give you a rough estimate as to how many gallons are in your tank. But over time, this bobber can get coated in sludge, and this can bog it down. This means that the gauge will be inaccurate as it gets older and coated in sludge. This also usually means that your tank’s float gauge will need to be replaced. In this article, I’ll be covering exactly how this is done and when you should replace it.
What will You Need to Do This?
Before I tell you what you need to do to replace your heating oil gauge, you should pickup the following items. These will make sure that your process is done swiftly and smoothly. To begin, you will need the following:
- Rubber Gloves
- A Pair of Old Clothes (Heating Oil is messy and smelly, wearing old clothes will ensure that you don’t ruin a pair of nice new clothes)
- A Trash Bag
- A Pipe Wrench that is 14″ or more. I recommend this one – Purchase It
- Pipe Dope or another form of thread sealant – Purchase It
- Liquid Wrench (This is Optional) – Purchase It
How Does a Float Gauge Work?
Understanding how a float gauge works is important so that you’ll know how much oil is in the tank. This will also help you get a better idea of what to expect when you’re replacing the gauge. At the bottom of the float gauge’s disc is a metal arm that will move up and down in the tank. This allows the bobber to sit at the top of the oil and gives it enough movement for the gauge to read. The gauge also has a cylinder with a colorful disc inside. The cylinder has little marks on it that help determine where the oil level approximately is. However, it’s important to note that float gauges are not 100% accurate because they do not accommodate for the curvature of the tank.
What Causes a Float Gauge to Break?
The biggest reason for a float gauge breaking is when it gets coated in sludge. This tends to bog down the bobber which can cause the bobber to read inaccurately. Additionally, the metal arm of the gauge can also bend and break. If the arm of the float gets caught on the side of the tank or sludge holds down the gauge, it can break. Due to this, you might have to frequently change out your float gauges. Which can be expensive in the long run.
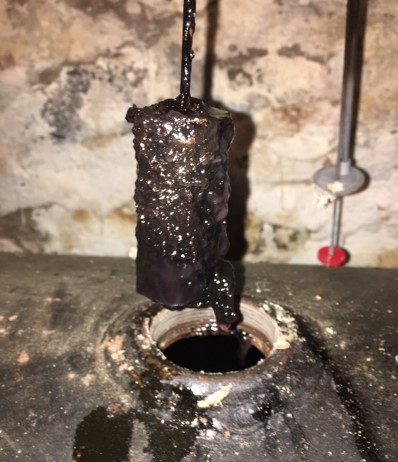
Additionally, over time the assembly of the float gauge can rotate. This is how the arm of the float gauge gets stuck on the sides of tank walls. When the float arm is stuck on the side of the tank, it can cause the bobber to get stuck and this can cause the gauge not to read what the tank’s level is.
Step 1: Loosening the Fitting
Before you go ahead and unthread the gauge from the assembly, you should loosen it up a bit. Start off by removing the gauge’s plastic vial on the top with your hands and remove it, revealing the disk. Then, you can put the pipe wrench on the gauge’s metal fitting. Now, you can begin turning. DO THIS VERY SLIGHTLY! If you turn it too hard, then the float will hit the side of the tank’s interior.
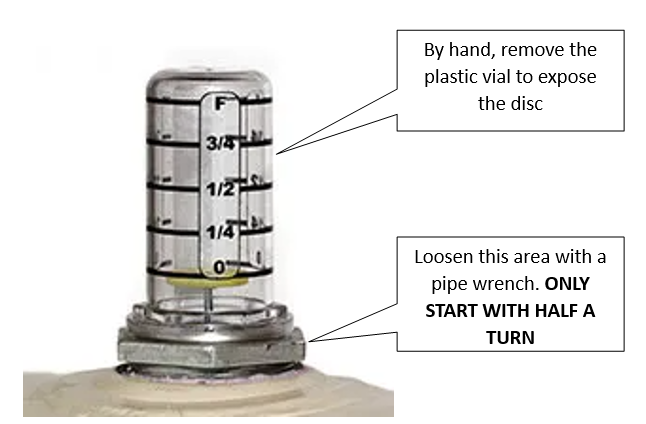
Important Note: If the fitting of the gauge isn’t moving, go ahead and soak it in penetrating oil for a couple hours or even a day or two. After a bit of waiting, the gauge should now come out of the fitting.
Step 2: Lifting the Disc and Completley Removing the Fitting
Once the fitting has been loosened, you’ll be able to start taking out the float gauge. You ideally should have someone help you with this process. But, it’s not a requirement to have someone help you do this, it just makes the process a lot easier. If you’re doing this alone, then continue to follow the steps below to get the float gauge out of your tank.
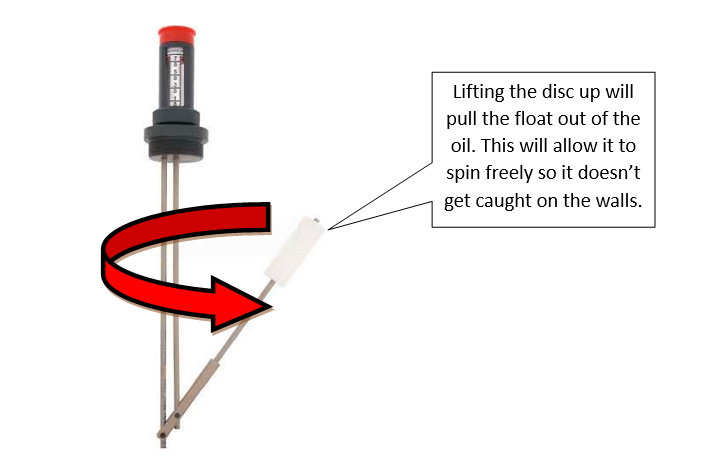
You’ll want to start by unscrewing or taking off the cylinder of the float gauge. Unscrewing this will allow you to pull up the disc and pull up the gauge out of the tank. Pulling the gauge out by the disc will pull the gauge out of the tank and make it easier to take it out without hitting the sides of the tank.
Step 3: Removing the Gauge’s Float Assembly
After loosening the gauge’s fitting, you can can remove the float assembly. Now, this is the messy part. So make sure you’ve got your gloves on and your trash bag handy! You’ll want to release the disc next. This will allow the gauge to settle back into the tank after dropping the disc. This will make it easier to get the gauge out of the tank.
Now that you’ve let go of the disc, you can pull the gauge out of the tank. However, be sure to have the garbage bag ready to put the old float gauge in. This will be messy and oil will come out of the tank. So after putting the gauge in the garbage bag, make sure you have your paper towels handy to wipe everything clean after taking the gauge out of the tank. Oil will spill out when you’re doing this. So be prepared!
Step 4: Install the New Gauge!
Now for the fun part, it’s time to install the new gauge! Weather you’re installing the Smart Oil Gauge or a new float gauge you’ll want to be sure to careful when you install it. But basically, you’ll be going through the process in reverse. But, before you do anything else you’re going to need to clean off the tank’s fitting. As per usual, you can use an old rag to clean off the fittings.
If you’re installing a new float gauge, then you’ll want to mark which direction you’d want to float gauge to go from the fitting. You can use a permanent marker or something similar to do that. You’ll also want to make sure that the float doesn’t hit the the sides of the tank because it’ll get caught and not be able to read properly. So you can always put the floats arm facing inward on the tank.
You’ll slowly want to lower the float into the tank until the tank’s fitting and the float gauges fitting connect. Then, you’ll gently want to lift up the new disc so that the arm lifts up in the tank so it’s not sitting in the oil. You’ll want to continue to slowly lift it up and tighten it until it’s snug. But it’s recommended that you do that slowly. After ensuring that the gauge is securely attached to the tank, you can reinstall the cylinder.
Installing the Smart Oil Gauge
Now, if you’re installing a Smart Oil Gauge instead of a float gauge the installation process is much simpler. All you have to do is put a thin layer of pipe dope onto the threads of the gauge. Don’t put a lot because that can cause the gauge to not read accurately if pipe dope gets on the sensor.
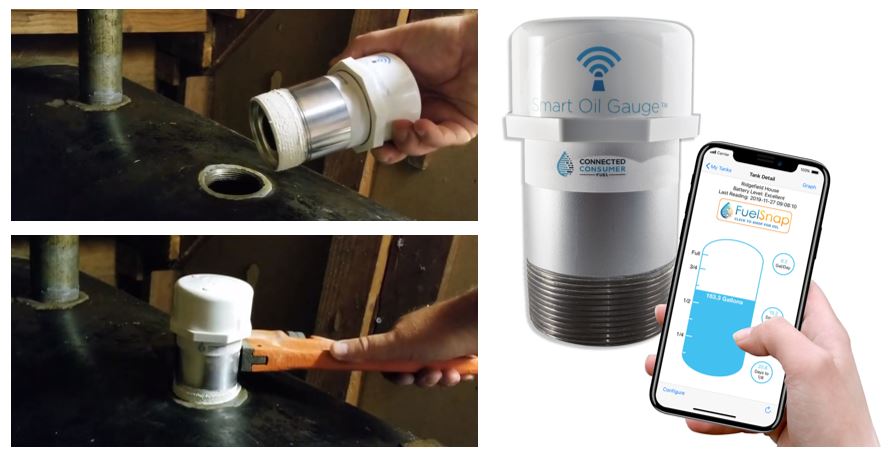
Now, if you find yourself unhappy with your current float gauge, then the Smart Oil Gauge is a great replacement option! There is no float arm that can get caught on the side of the tank and cause the gauge. The Smart Oil Gauge also uses an ultra sonic sensor that is able to determine how much oil is in the tank. Just make sure that your Smart Oil Gauge is configured for the right tank size!
The Smart Oil Gauge will be able to give you a breakdown of how much oil is in your tank and what your usage is. This will help you better understand what to do incase you run out of oil or you need to know what your usage is. You’ll be able to find out all of this through the purchase of a Smart Oil Gauge!
Closing Points
To ensure that your float gauge is reading properly, you’ll need to make sure that the float is properly installed into the tank and sits on the tank properly. This will ensure that the float’s bobber will be able to read the oil level properly.
But, if you wish to go with the Smart Oil Gauge as your new gauge, you won’t have to worry about a bobber getting stuck on the tank or the gauge being unable to read properly. As long as your Smart Oil Gauge is set up for the right tank size, the gauge will be accurate. The gauge will also be able to send you alerts from the app via notifications or emails. This way you can make sure that you’re not running out of oil!
Happy Heating,
Hunter

