Are you having trouble determining how many gallons of oil are in your tank? If you are, then it might time to replace your oil gauge. In this article, we’ll walk you through the process of replacing your tank’s float gauge. However, if this is not something you feel like doing yourself, then feel free to contact an HVAC technician to come out and replace it for you!
What do you need?
If you are capable and know your way around an oil tank, then replacing your gauge will not be too difficult! The following tools are required:
- Rubber Gloves
- Wear Old Clothes (Heating Oil smells! So be sure to not ruin your favorite pairs of clothes!)
- A wrench that is 14″ or bigger – Buy it here!
- Pipe Dope or Thread Sealant – Buy it here!
- Penetrating Oil/Liquid Wrench (This is OPTIONAL) – Buy it here!
How does your Float Gauge Work?
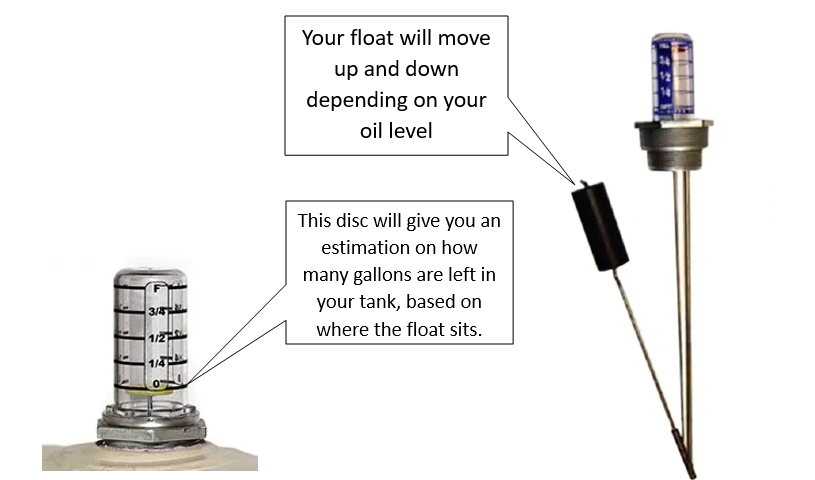
Before we start, it’s important to know how the float gauge works. This will help in the removal process, as well as knowing what to expect. Essentially, there is a long thing metal rod that attaches to the “float” (sometimes also an be a cork). The long metal rod is like an arm. The arm has a hinge that moves up and down with the float, depending on the tank’s oil level. On the top of the metal arm, sits the gauge. It is comprised of a little colored disc that’s housed in a plastic vial. The disc will move up and down with the float and give you an estimation as to how many gallons are in your tank.
How does a Float Gauge Break?
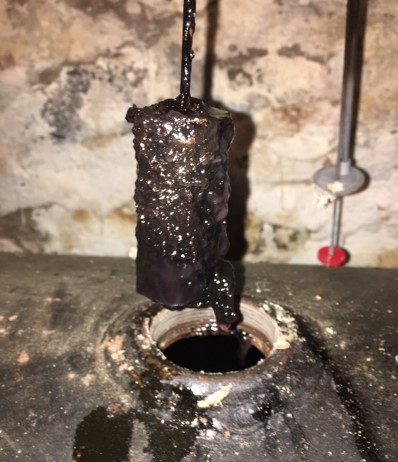
Unfortunately, you might have to replace your gauge more often then you’d like. There are a number of reasons for why they go bad so quickly. The most common reasoning for this is a build up of sludge on the bobber. There’s a photo below that will show you exactly what this looks like. The metal arm that the bobber sits on can also get bent over time. Sometimes if you push down on the disc of the float gauge, this metal hinge can break or bend.
Finally, over time the whole assembly of the gauge can rotate. This can cause the float to become stuck on the side of the tank’s wall. When this happens, the gauge is no longer able to move up or down and the gauge will be stuck. Replacing the gauge entirely is the best solution at that point.
Step 1: Loosen the Fitting
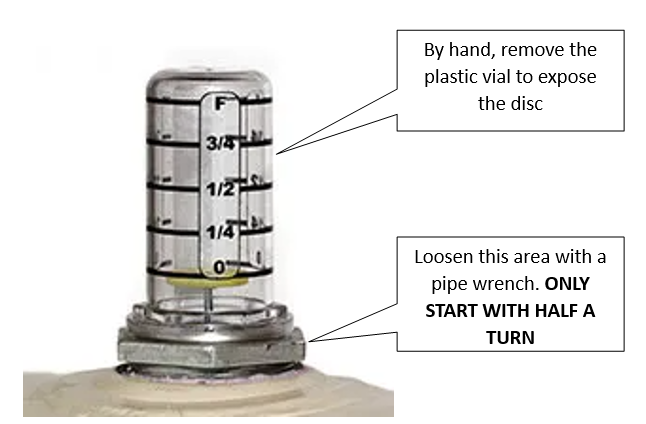
Before unthreading the float gauge’s assembly, you have to start off by loosening it. First, manually remove the plastic vial with your hands and uncover the disk. Secondly, put the pipe wrench on the gauge’s metal fitting . Then VERY SLIGHTLY loosen the fitting with your hands. DO NOT Loosen this more than half a turn because the float will hit the tank’s interior wall.
Pro Tip: If the fitting isn’t moving, you can soak it in penetrating oil (Liquid Wrench for Example) for several hours or days. After you waiting, you should be able to unscrew it faster.
Step 2: Pull Up the Disc and Loosen the Fitting Completely
Once you’ve loosened the fitting, you’ll need to use both hands to continue. Ideally, it would be best to have someone help you during this process. However, it is not a requirement and this can be a one person job. Simply just continue to follow the steps below if you are alone.
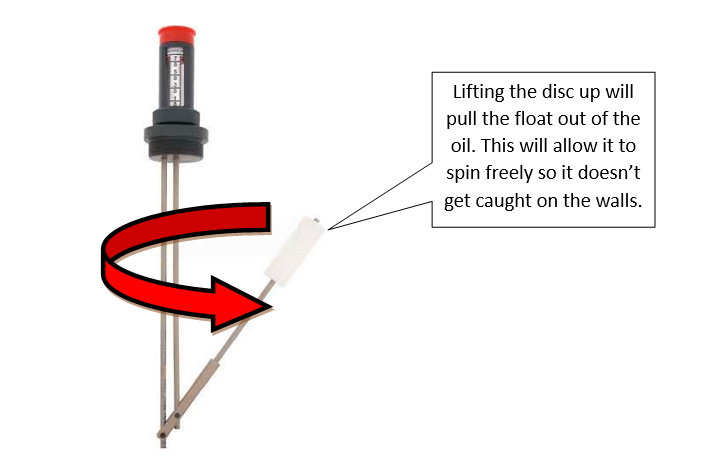
Pull the disc up as far as it can go. Doing so will lift up the float. This will allow you to rotate the gauge’s assembly. Lifting the assembly out will allow the assembly to rotate and move around, without smashing into the inside wall of the tank.
Step 3: Removing the Float Assembly
Once you’ve loosened the fitting completely, you can remove the float gauge’s assembly. This next step is messy, so be sure you have your garbage bag and paper towels ready!
Allow the float to settle back into the tank by releasing the disc. Slowly pull up the assembly out of the tank and the float will back down into the tank. This will let you take out the assembly from the tank. Immediately place the gauge and assembly into the garbage bag for disposal. Use the paper towels to wipe up any oil that spills out.
Step 4: Install your New Gauge
Whether you are replacing the old float with a new float or a smart oil gauge, we’ll have to go through this process again in reverse. However, we’ll first need to wipe the fitting on the top of the tank clean and apply some pipe dope to the new gauge.
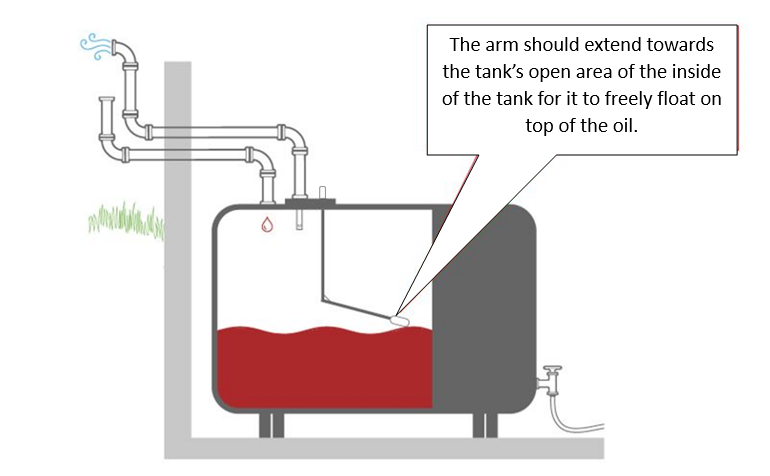
Mark the fitting of the tank to indicate which direction the arm should fall once the assembly is in the tank. Additionally, it is important to make sure that float doesn’t hit the inner wall. To prevent that, you can extend the float into the open area of the tank.
Slowly lower the float into the tank until the two fittings connect. Then, gently lift the disc up to lift the bobber out of the oil. After doing that, you can tighten the assembly as far as it can go.
Continue to slowly lift up the disc, and slowly tighten it until it’s snug. You can stop tightening when the arm is positioned properly in the tank. Once the gauge is securely attached to the tank, you can begin to secure the vial into place and you should be all set!
The Smart Oil Gauge
If you are unsatisfied with your manual float gauge, then the smart oil gauge is a fantastic replacement! It’s super simple to install and can read your tank’s level wirelessly with it’s ultrasonic sensor. The smart oil gauge will send a signal down to the oil level and then back up to the gauge! Then, based on what type of tank your gauge is configured to, it will tell you the reading of how many gallons are in the tank!
You can even use the smart oil gauge alongside the float gauge if you’d like the best of both worlds! You’ll easily be able to thread it onto an extra fitting on the top of your tank. All you have to is apply a thin layer of pipe dope onto the gauge’s threads and tighten it into the tank with a pipe wrench! If you have the smart oil gauge app downloaded onto your phone, then you’ll be able to check your level and readings from wherever you are! You can check out this video here if you need help installing the smart oil gauge!

Conclusion
To read your new float gauge, simply just monitor where the disc rests inside the plastic vial. Doing so will allow you to monitor your oil level. However, be aware that overtime you will have to replace the gauge again.
If you decide to go with a smart oil gauge as your new gauge, then you just have to simply ensure that you configure it under the right tank size. Additionally, make sure that you’ve set up your alerts so that you are notified when you need a fill! That way you can stay on top of your oil level and ensure that you’re not running out on oil anytime soon!
Be sure to check on our FuelSnap website for the most up to date and lowest prices for heating oil in your area! This will make sure that you are getting the best deal on heating oil!
Happy Heating,
Hunter

