Is it hard to tell how much heating oil is in your oil tank? If so, it may be time to replace your oil tank gauge. In this post we’ll walk you through the process of replacing your home heating oil gauge. If you are not handy, or are having any trouble with this process whatsoever, you should definitely contact your oil or HVAC company for this!
Tools Required to Replace Your Oil Tank Gauge
If you’re handy, replacing the gauge on your heating oil tank is not too difficult. The tools required are:
- Rubber gloves (remember, heating oil stinks, so make sure to wear old clothes too!)
- Garbage bag
- 14″ pipe wrench (or bigger) – get it here
- Pipe dope / thread sealant – get it here
- Penetrating Oil (e.g. Liquid Wrench) – OPTIONAL – get it here
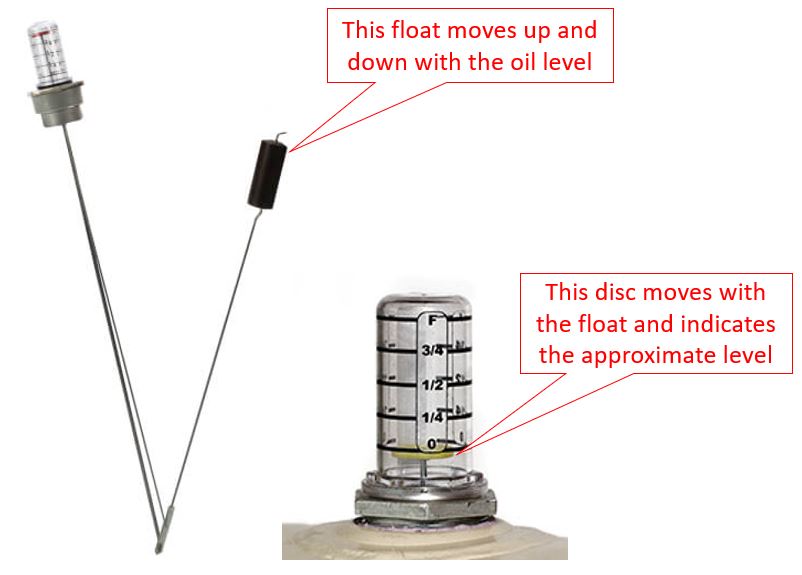
How Your Float Gauge Works
Before we begin, it is important to understand how a float gauge works. This will aid in removing it so you know what to expect. In a nut shell, there is a floating piece (the ‘float’) – sometimes cork, but more recently plastic – that sits atop the oil. This float sits at the end of a hinged arm. At the other end of the hinged arm is a plastic disc that moves up and down with the float. The disc is housed behind a plastic vial that can be removed by hand. The disc and vial provide a rough indication of the oil level in the fuel oil tank.
What Causes a Broken Float Gauge
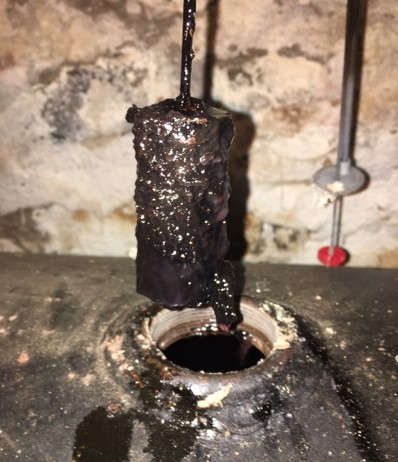
Oil tank float gauges are notorious for going bad. They can go bad for a number of reasons. Most often, the float builds up sludge and no longer floats properly as shown below. Also, the thin piece of metal that connects the hinged arm to the disc can be bent. If you’ve ever removed the plastic vial and pushed down on this disc to see if the float gauge was still working, you could have bent the metal in the arm.
Finally, the whole assembly can rotate inside the tank over time, causing the float to get wedged against the inside wall of the tank. When this happens, it will no longer move up or down. Replacing your heating oil tank gauge is the next step at that point.
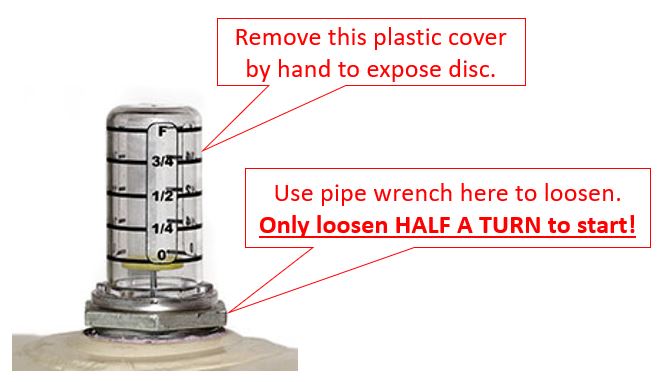
Step 1: Loosen Fitting
Before you can unthread the float gauge assembly, you must begin by loosening it only. First, remove the plastic vial by hand to expose the disc. Second, position the pipe wrench on the metal fitting that threads into the tank. Use both hands and loosen the fitting ONLY SLIGHTLY! You cannot loosen this more than half a turn yet because the float will hit the inside wall of the tank.
Pro Tip: If you cannot loosen the fitting easily, soak it in a penetrating oil such as Liquid Wrench for several hours or up to a couple of days.
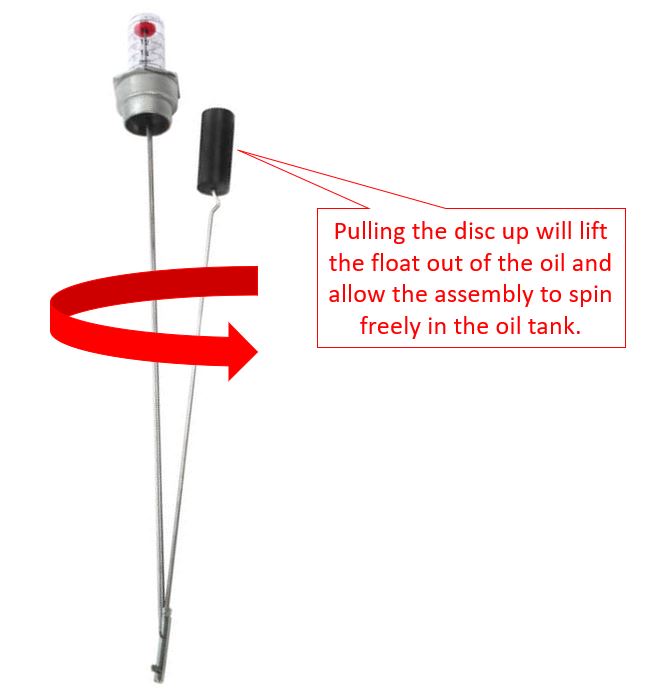
Step 2: Pull Disc Up and Loosen Fitting Completely
Now that the fitting is loose, you will need to use two hands to continue. If you have someone helping you this would be ideal. If not, no big deal – just continue these steps below.
Pull up the disc as far as it will go. This will lift the float out of the oil (see below) and allow you to rotate the assembly. By lifting the float out, the assembly can rotate without the arm crashing into the inside of the tank.
Step 3: Remove the Float Assembly
Once the fitting is completely loose, you can remove the float assembly. Get your paper towels and garbage bag ready for this step!
Release the disc to allow the float to settle back in the tank. Slowly raise the assembly out and allow the float to fall while doing so. This will allow you to remove the whole assembly from the tank. Use the paper towels to catch any dripping oil, and place the whole assembly in the garbage bag immediately.
Step 4: Install Your New Float Gauge
To install a new float gauge, you’ll want to essentially reverse these steps. Begin by cleaning the fitting on the tank, and applying pipe dope to the threads of the new float gauge assembly.
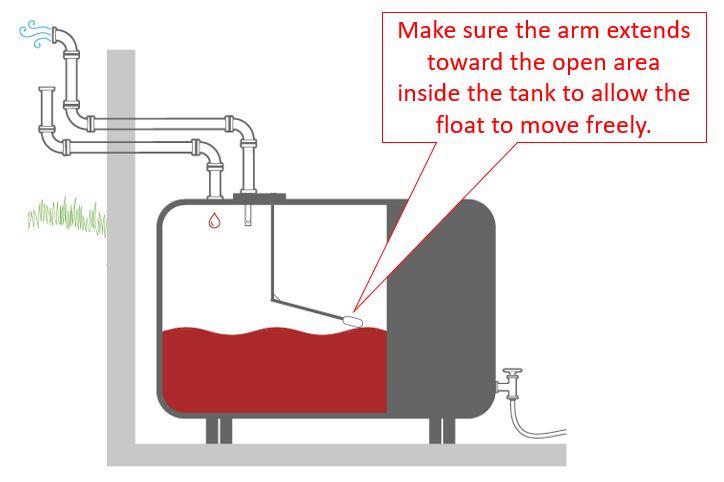
Use a marker on the fitting to indicate the direction that the arm should fall once the assembly is on the tank. You will need to insure that the float can extend into the open area of the tank so the float does not hit the inner wall.
Gently lower the float into the tank until the fitting mates with the tank. Gently lift the disc to raise the float out of the oil, and hand tighten the assembly as far as you can.
Keep lifting the disc up, and tighten with a pipe wrench until snug. Make sure to stop tightening when the arm is oriented properly in the tank. Once tight, hand-tighten the plastic vial in place and you are good to go!
Alternative To A Float Gauge
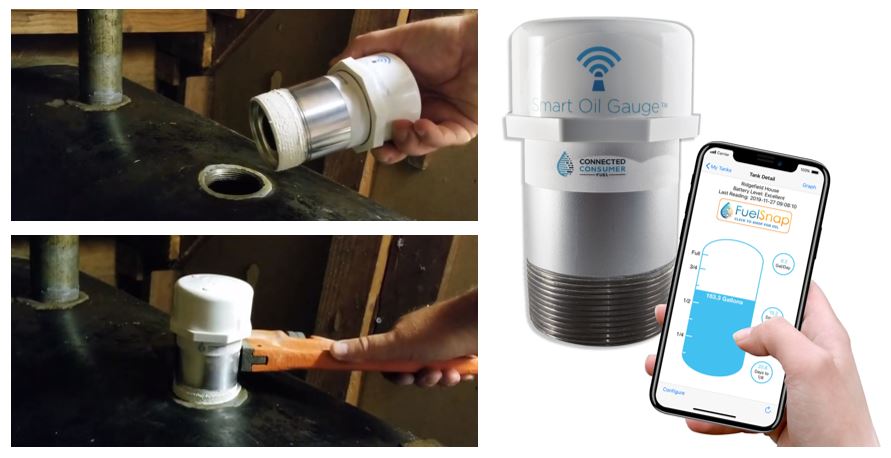
If you’re unhappy with your heating oil float gauge, or are tired of replacing it over the years, there are better alternatives available. You can consider a Smart Oil Gauge, for instance. The Smart Oil Gauge uses an ultrasonic sensor to detect the level. As such, it is never directly touching the heating oil. This keeps it from getting sludge buildup on it.
The Smart Oil Gauge gets threaded into an extra opening on your tank, and can even be used in addition to a traditional float gauge. Installing a Smart Oil Gauge is much more straightforward as well. Simply apply pipe dope to the threads, and tighten it in with a pipe wrench. Download the app on your phone to connect the device to WiFi beforehand, and then start monitoring your usage remotely. Check out this great installation video if you would like to install a Smart Oil Gauge.
Reading Your New Oil Tank Gauge
For some helpful insights into your new float gauge, read our post here on how to read an oil tank gauge. If you went with the Smart Oil Gauge, just make sure you configure it for the proper tank size, and set up your alerts in the app as well. The Smart Oil Gauge can send text and email alerts when the tank is low. This way you will never be caught off guard and run out of heating oil again!
Hopefully this illustrates how to replace your heating oil tank gauge. Remember to check FuelSnap when your tank is low to make sure you’re getting the best deal on home heating oil!
Happy heating,
Steve

