With the Smart Oil Gauge, it’s important to have a stable internet connection. But sometimes you’ll need to change your router, password, or SSID for your network. In this case, you’ll need to update the credentials. This is to ensure that the gauge can continue to upload to our servers so you can get your readings. In this article, I’ll cover the most popular and effective way to reconnect your gauge to the WIFI!
When You Would Need to Update the Gauge’s Credentials
Updating the Smart Oil Gauge’s WIFI credentials isn’t something that you would need to do very often. You’ll only ever need to do this if you have made a change to your WIFI network. This can include something as simple as an SSID change or even a password change. More often than not, you’ll need to do this if you’ve changed your WIFI router recently.
Changing your WIFI router is something that you should do every couple of years. It is also the most common reason for needing to update the WIFI credentials on the Smart Oil Gauge.
Method 1: Smart Update
The most common method in reconnecting your gauge to the WIFI is through the Smart Oil Gauge App. There is an option in the “Tools” screen that says “Reconnect WIFI”. From here, you will simply just need to follow the steps on reconnecting the Smart Oil Gauge to the WIFI.
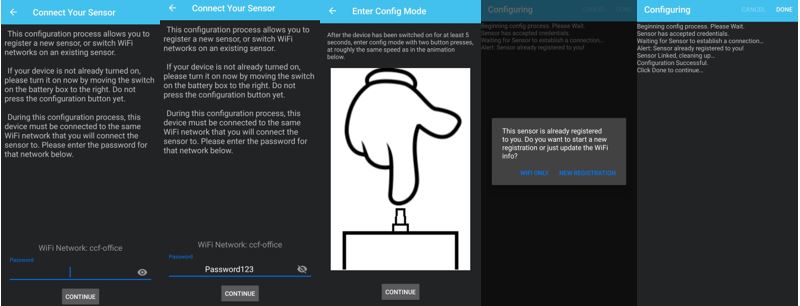
When using the in-app update process, it’s important to be on the same network that you wish to connect the gauge to. It’s important to know that your network MUST be 2.4 GHz only. If it isn’t, you’ll have to go through the alternate process.
Once you’ve typed in your WIFI password, hit continue and make sure you press the tall & thin black button twice. This will cause the gauge to enter the Smart Config/Update mode. The hit continues and the gauge will start updating the credentials. You might get an alert that says “This Sensor was already registered”. If you do get this alert, select “WIFI only”. Your gauge should then complete the update process and reconnect to your WIFI!
Method 2: Alternate Update
If you cannot reconnect the Smart Oil Gauge using the in-app method, then going through the alternate method is probably the best way to reconnect the gauge to your WIFI. Unlike the in-app process, you’ll need to go into your WIFI settings.
First, you’ll need to press and hold the tall thin black button on the top right of the Smart Oil Gauge, once for two seconds. You can usually trigger this by counting “one-one thousand, two-one thousand” while holding the button, before letting go.
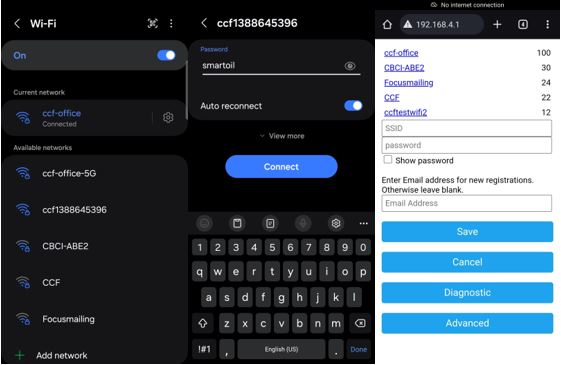
After you’ve held the button down once for two seconds, you’ll see in your WIFI settings a network that says “CCF######”. As you can see in the above photos, in my phone’s WIFI settings, I can see that the CCF network shows up under my “Available Networks”. Once I select the network, if this is the first time I’m joining it, I will need to type in the “smartoil” password to connect to it.
Now, if you’re on Android when doing this, then it will say “Connected without internet” when you successfully connect to the CCF network. If you are on Android, it may or may not take you to the login screen right away. If it doesn’t, you’ll need to go to your web browser (Google Chrome, Firefox, etc) and type in an IP address. That address is 192.168.4.1, and after typing it in, you’ll be brought to the login screen.
Once you’ve made it to the login screen, on the top right or in the center, you’ll see your WIFI network listed there in purple. Tap on your WIFI network and it should auto-fill the SSID box. Once you’ve done that, it will then prompt you to type in your network password. Type it in and leave the email address blank, before hitting the save button. Your gauge should then reconnect to the WIFI.
Method 3: WPS Update
The final method that I recommend is the WPS method. This will only work if your router has a WPS button. When going through this process, I recommend bringing the gauge up to the router if possible. It makes the whole process a lot easier. The first thing that you’ll need to do is go over to your router and check for a WPS button. Usually, this button will look like either a globe, two arrows chasing each other, a lock, or simply might just say WPS on it. Once you’ve located the WPS button, press it and the router should start flashing.
Once you’ve pressed the WPS button, press and hold on to the tall-thin black button once for three seconds (It’s best to count one-one thousand, two-one thousand, three-one thousand, before letting go). If all goes correctly, then the gauge should start flashing three times every second and should automatically make a connection to the WIFI.
Conclusion
If you’ve made any changes to your WIFI network, then going through these processes will help get the gauge back online. They are all pretty simple and easy to follow, so getting the gauge online using these methods, shouldn’t be an issue!
However, if you’ve tried all of these methods and still cannot get the gauge online again, please feel free to contact our tech support team! We are always happy to help troubleshoot your device! You can reach us at 203-456-1499 option 3, Monday through Friday from 8 am-5 pm EST.
Happy Heating,
Hunter

