
Getting your Smart Oil Gauge set up is very important for its functionality. Without ensuring that the Smart Oil Gauge connects to your internet properly, you might not get any sort of readings or uploads shown in the app. There are a couple of ways to connect your gauge to the WIFI. However, which process you’d prefer to do might depend on your preference or which one you find easier. I’ll be going through each of those processes here and how to do them!
The App Process
Our process on the app is very in-depth and takes you through the steps of getting the gauge set up. But before starting this process, you must have your WIFI password handy, as well as physical access to the gauge. Doing this will make this process a whole lot smoother. From here, you’ll select your sensor. This is where you choose between the standard Smart Oil Gauge or the Smart Oil Gauge Duo. After choosing your device, switch off the sensor. This is so that we can ensure we start from the beginning. Once the gauge has been turned off, go ahead and switch it back on, and the gauge will flash once. If it didn’t, press “No, it didn’t flash.” There will be options for troubleshooting the gauge from here. But if it did flash, type in your password after selecting “Yes, it flashed”.
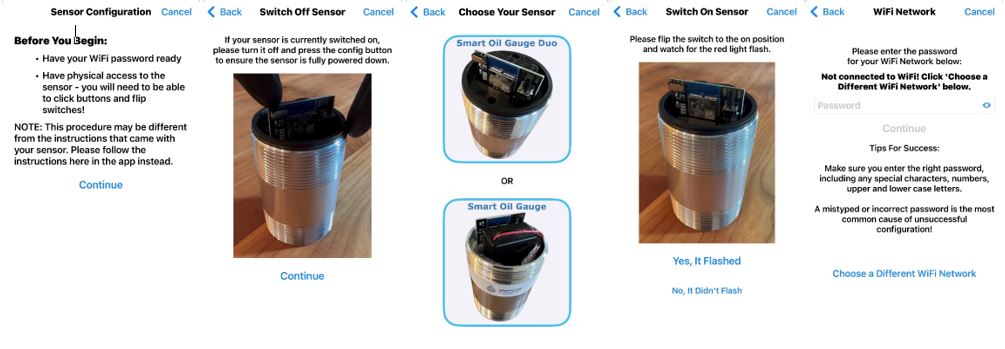
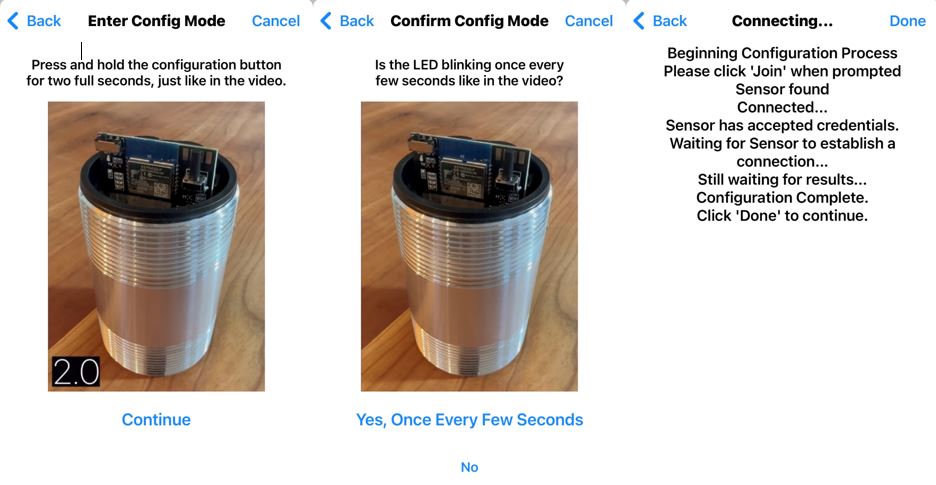
After that, you’ll type in your WIFI network password for the network your phone is currently connected to. Once you’ve typed in your password, hit “continue,” and then you’ll put the gauge into config mode. Doing so requires you to press the button on the top right once for two seconds (counting one-one thousand, two-thousand), and the light should start blinking once per second. Your phone will see the CCF network pop up. Tap it so the gauge and your app can make a connection! The gauge should now be online! If not, check your WIFI password and then try again!
After you’ve successfully gone through the app process, you’ll answer various questions about your tank’s size, location, and much more. This will help set up your gauge for the proper setup and tank sizes.
The Alternate Process
This process takes you through your phone’s WIFI settings, rather than the app. It’s easy to understand and straightforward. It requires you to go to your phone’s WIFI settings rather than the app. For example, on IOS devices, simply click on Settings and then WIFI. This will bring you to your WIFI settings. However, on Android, this is a little different. You’ll need to go to “Settings” and then select “Connections”, then select Wi-Fi, and you’ll be in your WIFI settings.
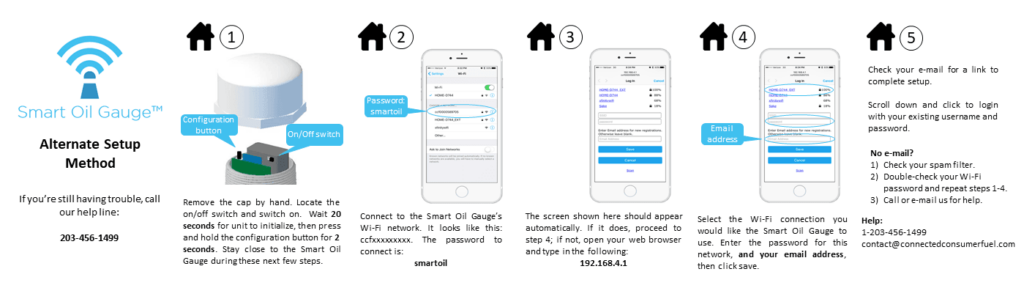
Once in your WIFI settings, you can start the process of getting the gauge set up. Like the app process, you’ll want to press and hold the button on the gauge for a full two seconds (counting one-one thousand, two-one thousand, then letting go). The gauge should start blinking once every second. If it does, you’ll see a network showing up in your WIFI settings that says “CCF########”. The number that follows the CCF network is the gauge’s serial number. You’ll want to join that network by typing in “smartoil”. If you’re on an IOS device, you should immediately be brought to a screen that says “Captive WIFI”. On Android devices, you might get a prompt with an option that says “Connect only this time”. After connecting to the CCF network, go to your preferred web browser and type in the following IP address to get to this screen: (192.168.4.1).
Once on the login screen, you’ll see your WIFI network listed there in blue. Select it, and then you can type in your WIFI password. From there, type in your WIFI password and fill in your email address. You’ll then see a prompt that says “WIFI Configuration Complete”. You should receive an email shortly after requesting that you finish up the setup process.
WPS Config Mode
The WPS config mode is a specific config mode that will provide a secure connection between the Smart Oil Gauge and the router. However, this process can only be done if your router has a WPS button. Usually, this button will look like either a lock, a globe, or even just say “WPS” on it. Typically, this button is on the back of the router. But sometimes, the button is on the front of the router. Once you press this button, you’ll see the router start flashing. From here, you’ll want to press and hold the button on the top right of the gauge for three seconds. This will cause the gauge to start blinking three times a second, and it should be able to connect to the router.
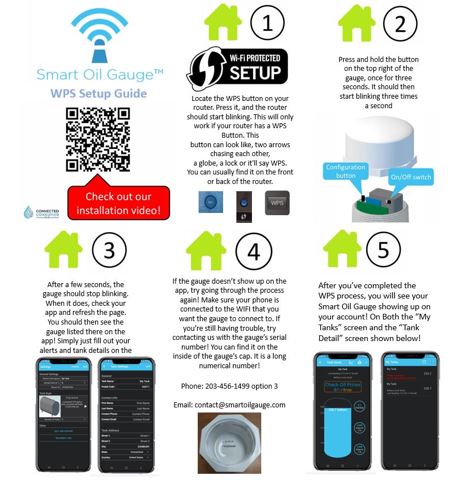
If the Smart Oil Gauge was successful in connecting, then you should be able to go onto the app, refresh the page, and the gauge should show up! From there, you’ll have to go through the tank settings and sensor settings to get the gauge set up for the correct tank size and any other adjustments you’d like to make. To do this, select “My Tank” and then click on the three dots on the top right and configure (Android) or the gear on the bottom left (IOS). You’ll then see a “Tools” screen, where you’ll be able to select and adjust those settings.
Smart WIFI Mode
Now, this process is more of a setting that should be enabled on the Smart Oil Gauge. Specifically, if the network you’re using is both 2.4ghz and 5ghz. On a lot of routers nowadays, there is a setting enabled by default called “Smart WIFI”. Essentially, this is a setting on the router that moves devices from 2.4ghz to 5ghz and vice versa to improve performance. This setting is very useful, especially for high-performance tasks such as gaming and streaming.
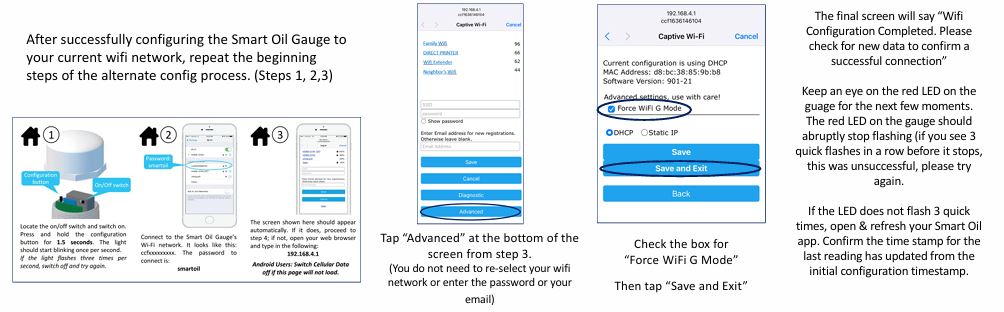
However, the Smart Oil Gauge is not compatible with 5ghz. So when the router moves the gauge to 5ghz from 2.4ghz, the Smart Oil Gauge is going to disconnect. If your network supports both frequencies, I would strongly recommend going through this process to enable this setting. This will help your gauge stay connected and upload reliably.
Trying them All
If you’re having trouble going through one of these processes, it’s always a good idea to try going through one of the others! The app process for the Smart Oil Gauge is the most popular one! However, if you’re having trouble going through the app process, then I would suggest trying either the Alternate or WPS processes! These processes will be able to provide another way to try to get the gauge online and set up!
The Smart WIFI Method is only a process to enable the “Force WIFI G” setting on the Smart Oil Gauge. Its steps are similar to those of the alternate process, just a little bit different towards the end. However, please know that this process cannot be done through the app and must be done through your WIFI settings!
All these processes are meant to make the setup for your Smart Oil Gauge much easier! However, I understand that they still might be confusing! So if you’re confused at all during the setup, or still don’t know what to do after reading this article, our support team is happy to help! You can contact our support team from 8 am-5 pm EST, Monday through Friday, at 203-456-1499 option 3. You can also shoot us an email at contact@smartoilgauge.com or support@smartoilgauge.com, and a member of our team will respond as soon as possible!
Happy Heating,
Hunter