It is both a good and common practice to regularly inspect your oil tank. You should do this every few months, but you should get a tank inspection at least once a year. Most oil dealers will actually require a tank inspection prior to the fill. The inspection will only take a few minutes to do. But if you wish to inspect the tank yourself, then there a few crucial things to know.
Inspecting Above Ground Tanks
There are still many home owners who use in-ground heating. However, above ground heating oil tanks are the more popular of the two. It’s important to know that that above ground oil tanks are a bit easier to maintain and service. The same is true for a tank inspection.
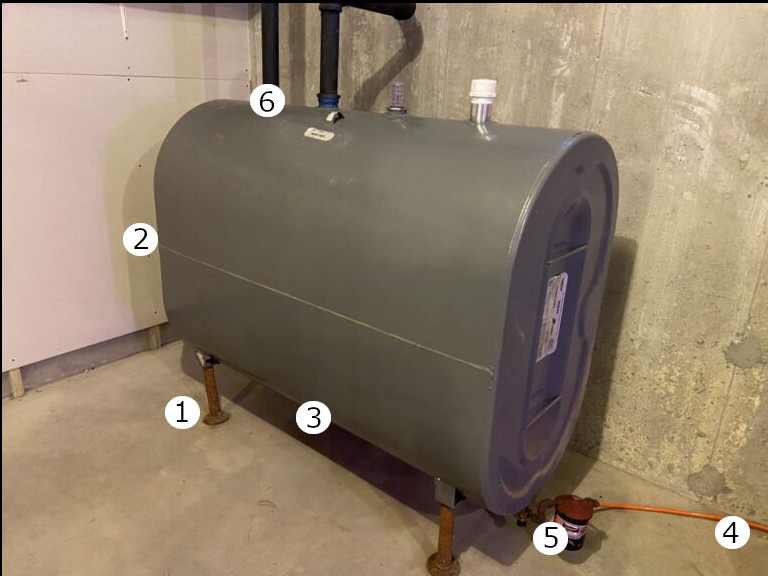
Heating Oil tanks commonly come in the size of 275 gallons. They are typically in the shape of an oval. Additionally, they are the most common form of heating in the Northeast United States. Below, you’ll see what a standard tank looks like. Additionally, please be sure to keep this photo as reference. It will be a helpful tool in the inspection of your tank.
Step 1: Inspect the Base and Footing of your Oil Tank
The first thing to do when you inspect your tank is to ensure the floor beneath your tank is sturdy. This is vital because over time the ground beneath your tank can settle which will cause problems in the future. Next, you must inspect all four of your tank’s legs. You must make sure that they are rust free. This is important because a full 275 gallon tank weighs up to Two Thousands pounds. That’s about the size of a small car!
On an Outdoor tank, inspecting the base and footing of the tank is significantly more important. Your outdoor oil tank needs to be sitting on a single concrete slab. Having each leg on a separate cinderblock or even on the grass of your yard. If that is the case, it is important that you change the ASAP. That offers uneven weight distribution causing the ground underneath to sink. Sometimes the tank legs will create a hole that could cause your tank to fall over. Uneven cinderblock distribution can even effect the tank’s level by making it uneven. Even worse, the tank could fall over and spill.
Step 2: Check for Rust Free Seams
The sides of your oil tank are welded together. There is potential for deformities in the welded area. The seams should be regularly inspected for rust to ensure that this doesn’t happen. Once rust begins to appear around the seams, oil will slowly begin to leak out of your. Sometimes, the tank can even rupture if the leak has been there for a long period of time. It is vital to make sure that there are no signs of leakage on or around the tank’s seams.
Step 3: Make Sure the Bottom of the Tank isn’t Leaking
Similar to the rusting seams, the bottom of your tank tends to have a higher chance of exposure to corrosion. This is due to specific heating oil blends being hygroscopic. That means that they are more susceptible to absorbing water. Water in your tank will lead to corrosion on the interior. That will then cause small holes to form alongside the bottom of the tank. This is what will cause your tank to slowly leak onto the floor. This will then cause even more damage to the tank. Be sure to keep an eye on the fitting where the oil tank comes out. It is important because you want to make sure that it is secure and not leaking out onto the floor.
Step 4: Check the Oil Line for Leaks
Believe it or not, the oil line is capable of leaking as well. This is usually more common on older tanks which is why modern tank oil lines are made from copper that have a plastic coating that provide the lines with additional reinforcement. It is important to check your line for any sort of leaks or cuts on the line itself. Check to make sure you check the entire line and follow it all the way to your oil burner (furnace or boiler). Although it is rare to have the lines themselves leak, it is still something that should be aware of and keep an eye out for.
Step 5: Check your Oil Filter for Leaks
Your heating oil will pass through an Oil Filter on it’s way through to the oil tank. The filter is usually found close to the oil tank and feed lines. However, sometimes you can usually find it by the burner. Filters usually get replacements fairly often and it is quite important to make sure that there are no leaks by the filter for when your oil makes it’s way to your burner. Checking your tank’s filter regularly is important to ensure that there are no hidden leaks that pose a threat to your tank in the future.
Step 6: Inspect the Top of your Tank for Leaks
Leaks on the top of your tank are not as important compared to those in other locations of your tank. However, it is still a good idea to make sure that you are aware of them and take care of them ASAP. Additionally, if you’re seeing any oil on the top of your tank, then your tank has been overfilled. It is important to keep an eye on your tank to see if it is being overfilled.
Overfilling a tank will have major consequences for not just the tank, but for your basement. In the scenario of an overfill, oil will spill out onto the floor of your basement. This could cause damage to the flooring and the tanks legs to rust. If your tank is outside and experiences an overfill, it will make it’s way into the soil of the ground. This can damage the environment and can be incredibly hazardous.
Inspect your Tank’s Whistle/Vent Alarm:
This a crucially important step in the process of your tank inspection. Your tank’s vent alarm is a very important part of your tank. The whistle makes a high pitched sound that indicates the tank is filling up. It lets the driver know when to stop filling the tank. Typically when the oil reaches 7 or inches from the top of the tank, it will stop whistling. This will then inform the driver to stop filling the tank. However, it is very important that we are aware that the tank’s whistle is working properly.
If the tank’s whistle isn’t working properly, it could cause your tank to overfill which will cause damage to your tank’s environment. Most dealers will not fill the tank at all if there isn’t a working vent alarm. They will then advise you to fix the whistle and they will come back at a different time to fill your tank.
Conclusion
It is crucial and important that you stay on top of your oil tank maintenance. A frequent tank inspection will keep you ahead of the game. Even if you aren’t the one looking it over, it is important to be aware of what to look out for to prevent leaks in the future. If you notice that your tank is starting to show some wear and tear, then we recommend replacing it. If you’re considering getting a replacement tank, take a look at these articles. We go over the pros and cons of both Granby Tanks Vs Roth Tanks and Heating Oil vs Heat Pumps. Oil tanks can last up to 30 years but having a leak in your tank can be catastrophic! If you follow the steps in this article, you won’t be awake at night wondering if your tank is leaking or not!
Additionally, the Smart Oil Gauge is a great tool to have to be able to monitor how many gallons of oil are within your tank at any given time! Using it will help you keep track of any dips or spikes in oil level and can even clue you in on a possible leak, if you’re burning an excess amount of oil.
Happy Heating!
Hunter

