If you’re an avid reader of our blogs, then you’ve definitely heard me talk about ordering oil from our FuelSnap website. I typically recommend doing this because our platform allows you to shop around and look at pricing for local dealers in your area. But I’ve rarely shown how this works or what to do. In today’s blog post, I’ll be going over exactly what you have to do!
Step 1: Entering your Zip Code
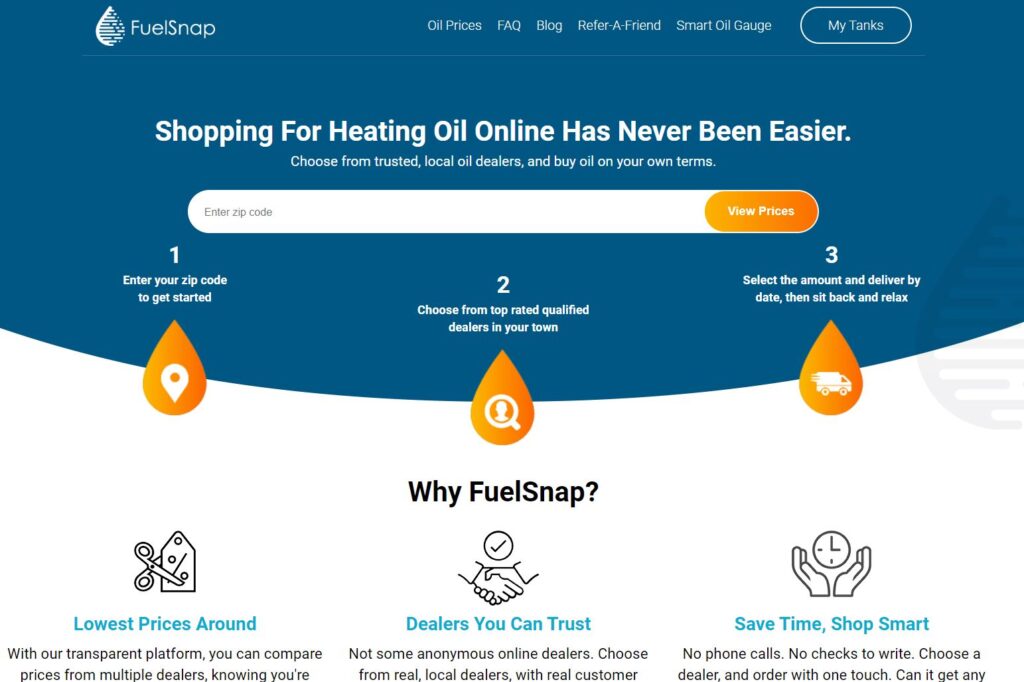
The very first thing that you should do when ordering oil on our website, is enter your zip code. Doing this will ensure that you’re seeing the dealers in your area. This also helps you get an idea of your area’s pricings, and how much you’re going to want to spend.
This is the front screen for our FuelSnap Website. Here is where the process of placing an order will begin.
The zip code that you type in should be the zip code for the delivery address. Say for example you have multiple properties, one being in a different state. If that’s the case, make sure that you put in the zip code of the desired delivery address in that zip code bar. This zip code also determines which dealers can deliver to that address.
Step 2: Choose your Dealer and Delivery Amount
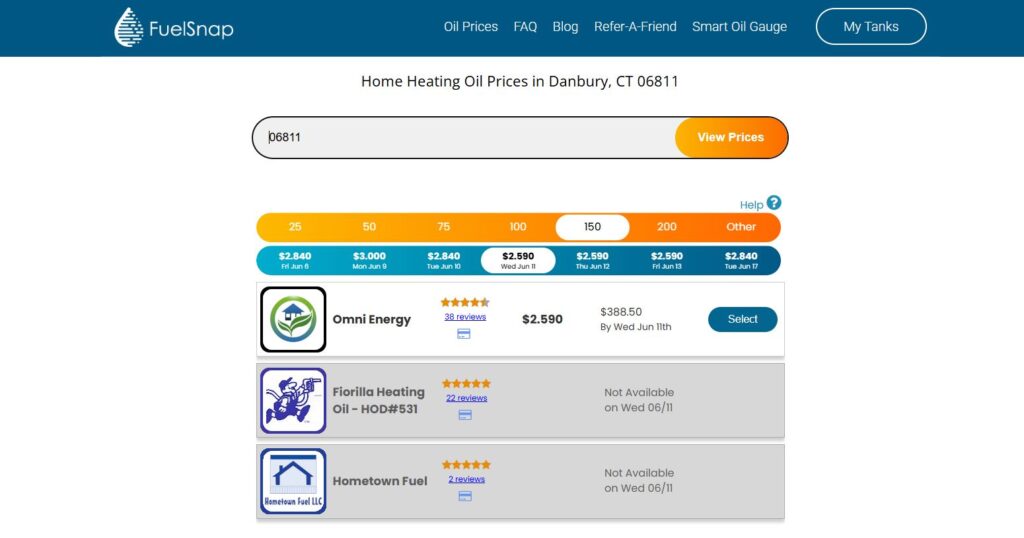
After typing in your zip code, you’ll see a list of your local dealers. What you’ll want to do from here is select the dealer you wish to order from. You can look at their prices and available delivery by dates to determine when’s the best to order. Select the one that offers you the best price and most convenient delivery date.
After selecting dealer and deliver by date, you can choose how much gallons that you wish to order. You can choose the amount you wish to order, but it’s also good to know that some dealers will offer a difference in price depending on how much you order. For example, with some dealers, the price might be 2.99 a gallon for 150+ gallons. But that same dealer might charge 3.05 for 100-150 gallons of heating oil. So be sure to be mindful of that when placing the order.
This screen displays the dealers available in your area. As well as their pricings.
It’s also important to know that when ordering oil on our FuelSnap website, once you’ve placed the order, your price per gallon is locked in. So if the cost per gallon goes up the day after you delivered, then the dealer must give you the price per gallon of the ticketed amount.
Step 3: Delivery Address and Location of the Tank
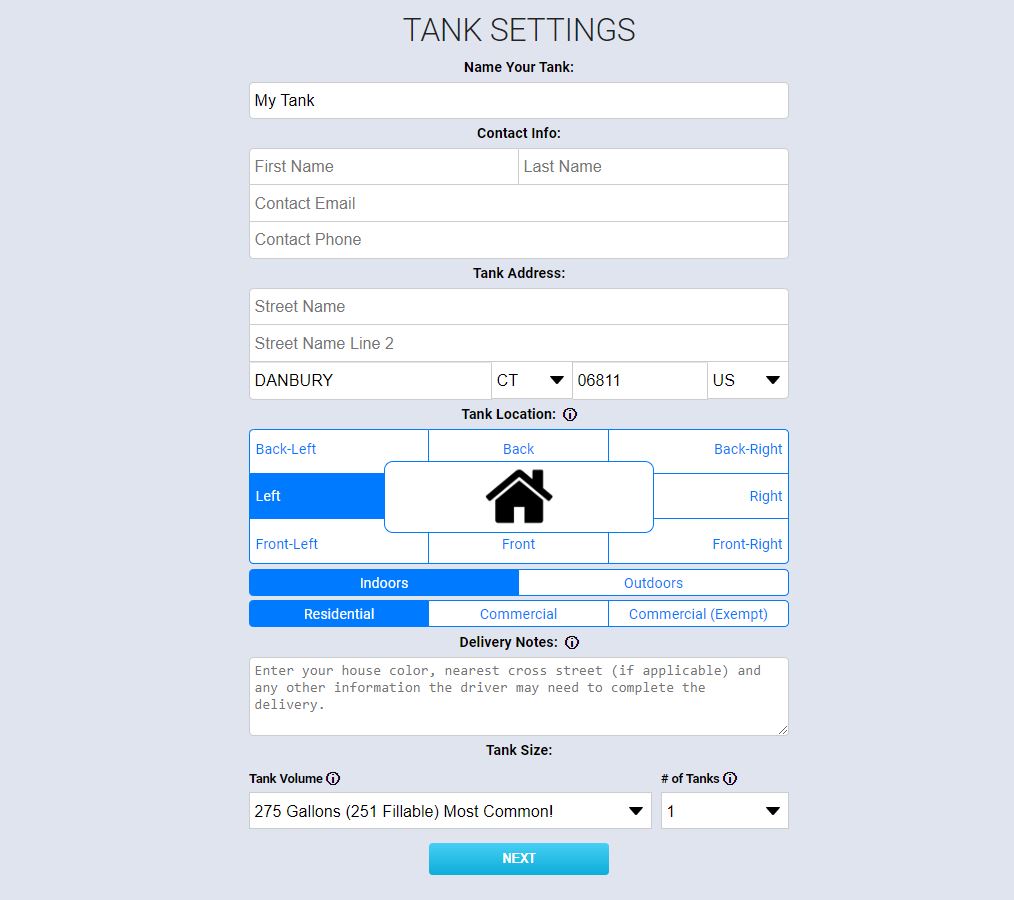
Now, while this is probably self-explanatory, the most important part of this process is the delivery address. The driver won’t be able to deliver without this! This information is crucial to ensure that the driver delivers to the right house! Where the tank is located is also an important part of the order as well. Including the tank location makes it easier for the driver to understand where the tank is and what to look for.
Here, you’ll fill out information about your tank’s location and address. Your tank’s location is also important here, so that the dealer knows where to look.
It’s also important that you include contact information on the ticket. This is often a phone number and email. Providing those will allow you to receive the order receipt via email, as well as allowing the driver to contact you via telephone if he needs to!
Tank inspections are another common thing with certain oil dealers. Some oil dealers will require an inspection of your tank. This is often the driver just checking to make sure that the tank itself isn’t leaking and that it’s properly vented. Not all dealers require them, but it’s important that you get one if they require it.
Final Step: Finalizing the Order
The very last thing you should do when placing an order in finalizing it. This requires you filling out the amount of gallons that are being delivered, when they’ll deliver by, confirming your address, and filling out your billing information. It will also show you the total.
On this this screen, you’ll get an alert saying that the tank will require an inspection. But, this is only from dealers that require an inspection before delivery. These will require someone above the age of 18 to be at the home at the time of the delivery. It’s usually the driver that does it.
This is the final screen in this process. Here, you will see how many gallons you are ordering, when it’ll be delivered by and what the address is. Plus your payment information.
After ensuring all of your order information is correct, go ahead and slide the bar on the bottom to finalize the order! Then you’re done! You’ll receive a confirmation email that has the dealers, contact information, as well as the details of your order.
Concluding Thoughts
Ordering oil on our FuelSnap website is very easy! Especially now that you’ve been equipped with the steps on how to do it and knowing what you need for the order itself! If you follow the above guide, you’ll know what to do when you are placing the order!
If you need help, or you wish to speak with someone over the phone and place the order, feel free to do so! You can reach our support at 203-456-1499 option 3 or 203-456-1015, Monday through Friday, 8am-5pm EST.
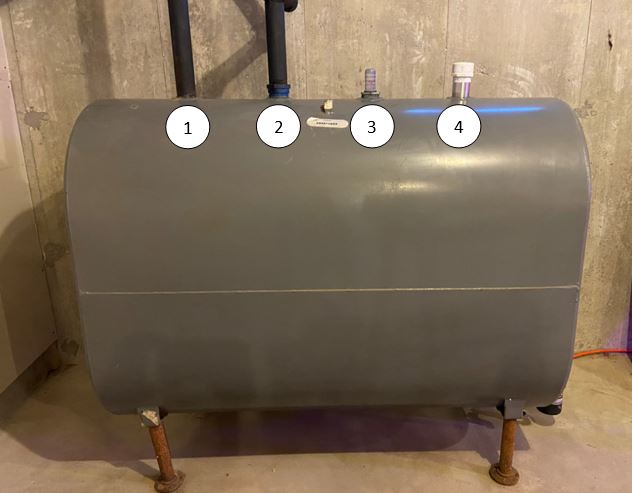
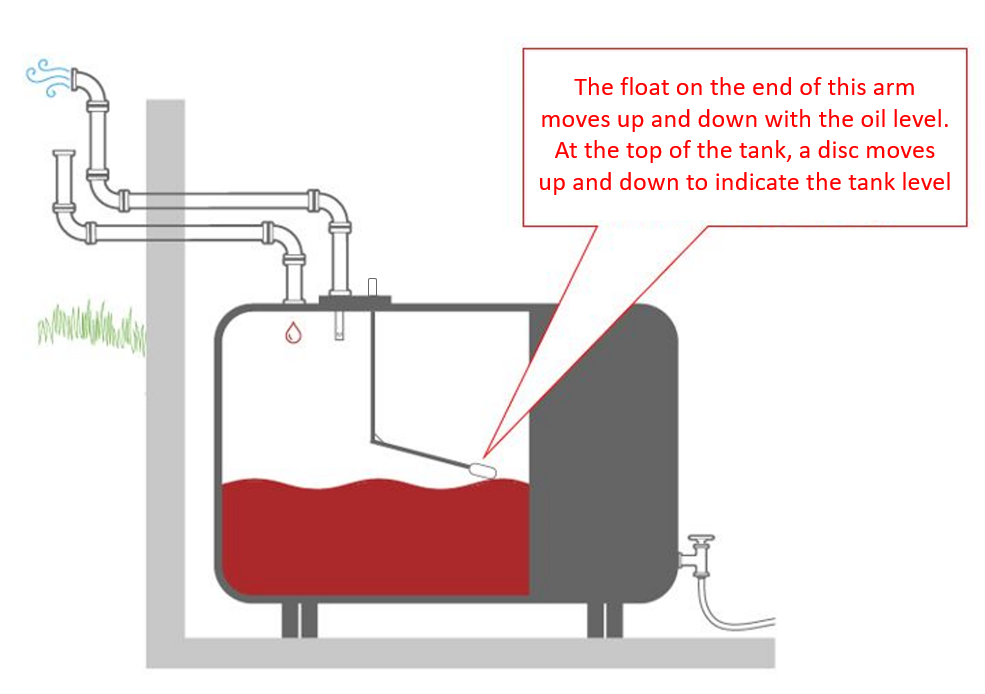
Using a Smart Oil Gauge on your heating oil tank is incredibly useful. It’ll be able to tell your usage as well as when you’ll need to order oil! Most heating oil tanks will have four fittings on the top of the tank. One occupies the fill pipe, another the vent pipe, and lastly, the float gauge. This will usually leave an extra fitting open for the Smart Oil Gauge!
However, on some tanks, there is one less fitting, or the feed lines are actually on the top of the tank. In an event like this, you might be confused on what to do. It’s important that your gauge is installed correctly. So in this article, I’ll be going over what exactly you should do if your tank only has three fittings.
What’s On a Heating Oil Tank?
Most Heating Oil tanks will have four openings available. They usually look like this:
This is the Fill Pipe. This is where the driver will pump oil into the tank. The fill pipe normally leads outside where the driver can access it with the truck.
This is the vent pipe. Air will enter and leave the tank through this pipe during fill-ups and when oil is being used up. This pipe also leads outside and is sometimes right next to the fill pipe.
The float gauge is what is installed on this fitting. This gauge gives you an estimate for how much oil is in the tank. It’s a little cork bobber on the end of a metal arm that floats on the surface of the oil.
The extra opening is normally the last opening that isn’t occupied or is occupied by something else. If you have a dual tank system, then you’ll find that the connecting pipe will normally connect both your tanks. Now, if you have feed lines that are top-fed, then they’ll likley be in this fitting as well.
Heating Oil Tanks will have an orientation like this most of the time. However, what’s in the fittings of the tank will vary widely.
Where to Install the Smart Oil Gauge on Three Fitting Tanks
If your tank only has three fittings on the top of the tank, then there are two ways you can go about installing it. Which of these two ways depends on how your tank’s setup.
Fitting Layout #1: Float, Fill and Vent
If your tank has the above-mentioned setup, then you’re going to have to remove the Float Gauge if you want to use the Smart Oil Gauge. However, that being said, replacing the float gauge can be a little annoying sometimes. But if you follow along my guide on how to remove the float gauge, then it’s simple! Just be sure you don’t simply unscrew it. That can cause the arm will then collide with the side of the tank and possibly damage itself or the tank.
This layout is fairly common amongst heating oil tank users. Sometimes there will only be three fittings in the tank. Usually this will result in you having to take out the float.
Fitting Layout #2: Float Gauge/Vent Combo, Fill Pipe and Feed Lines
While in most heating oil tank configurations, the feed lines tend to be installed on the bottom, occasionally they will be on the top of the tank. But, with Roth tanks, the feed lines are always on the top of the tank. That means for Roth tank installations of the Smart Oil Gauge, you’ll have to uninstall the dial gauge and install the Smart Oil Gauge in that fitting. As for Granby tanks, the feed lines will occasionally be on the top. When this happens, your only option is to take out the float gauge and install the Smart Oil Gauge there. But another important thing to know is that with top-fed feed lines, they don’t always reach the bottom of the tank. This leaves roughly 30 gallons of oil that the system can’t draw from. It’s almost like a straw that can’t reach the bottom of a cup.
Top fed feed lines aren’t very common. However, when you do see them, they’ll often look like this!
Your other option is to move the feed lines to the bottom of the tank. DO NOT attempt this on your own. You MUST have a skilled and qualified technician do this for you. Otherwise, you can break your tank, damage your system, and cause oil to leak throughout your home. The average homeowner is not capable of doing this. The technician creates a vacuum that will prevent all the oil in the tank from spilling out. Doing this on your own is not feasible. Now, this is usually a last resort when it comes to using the Smart Oil Gauge. However, if you like the float gauge on the tank and want the best of both worlds. then this is the right move for you.
What to do if you Have Three Fittings?
Using a Smart Oil Gauge for your heating oil tank is a great way to monitor your usage and heating oil level. A lot of our clients have gone to great lengths to get the Smart Oil Gauge installed on their tank. You can also use it with your float gauge if you have enough fittings! But with only three fittings on the tank, you’ll have to remove the float gauge. You can read through our guide on that here.
Relocating your feed lines is also an option. However, this isn’t easy to do and requires an HVAC technician to do it for you. A qualified technician is the best way to get this gauge set up on the tank for you! You can typically call to schedule an appointment for them to do this. Or the next time they’re doing some tank work, you can ask them!
The maintenance of your home heating oil is very important! This is crucial for keeping your system at its peak performance. Ideally, you’ll want to get your system maintenance done annually. However, you might be wondering what comes with a furnace tune-up? Read on, because I’ll be going over everything you need to know!
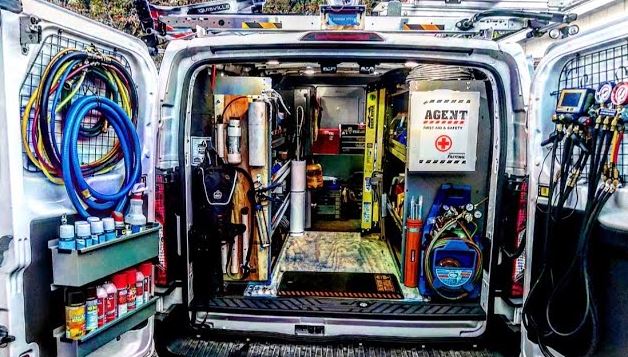
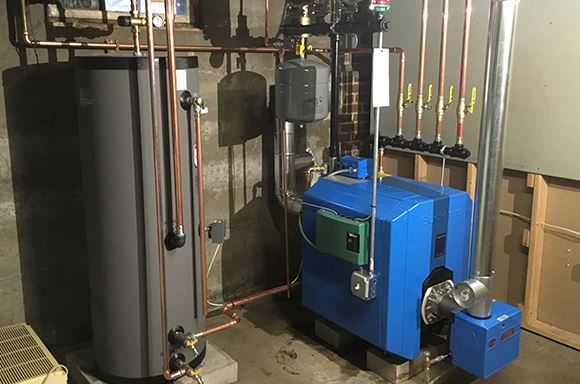
This is the inside of an HVAC truck. They have everything they’ll need to service your system in here!
Typical Home Systems
Now, there are a lot of different types of home systems. But, there are a few common types that you should be on the lookout for! You’ll more than likley have one of these systems installed at your home!
Furnace: These are by far the most common type of home heating system and often the most serviced. They’re also very simple to understand and will usually provide heat by pushing hot air through the home with the use of ducts.
Forced Hot Air: This is another common system seen today. However, they’ll tend to work in conjunction with both cooling coils and a compressor. But the nice thing about these systems, is during the winter they provide heat, while in the summer they produce cool air.
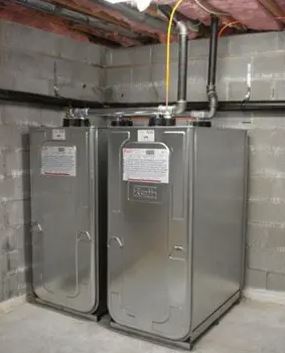
Boilers: These are in many homes now and will utilize hot water that’s pushes through the home with baseboards. The water then heats up and pushes through the baseboards of your home. The tune-ups for these systems is different than Furnace and Forced hot air tune ups. This is mostly due to the lack of air filters.
What are the Steps of a Tune-Up?
The process of getting a heating system tune-up is very similar to that of getting a car service. Similarly to checking your car’s oil and fluid levels, you have to do the same with a furnace. This will be done to your system by an HVAC technician, who will often inspect, clean and replace the following list of items if required:
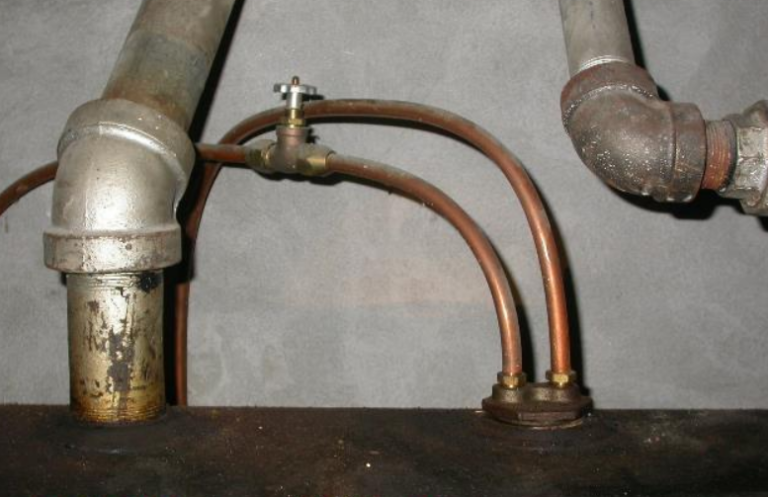
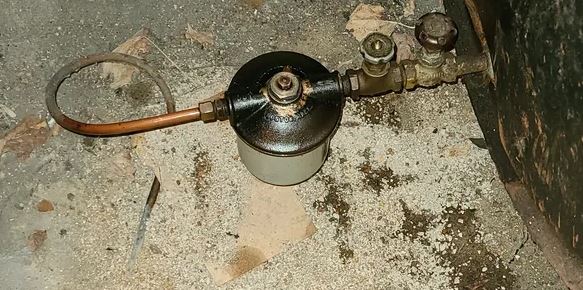
The Oil Supply Line: One of the first things that your HVAC technician will do make sure that there’s oil incoming from your tank to the furnace. But they’ll usually disconnect the line to properly inspect it. They do this to ensure that there’s a good flow of oil from your tank to the burner. On rare occasions, there is a build of sludge in these lines. This actually causes a bit of resistance in the line. In this event, the dealer will clean it out by pressuring the line from one end. This forces the sludge out of the line.
This is what the oil supply line with look like for heating oil tanks. This is often one of the very first things they’ll inspect!
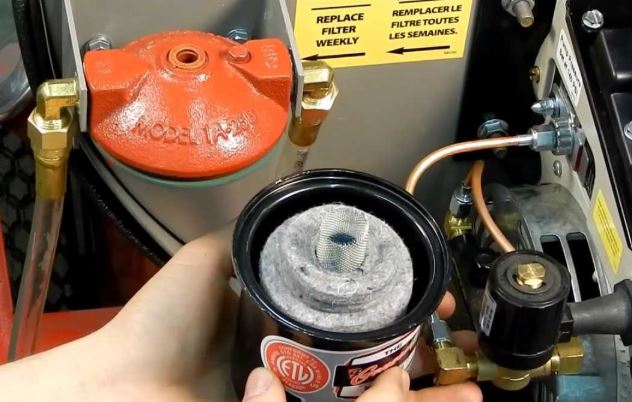
Changing out the Filter and Strainer: Similar with how your car has an oil filter, your system also has an oil filter. They can get quite gross over time. The filter catches anything in the oil that you don’t want going over to the burner. While beyond the filter is like another filter inside your system that catches anything your filter misses.
This is your oil filter. You can replace it yourself. However, your HVAC guy replacing it, is always a safe option too!
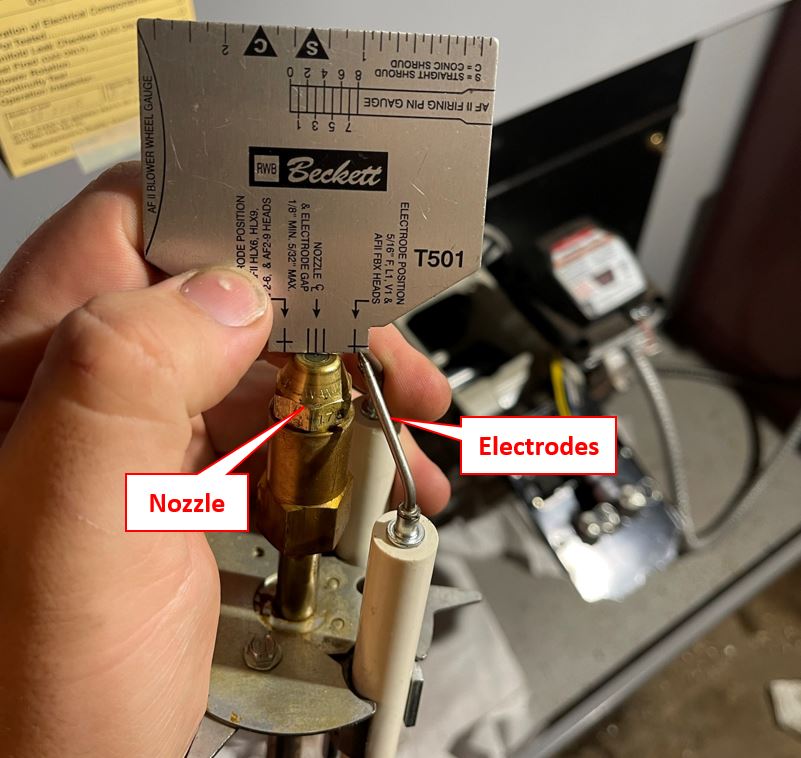
Burner Components: Before the oil goes through the process of combustion, the oil must go through the nozzle and undergo the process of atomization. Over time, however, this nozzle can clog and wear out. In this case, the technician will go ahead and replace it. Then, after the nozzle is replaced, the technician will use a specialized template that helps line up the tips of the electrodes in the nozzle. These electrodes will help the atomized fuel to ignite, so if they show any wear and tear at all, the technician will go ahead and replace them immediately. Finally, the last thing that the technician will need to do is a visual inspection of combustion chamber to ensure everything is working properly.
In the above picture, the technician will replace the nozzle and adjust the electrodes if needed. Usually the electrodes will need to be replaced if they’re worn out.
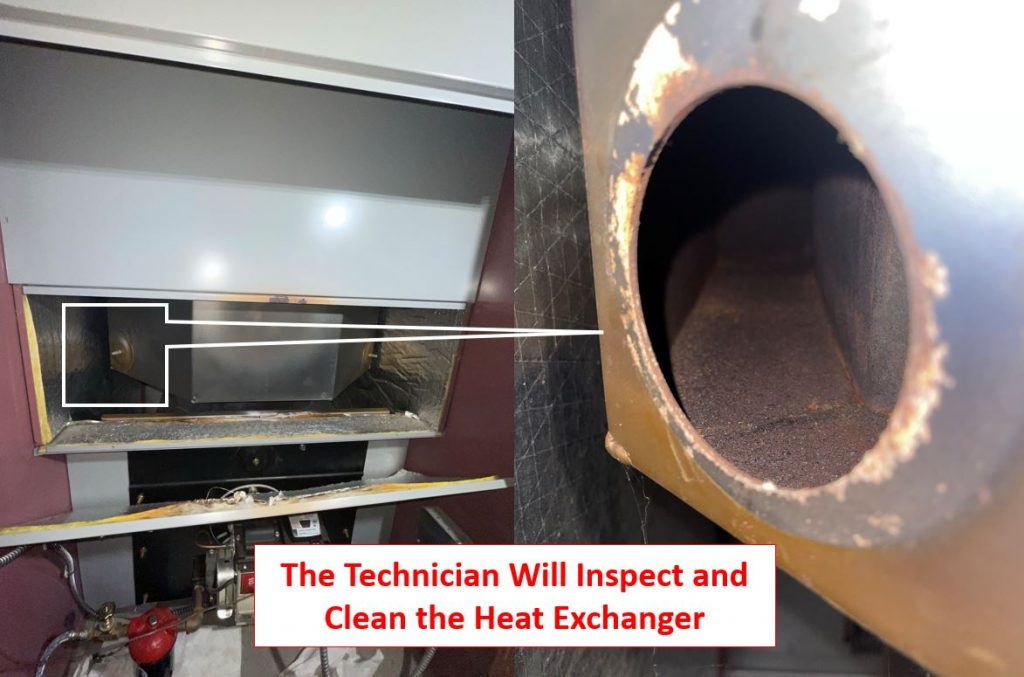
The Heat Exchanger: Before it becomes hot air, cold air passes through the heat exchanger. This is where cold air goes through the conversation process of cold air to heat. Now, as some furnaces get older, their ability to do this gets a bit harder. Older ones will tend to fail, which can cause the heat exchanger to crack and break. The cracks make the burner’s exhaust mix in with the clean air which makes it harder for the system to provide you with clean hot air.
This is a close up view of the heat exchanger. If there’s any damage, the technician will replace it.
Combustion Analysis: There are special tools that will often test your systems efficiency. These will check the color of the smoke produced by your system. This is to ensure that the smoke is adequate. The analyzer checks both the CO2 content and temperature of the smoke. Using this information, it will effectively determine your systems efficiency.
Changing Out the Air Filters: This is the easiest part and you can often do this yourself. This should be done annually, so if you wish to wait for your your HVAC technician to do it during your annual maintenance then you can wait for that as well! But if you want to do it yourself, go ahead check my previous articles on changing out air filters! You can find one here!
Furnace Tune-Up Peace of Mind
With us still in the coldest part of the year, it’s very important to ensure that your system is up and running so that you continue to remain warm! Plus, being confident in your home’s heating oil system is important!
Being sure that you have annual maintenance on your system is very important. But now you know what to look out for! Similar to changing your oil in your car, you must do this frequently. This is to ensure that everything is working properly and that nothing is worn out or broken! But, make sure that you hire someone who’s reliable and trust worthy!
If you’re looking to purchase a new oil tank or are starting out in heating oil, you might’ve noticed there are options for double-wall tanks. These tanks are gaining popularity and proving to be very useful. The term double-wall means that inside the tank, there is an additional “tank”. This ensures that if the walls of the interior tank were to fail, the oil would be caught by the exterior walls of the other tank. I wrote an article that goes in depth about comparing a Roth Double Wall with a Granby Steel tank. I recommend checking it out if you want a more in-depth analysis. You can find it here.
How Does it Work?
While they’re more popular in Europe, they’re starting to get an increase in popularity here in the states. Roth tanks in particular, come with an interior plastic tank where the oil is stored. Like I mentioned above, if that tank were to fail, the exterior steel part of the tank would catch the oil, preventing a spill. Think of the steel exterior like a suit of armor!
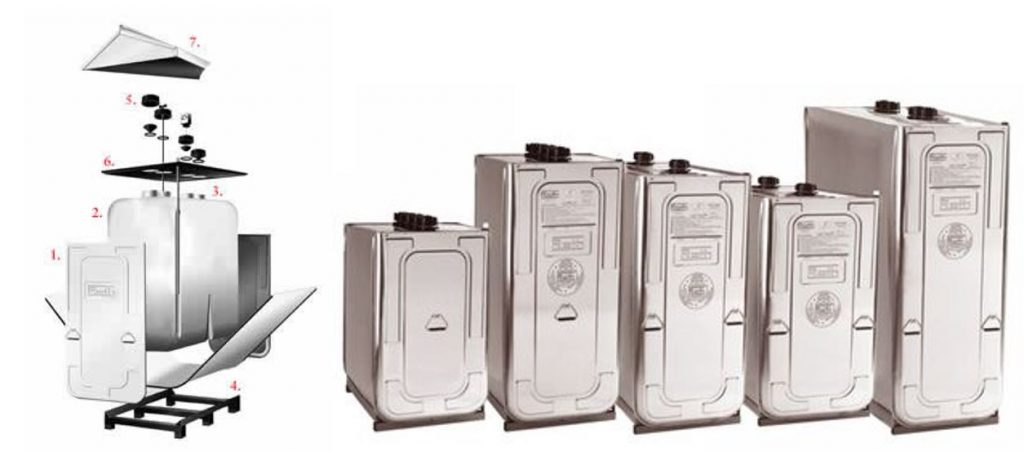
These are Roth tanks and are the most popular double-wall tanks.
Recently, Granby has started making double-wall tanks similar to Roth tanks. If you have a Granby tank and are concerned that your Smart Oil Gauge can’t work on it, don’t worry, you’ll just need to purchase the Roth Adapter for your respective model of gauge, and you’ll be able to use it!
There are many benefits to having a double wall oil tank. I’ve compiled a list of all of them below for you:
Leak Protection: This is considered to be the biggest advantage of these tanks. The interior plastic tank offers another layer of protection in case the interior is damaged or fails. While the interior tank failing is not very common at all, it’s nice to have an extra peace of mind.
Compact: Another nice thing about these tanks is that they are taller than Granby tanks. So they don’t take up as much space as Granby tanks do! This means that you can put Roth tank in your garage or basement and it will take up less space!
No Corrosion: The interior tank is made of plastic. Plastic doesn’t corrode like steel, which means that not only is there no chance of corrosion, but the double wall tank will also have a longer lifespan when compared to steel tanks.
Decrease in Sludge Build Up: With the interior plastic tank, there is much less sludge that builds up. The interior plastic tank will not rust over, so this significantly decreases Sludge build-up.
Much Better Warranty: Most steel tanks will only have a warranty of 10 years. However, with Double Wall Tanks, you’ll see that they have a 30 year warranty! This is much better and much longer lasting.
This is an an example of a Roth 1500L, these are the largest of the Roth tanks. They can hold up to 400 gallons!
The Disadvantages
Now Double-Wall Tanks are not without their disadvantages. All tanks have them, so it’s good to know what they are and what to keep a look out for!
Expensive Cost: The biggest downside to these tanks are their price. They tend to be more expensive than standard steel tanks. This is often because of their reliability, but their construction process is also a little bit more complicated.
Not An Exact Replacement: These tanks have a different footprint than your standard Granby steel tanks. Double-wall tanks have a more square base/footprint compared to the lengthy base and four legs of the standard steel tank.
Complex Installation: If you’re installing more than one of these tanks in one location, the installation can be complex. This is because the piping that will connect these tanks together is very specific and must be put together correctly for the system to work properly.
Double-wall Dual setups will often look like this.
Are Double Wall Tanks Worth It?
Double-wall tanks are absolutely worth it! These tanks are not only durable, but they’re also reliable. They’re compact which means that they don’t take up as much room. The plastic interior also gives you another layer of protection from the tank leaking! The longer warranty also helps you have the peace of mind that if the tank fails, it’s covered!
But that being said, don’t be hasty and make this decision on a whim. You should continue to do your research before buying. You can even ask your local dealer to see what they suggest! Feedback from them will be very valuable!
Happy New Year, Smart Oil Gauge users! We’re in peak heating oil season right now, and heating oil is on everyone’s mind. So you might be asking, “How much oil should I order?” or “How much is oil in my area?”. So in this blog post, I’ll be covering everything that you need to know!
But, please keep in mind that if you run out of oil, it’s VERY important to order oil ASAP. If you run out, then place an order for a dealer to come out and deliver immediately! A system that has no oil in it for a prolonged period of time can be problematic. Afterwards, go to the gas station and get about 5-10 gallons of diesel. This will hold you over for at least a day or two until your order comes. If you suspect that you’re out of oil, use this article here as a reference on what to do.
During the winter, you’ll find yourself burning more oil daily to accommodate for the cold temperature.
What Factors Will Impact your Consumption?
There are plenty of factors as to what affects your consumption. However, the most important ones to know are listed below:
The Temperature Outside: This is important because what the temperature is outside will determine how much oil you’re going to burn. The colder it is outside, the more oil you’ll burn.
The Temperature Inside: Whatever you decide to set your thermostat to will affect how much oil your system is burning. Most of the time, setting it to around 70 degrees will give you the optimal temperature. It’s good to know that the higher you set your internal temperature, the more oil you’ll burn.
Home Size: The bigger your home, the more oil your system will burn. Your system is going to burn more oil to heat more surface area in the home. For example a two story home will burn more oil than a single story home would.
Insulation: Your home’s insulation is essential. If you’ve got good insulation in your home, then you’re likley to burn less oil. This is because a home that’s well insulated will have an easier time retaining heat. Some doors and windows might be drafty, so it’s important to make sure that they’re covered up!
How Old Your System Is: The older your system is, the less efficient it becomes. This is due to aging and the older your system is, the less efficient and effective it becomes. A newer system will always be more efficient than a system that’s 30-years old.
What You Use Heating Oil For: This is important when determining your usage. If your using it for just heat and hot water, then you’ll be burning it faster than someone who uses it for just heat or hot water.
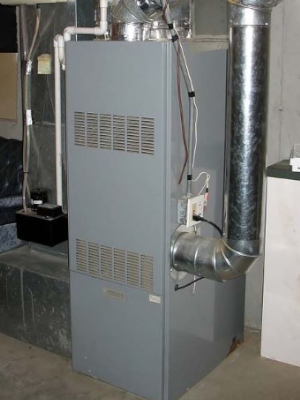
This is an example of a more modern heating system. It is much more up to date and modernized for convenience.
The Size of Your Home and Usage
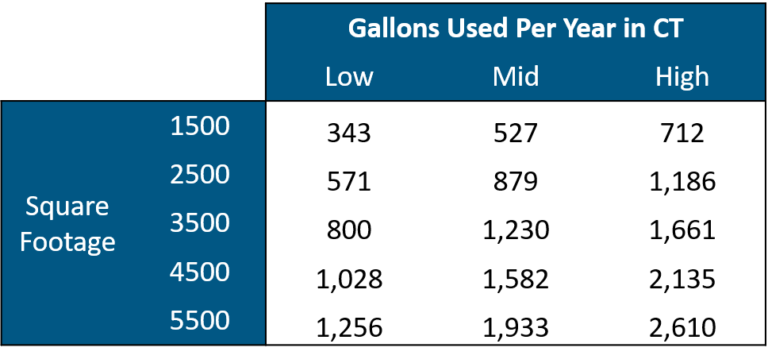
I’ll be keeping this part simple, because it’s important to understand this and it can get a little confusing. So, we’ll be focusing on just two very important aspects of your system. Those being your home’s size and your usage. In the below chart, you’ll want to find the size that your home roughly is. Using this chart will be able to give you an idea of where your usage stands when compared to other homes of different sizes.
By using the above graph, you’ll want to compare the temperature with the square footage for the average amount of oil burned.
Now keep in mind that this chart is only really useful for the colder winter months. During the summer months, you’ll be burning significantly less oil which will result in lower overall usage for your home.
The average winter day in Connecticut will often have you seeing about 5-7 gallons per day in usage. Be sure to use this baseline as a guideline when you schedule your delivery.
Another important bit of information to know is your tank capacity. Most tanks will never be filled to maximum capacity. This is to allow airflow, prevent leaks and avoid overfilling. For example, if you have a 275 gallon tank, the driver will keep pumping until they hear the vent alarm stop. On tanks of that size, that’s usually around 250 gallons. With a usage of roughly 5 gallons per day, you’re looking at around 40 days of usage.
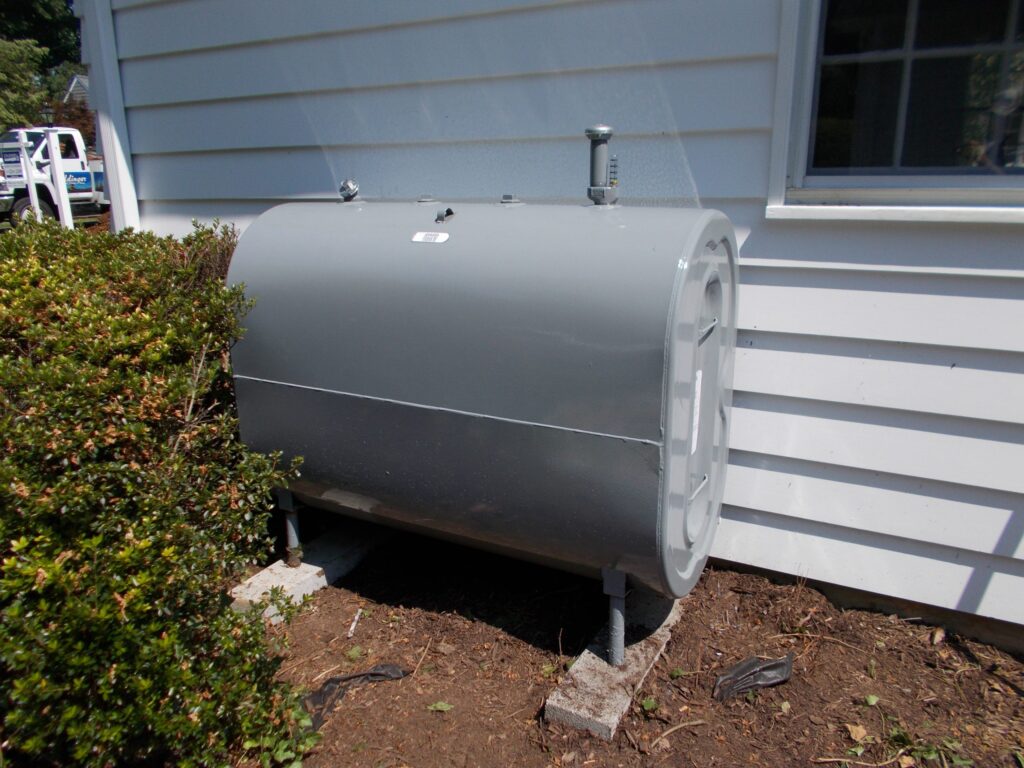
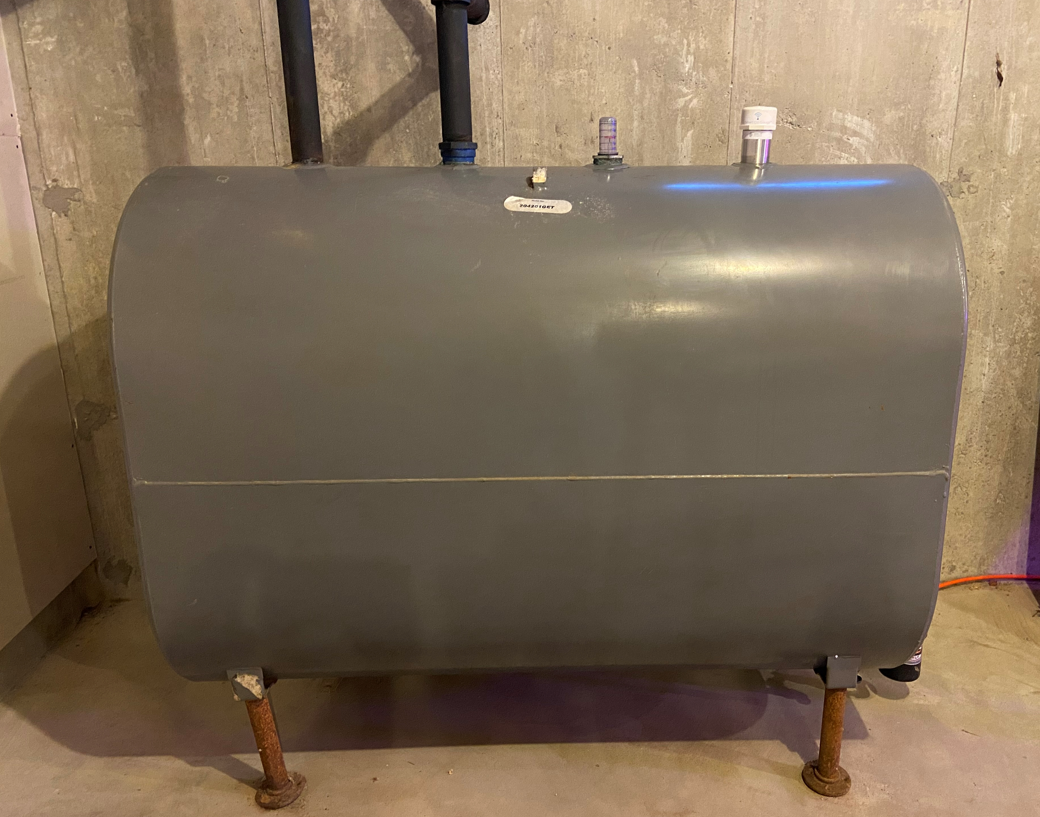
An average 275 gallon oil tank will look like this. It’s true capacity is actually 250 rather than the 275 gallon maximum capacity.
Yearly Usage
The winter months are usually the most common days throughout the year when you’ll find yourself using heating oil. However, some home owners will be burning it year round! If it’s not being used for heat during the summer, then it’s likley being used for hot water. But, you’ll only ever be burning .5-.8 gallons per day for just hot water.
When using oil during the winter months, you’ll have to refer to the above mentioned factors as to what contributes to your usage.
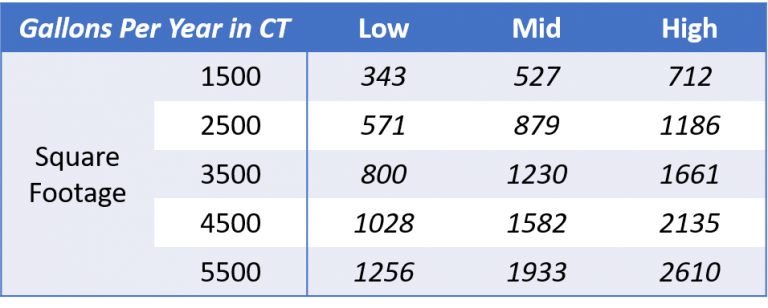
This chart shows your annual usage based on the square footage of your home! This is an averaged data, so there’s a chance that yours might be different!
How Do you Track Your Consumption?
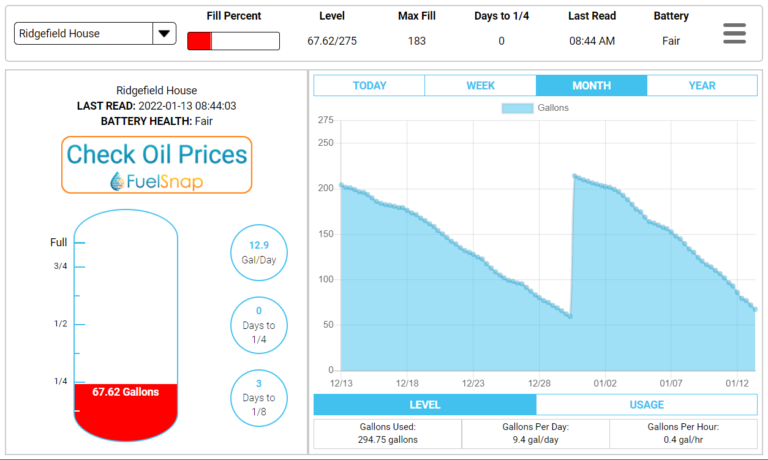
There a lot of different ways to track your usage. But the most popular and the way we recommend is by using a Smart Oil Gauge. It uses an ultrasonic sensor and is accurate from 0-72 inches. The gauge requires a 2.4ghz WIFI connection and a stable WIFI connection that will help the device have a solid signal to connect and upload to our servers using the router. The gauge will report all level and usage to data to the app. This data is compiled into four sections, being day, week, month and year! You can also export your data if you wish to do so!
Data from the Smart Oil Gauge looks like this on our website. You’re able to view usage and level data all through our website or through the Smart Oil Gauge App!
Check Your Tank Regularly throughout the Winter
Using the above tips and tricks, you should now be equipped to be able to monitor and track your heating oil usage! But that being said, you should definitely keep track of your oil level on occasion. You can monitor your tank’s level using a Standard Float Gauge or a Smart Oil Gauge. If you’re unsure how to read the float gauge, take a look at this blog post here. I go over exactly how you read your gauge and what you need to know! But it’s important that you check regular to prevent run out! Running out of oil can lead to the feedlines getting clogged with sludge. Setting a reminder in your phone every week is the best way to remind you to check your level!
Heating Oil is one of the most popular ways to heat your home in today’s age. It is not only reliable, but it’s incredibly efficient. Just one gallon of heating oil can effectively heat your home and provide consistent hot water! It is also known to be one of the safest ways to heat your home! It also produces more heat than propane and is often more readily available than propane, with thousands of dealers in the northeast alone!
So if you’re new to heating oil, or still aren’t sure what’s important to know, then don’t worry! In this article, I’m compiling everything that’s important and everything that you need to know! So feel free to bookmark this article and come back to it whenever you need to reference it! There’s going to be a lot in this article, so you might want to come back and reread it!
Where is it Stored?
If you’re using heating oil as your primary source of heating, then you’re going to have a heating oil tank installed somewhere on your property. These tanks are installed somewhere on the property but will usually be located either indoors or outdoors. Occasionally though, they can be found underground. Although, this is becoming far less common nowadays as they’re being removed to prevent environmental damage. If your tank is underground, then I highly suggest getting it removed ASAP. If you want more information as to why that is, check out my article on underground tanks where I go over why you should remove them here.
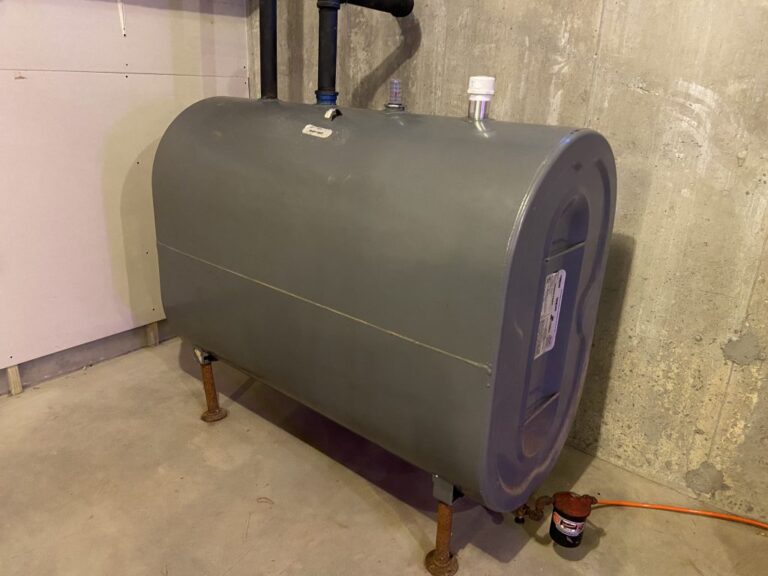
Most indoor tanks will look something like this.
This is by far the best and safest way to store heating oil. Preferably indoors rather than outdoors. That way the tank itself isn’t exposed to the elements. Typically those tanks will often need to be more frequently replaced compared to those installed indoors. This is often due to not being exposed by to the elements such as snow, heat and direct sunlight.
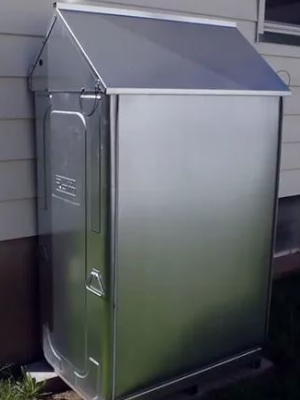
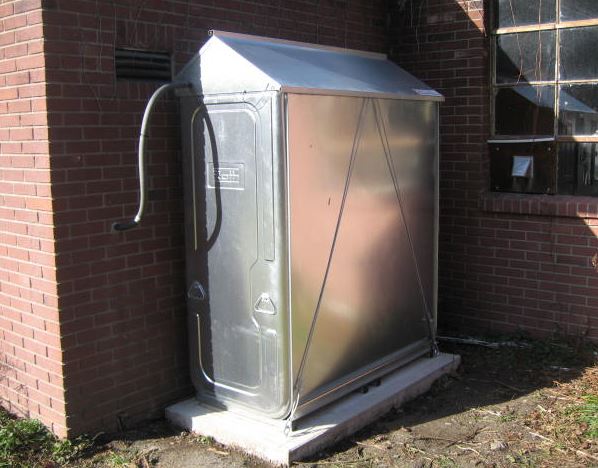
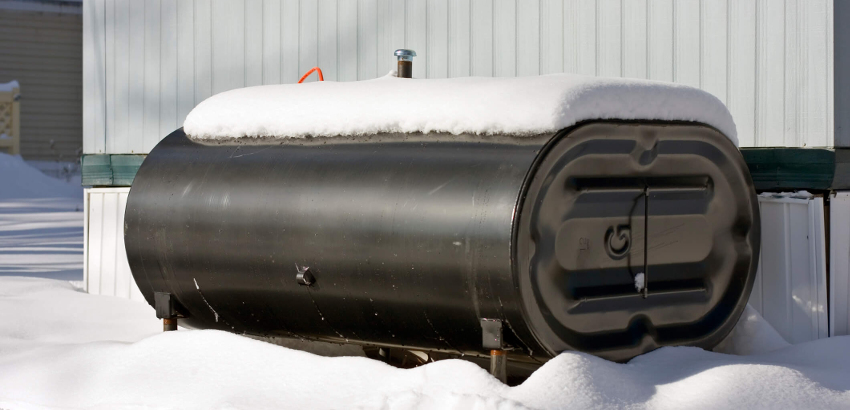
Outdoor tanks usually will have a similar setup to this.
How Does it Get Delivered?
Heating oil gets delivered by a truck. You’ll schedule a heating oil delivery with your provider or through the FuelSnap website. The dealer will then come out to your home with their Oil Truck to deliver heating oil. Unlike natural gas that’s pumped into the home, heating oil needs to be delivered.
After the driver’s arrived at your home, he will locate the fill and vent pipes. These pipes work in tandem with each other. The fill pipe allows the dealer to pump oil into the tank, while the vent pipe allows for airflow to leave the tank. These pipes are usually located on the side of the home on indoor tanks. While on outdoor tanks they stick up from the top of the tank. But on underground tanks, they stick up out of the ground.
Once the driver has connected the truck’s hose to the fill pipe, they will start filling the tank. As the driver fills the tank, they’ll listen for a loud whistling sound. That is the sound of oil being pushed through the tank’s whistle. This sound will keep going until the oil starts to cover the whistle. At this point, the driver will stop pumping oil into the tank to prevent overflow and leaking. If you’re curious on a more in-depth explanation of this process, check out my article on the topic here.
How to Order Oil
Now, this wouldn’t be a guide on heating oil if I didn’t go over how to order it! There are a few ways to order oil. However, there are three that tend to be more popular than others. They’re listed below:
Automatic Delivery: This is probably the most common way to order heating oil. By using this method, you are working directly with your dealer to determine how often and how much that they can deliver. This is determined based on your usage. But this also tends to be the more expensive option overall.
Call-by Delivery: Now this another common way to order oil. This tends to be more cost effective. The reasoning for this is because you’re able to order oil whenever you need to and get the best price possible by shopping around! You’re also in control of when they deliver. So no need to worry about your delivery showing up randomly!
Call-by Using a Smart Oil Gauge: This is the option that will give you the best of both worlds! You’ll have the convenience of automatic delivery while having the freedom of Call-by delivery. You can use our Smart Oil Gauge app to monitor your fuel level and control when you need to order!
What to Do if you Run Out of Oil?
If you run out of oil, then it’s important that you follow our guide on what to do. You can check it out here for a step by step process. But to briefly explain what to do, you’ll want to:
Ensure that you’re definitely out of heating oil.
If you’re out, ORDER OIL! It’s important that you do that so that you know when you’re next fill up is!
Go to the Gas Station and get 5-10 gallons of Diesel. This will hold you over until your delivery arrives.
Press your burner’s restart button to restart it.
Will the Dealer Deliver Oil If You’re Not Home?
In short, yes the dealer will deliver to your home if you’re not home. However, this is true only if you place an order with a credit or debit card. Most cash orders will require you to be present at the home during the time of the delivery. This ensures that the dealer is delivering to the right house and gets their payment.
Some dealers will also require a tank inspection for a fill up. This is usually the delivery driver and is usually free with the delivery. Not all dealers require this though, and it’s very simple to do. The driver will make sure the whistle is working and that there are no visible leaks coming from the tank.
Conclusion
This is a lot of important information. So feel free to bookmark this article, and come back to it when you’d like! This will help you get a better grasp on heating oil and what you need to know! It’s honestly the best fuel that you could have to heat your home!
Plus, with all of the different technology that we have, you can even do more research and be a bit more flexible when it comes to big decisions such as automatic delivery!
With Christmas only being a few days away, it’s important to understand what your heating oil usage on Christmas Eve and Christmas Day will be like. These days tend to be busy not only for you, but your heating oil system. But why exactly is that? Well, your usage will be different depending on what you’re doing for the holidays and how many people you’re having over! I’ll be covering exactly how much oil you should expect to burn during the holiday season!
How your Holiday Events Effect Usage
It’s important to know that what you end up doing for the holidays will effect your overall usage. If you’re used to having quiet holidays with only your immediate family, then your usage will be like any other day during the winter. But if you are going to have family over, then your usage might actually be higher than usual!
Large family gatherings might increase your oil consumption. This is often due to more people in your home, which can cause you to possibly increase the temperature of the thermostat. Increasing the temperature on the thermostat can cause an increase in usage, especially if you’re having a large family gathering! This is due to your system having to work harder to reach the desired temperature.
Large family gatherings will increase your oil usage to accommodate for the increase in home occupancy.
However, if you have a quiet Christmas with only your immediate family or friends, then this will likley be like any other day during the winter. If you have an average sized home, then you might find yourself burning around five gallons of oil a day. The same can be said on Christmas if you aren’t having a lot of people over!
Staying Home Increases Oil Usage
During the holiday season, you might find yourself staying at home to prepare for your annual family gathering. Weather or not that be at your house, you will likley see an increase in consumption over all. This is because if you’re staying at home to prepare, then you’ll be using more heat to keep you warm while you prepare. This is often because if you’re home all day or for long stretches of time. During this time, you’ll burn more oil to keep you warm!
But, what does this mean if you have guests over? Well this often increases your usage as well. If you have a large family gathering, you might have to turn up the heat to accommodate for more people. This increase in heat requirement will cause your system to do more work to keep your home warm. If your family gathering is large, then this will significantly increase your usage. Large family gatherings often require more rooms in your home to be heated. While most of the time you might find yourself in the kitchen or living room, sometimes the younger kids might go into their cousins bedrooms or sometimes in the basement or downstairs areas of the home. All these rooms will now need to be heated to accommodate for all the extra people. Not to mention more people using the bathroom which will result in more hot water consumption.
How to Mitigate Heating Oil Use on Christmas?
Now it’s important to know that this is peak heating oil season. So it will be harder to not burn oil, especially if you want to keep warm! But that being said, there are a few different ways to keep yourself from burning a lot of oil during your Christmas parties. You can find some of them below:
Good Insulation: Increasing your insulation is a great way to keep your home warm without ordering more oil. Insulation keeps the heat in your home, which will in-tern keep your system from burning a lot of oil, even with an increase of people at your home!
Early Prep: Prepping for your Christmas Gathering in advance actually puts you at an advantage when it comes to burning oil. This is because if you do a majority of the prep throughout the week prior to Christmas, then you won’t have to burn as much oil on the day of!
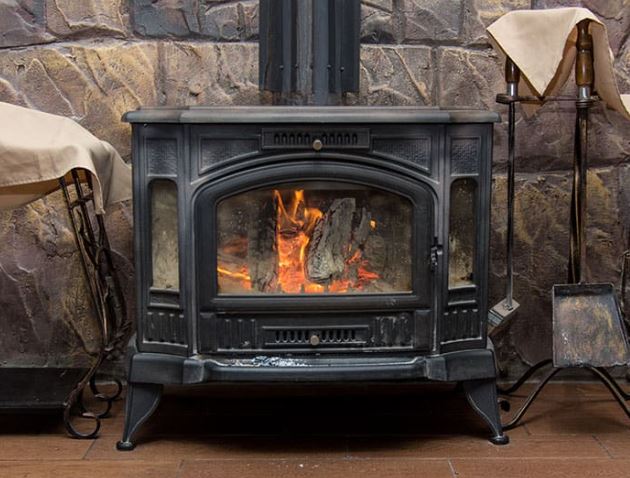
Wood Burning Stove or Fireplaces: Now, while these aren’t available to all homes, they are still very useful! If you have one, then definitely stock up on fire wood and start a fire. This will help keep several rooms in your home warm and reduce the amount of heating oil you burn! Plus, it’s also very festive!
Space Heaters: Space Heaters are convenient and reliable! All you have to do is plug them into the wall and they’ll heat a surprisingly large area! They’re especially useful in sections of the home where heat isn’t always readily available! Just make sure to unplug them when you leave the house!
Setting up a fire on Christmas is not only festive, but will help reduce your oil consumption!
Heating Oil On Christmas
Burning heating oil on Christmas is something that everyone does. But it’s also something that can be easily managed. Just like our holiday celebrations, it’s something we’ll always be prepared for and if you know exactly what you’re doing for Christmas, then you’ll be able to prepare yourself. Whether it be having the family over, or going to one of your relatives, being prepared for the holiday celebrations by ordering heating oil is a must!
With Christmas in only a couple more days, there’s probably a lot of things that you have to take care of. But adding a delivery of heating oil to it will help you stay on top of the season and prevent running out! While you might get it right away, order it in advance so that you’re fully stocked up for Christmas!
But most importantly, enjoy your Christmas! No matter what you’re doing, it’s important to spend these days with your loved ones! No matter what you’re doing, be sure to enjoy it!
Are you thinking about switching to propane? Back in 2015, this was probably the right move. But in today’s day and age, this is not the right decision. Propane was once considered the best way to heat your home. However, as time has gone on, this has proven to no longer be the case. It’s important to know what you’ll be getting yourself into before the switch. So I’ll be going over exactly what you need to know here!
What are the Benefits?
Now, propane isn’t without it’s benefits. If you don’t have access to heating oil or natural gas in your area, then propane is the next best option and it does offer very similar benefits. There are quite a few similarities that it shares with heating oil. Those tend to be the following:
Heating the Home
Heating Hot Water
However, propane has a few other utilities that heating oil doesn’t! This does give it a little bit of an edge on heating oil. Although because it produces less heat per gallon, it doesn’t get a lot of other legs up on heating oil. But you can use it for the following:
Powering a Generator
Fuel For Gas Fireplaces
Powering Gas Stoves
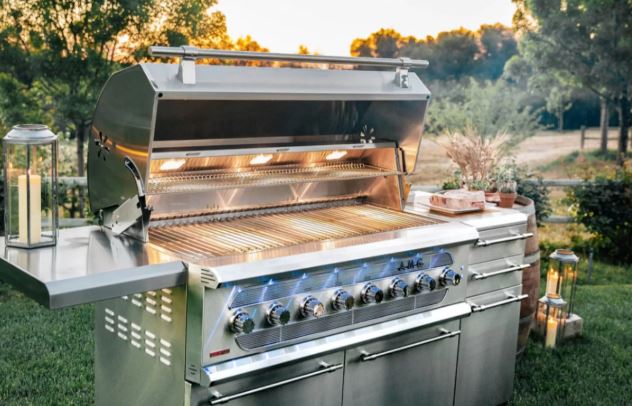
Outdoor Grills
Propane is essential in most modern grills. It’s a great fuel source for powering grills and stovetops.
What are the Disadvantages?
While propane is very similar to natural gas, there are quite a few differences. The biggest difference is being delivered by a truck. The fact that it requires a truck to be delivered, puts it in the category of a form of heating oil. Another huge difference with heating oil and propane is that with heating oil, you own your tank. Usually with propane tanks you rent it from the provider. However, you are given the option to buy out the tank, but it’s usually expensive!
But having your tank be owned by the supplier can lead to the following disadvantages:
Difficulty Switching Dealers: If your dealer owns your tank, then switching dealers is going to be hard to do. This is because propane dealers will tend to have you buy out the tank and this will cost you a lot of money. Propane dealers do this because they want to lock in your business, essentially restricting you to buy only from them! This also means that you can’t fill up your tank if you run out! That can be very frustrating!
Price Comparing Difficulties: If you were to call local dealers and try to get prices from them, chances are they won’t tell you. In short, this is due to dealers not wanting to fill another providers tanks. In most states in the US, including Connecticut, it’s illegal for a propane dealer to fill another’s tank. This is often due to safety regulations and ownership laws. However, with heating oil, using a website like FuelSnap, you can see a list of all the dealers in your area and their pricing!
Expensive Propane Pricings: Propane not only produces less heat per gallon, but it also tends to be much more expensive than heating oil. At the time of writing, in CT, propane is $3.85 per gallon, while heating oil is $3.15 per gallon. That is 70 cents more for less heat! This means that you’ll need roughly 35% more propane to get the same amount of heat as heating oil.
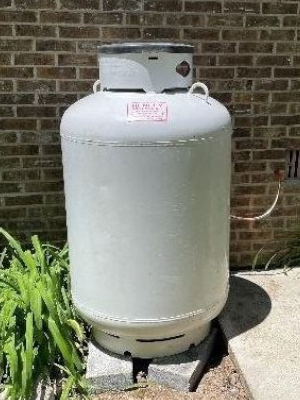
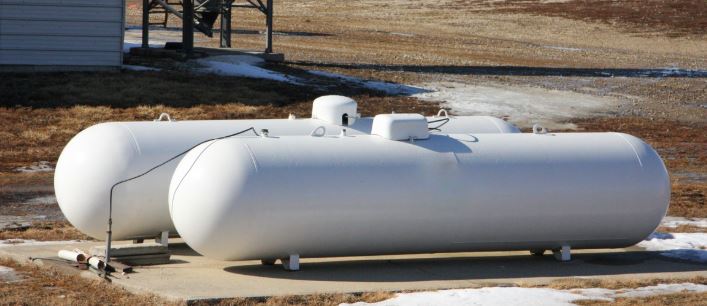
Propane tanks have a large range of sizes, which can make it even more expensive for a fill-up.
Should You Heat With Propane?
Long term, propane is not a great heating oil solution. It’s very restrictive when it comes to ordering for your home and can be expensive. When you’re comparing it to heating oil, it is outclassed. Heating Oil is the obvious choice, and is often more reliable. With being able to produce more heat per gallon at a cheaper price, it’s able to be a better solution long term.
However, propane is still a great source of heating for your home utilities! Just one small tank will be able to cover water heating, powering a stove and much more in your home! Plus, getting a small refillable tank for a grill means that you can the occasional summer barbeque!
Heating Oil is a very popular way to heat your home. Especially here in the Northeast United States! But why is it as popular as it is? There are a lot of factors that make it the prime choice. For example, it’s very safe to use, easy to obtain, and very efficient. But in this article, I’m going to go through everything you need to know about why that is. I’ll be discussing what makes it so popular in today’s market!
Comparing Heating Oil and Furnaces
In the Northeastern United States, you can find some of the nation’s oldest homes. Some of these homes even date back to the 1800s! But in the 1900s a lot of homes were heated with coal furnaces. This means that you’ll often find that most of these older homes have coal furnaces installed in them. These are usually located in the basement of your home and similar to heating oil, coal used to be delivered! You would have to order a shipment of coal that would be delivered to your home. The coal would come and would then be shoveled into your furnace to keep the house warm. However, over time these coal based furnaces became phased out and replaced with wood-burning stoves which were more efficient.
Wood burning stoves are still popular today! While not as popular as heating oil, they are still a helpful and useful tool for home heating!
When comparing heating oil to coal and wood, it’s often the better option. It produces more heat than both of them and is also much easier to maintain and operate. Heating oil is also easier to store compared to coal and wood. Back then, storing coal and wood was a hassle and not as convenient as it can be now. But, heating oil is very easy to store! Once you have a tank in your home, you can store the oil in your tank and the system will draw it from your tank to the burner when you need it!
Transitioning from Coal to Heating Oil
As heating oil got more popular in the middle of the 1900s, coal trucks slowly became both heating oil and coal trucks. Before they eventually became just heating oil trucks. This caused in an increase in popularity, thus phasing out coal from homes. Slowly but surely heating oil became the new normal. Heating Oil was just able to produce more heat per gallon compared to coal and wood ever were.
What are the Benefits of Heating Oil?
There are many benefits to using heating oil that other ways to heat your home might not necessarily have. Electric Heat and kerosene are both expensive, and while natural gas is convenient, it’s not necessarily easy to come by. But here are just a few of the benefits:
It’s Very Safe to Use: Heating Oil is one of the safest ways to heat your home. In it’s liquid state, it is non flammable and it has to go through the process of atomization for it to become ignitable. That means that it’s impossible for it to start a fire or explosion in the tank itself. If you were to drop a lit match into a bucket of heating oil, the oil would douse the flame. Just don’t try this at home because heating oil has a very pungent odor! Most importantly, it must be heated up to 140 degrees and atomized for it to become flammable.
Great Efficiency: One gallon of heating oil can produce a total of 138,000 BTUs. Now when you compare this to propane, which only produces 91,500 BTUs per gallon. So propane actually produces LESS heat per gallon. But while they are efficient, they can’t use 100% off all those BTUs. So heating oil will only produce 85% effective BTUs. Which equates to 117,725 usable BTUs. Propane will only be able to produce 86,925 usable BTUs per gallon.
Freedom to Buy: The nice thing about heating oil is that it’s not restrictive. You own your tank, unlike with propane, where you rent the tank. You can order from whoever and whenever you want. So you’re not reliant on one dealer to come out and deliver! So if you want to top off your tank, you’re able to do so! This will save you so much money in the long run, because you’re able to shop around and look for the lowest prices possible.
Adding Diesel When Running Out: Unlike propane, if you’re at risk of run out, you can go to your local gas station and pick up a couple of gallons of diesel.. While you should only do this in an emergency, heating oil and diesel are similar enough that you can do this if you’re in a tight situation. Five gallons can keep you warm for a few days or overnight, depending on the time of year!
Can Monitor Easily
Another great feature about heating oil is how easy it is to monitor! You can use a float gauge or a Smart Oil Gauge, to be able to track your level and usage on your tank! When it comes to the float gauge, you’ll have to go down to the tank every so often to check your level. However, with the Smart Oil Gauge, you can do all that with the press of a button and the touch of your finger!
Once you install your Smart Oil Gauge, you can monitor your tanks usage and oil level!
With the growing popularity of the Smart Oil Gauge, you won’t have to worry about running out or how many gallons you’re burning daily. The Smart Oil Gauge will have all that information for you available on the app! You can find all your data in one convenient place on the app! This will make it easier to understand when you need to order oil and how much you’re consistently burning.
Heating Oil Is the Way to Go!
When it comes down to it, heating oil is the best way to heat your home! Especially in the northeast, this is the easiest and safest way to heat. With it’s high combustion temperature and it’s efficiency producing heat, you’ll have no problem heating your home!
When using heating oil to heat your home, then that means that you’ll have alot of options when it comes to heating your home and where to order from. Plus, you have the freedom to order from whoever and wherever you like! It’s helpful and convenient which will make your heating process much easier and streamlined for your home!
It’s December! Which means that it’s the busiest time of year for heating oil dealers! But this is also the time of year when oil is in the most demand. Especially with Christmas and New Year’s around the corner, it might be hard to get some heating oil soon if you’re running low. So now you might be asking, “When should I order oil?” or “How Long Will my Tank Last me?”. Well, don’t worry, I’ll be sure to cover everything that you need to know about your heating oil usage during the winter season!
Tank Sizing
The size of your tank plays an important role in determining when you need to order heating oil. The more oil your tank can fit, the less frequently you’ll have to order. The most common size for a heating oil tank is 275 gallons. These tanks have a maximum capacity of 275 gallons. However, their true capacity is 250 gallons. This is because the dealer will leave the top couple inches free for air flow. They do this to prevent the tank from overflowing and to prevent leaks. This is on all oil tanks. The dealer will never fill your tank to max capacity because it puts the tank at risk of leaking. The second most common tank sizes are 330 gallons. Similar to their 275 gallon counterpart, their true capacity is 315 gallons.
Dual tanks are another common way to store oil in your home. These are tank combinations that are two tanks linked together. Meaning that these setups offer double the capacity. So on a system that has two 275 gallon tanks, your system will effectively be 550 gallons! This typically means that you’ll have to order less frequently, but in higher quantities. These tanks connect via the feed lines and the system will draw from them equally. But if there’s a clog in one of the feed lines, then that means that the system will end up drawing more oil from one tank.
Average heating oil tanks tend to be 275 gallons as their maximum capacity. But the true capacity tends to be 250 gallons.
Underground tanks tend to be pretty uncommon nowadays but are becoming increasingly rare. Their smallest sizes tend to be around 500 gallons, but some can get as big as 1000 or even 2000 gallons! These tanks are constantly being removed because they are environmental hazards. This is causing them to be constantly removed and replaced with newer tanks.
How The Size of Your Home Affects Usage
While the size of your tank will affect how much oil you burn, your home’s size also greatly contributes to high usage as well. Here are just a few of the major factors that contribute to high usage:
Home Size: This is probably the most important factor on this list. The size of your home will greatly impact how much oil your system will burn. The larger your home, means more surface area that your system has to heat, which means that you’ll burn more oil on the daily. For example, a 1500 square foot home might use an average 500 gallons of oil per year! Sounds like a lot right? Well a 3500 square foot home could use an average of 1200 gallons of heating oil per year!
The Energy Efficiency of your Home: If your home has good insulation, then this will drastically decrease the amount of oil you’ll use! Good insulation makes it harder for heat to escape the home, which won’t over work your system. 2500 square foot homes that gave good insulation will likley only use 600 gallons per year! Meanwhile a home of the same size that’s poorly insulated might end up burning 1200 gallons of heating oil annually!
System Age & Maintenance: The age of a heating oil system will play a big roll in how much oil you’ll burn. If your system is properly maintained, then your system can last up to 30 years before needing a new one! However, this is still no match for a newer tank system that tends to be roughly 30% more efficient.
Temperature: Both interior and exterior temperatures will effect how much oil you’re burning. If you tend to turn the thermostat high, try lowering the temperature on it. The higher it is, the more heat your system will burn. However, the outside temperature does play more of a role in how much you’ll burn! The average day in December is typically anywhere from 20-30 degrees. This can cause your system to burn roughly 5-6 gallons on the daily! Just to keep you warm! But in the single digits, you might even see yourselves burning 8-12 gallons of oil!
Your Daily Usage
After determining how big your home is, it’s important to figure out how much heating oil you’re going to be burning on a daily basis. This will give you a rough estimate as to how many gallons of oil you’ll be burning daily. Your home’s size will also help you determine when you’ll need to order more oil as well as how much you’ll be burning.
The above charts shows how your home’s size and the daily temperature will effect your usage.
However, with that in mind, it’s important that you should never let your tank get close to running out! This can damage your system and put you at risk for run out! To prevent this, you should always order oil at a quarter tank.
How Long Will Your Tank Last?
This factor is determined by when you order oil and by how much is already in your tank when you order. For example, if you place an order for heating oil when your tank is half way full, then you’ll last until your next delivery. However, if you order when you’re low on oil, then there’s a chance that you won’t get your delivery by the time you runout. Think of it like filling up your car. Letting your car run on empty is never a good idea. The same is true for a heating oil tank. Letting your tank run low will not only damage your system, but if you’ve got sludge build-up, the sludge will clog the tank’s feedlines. To prevent this, it’s really important that you order oil when the tank is at a quarter.
Following the rule “reorder at a quarter” is a good structure to have when ordering heating oil. Regardless of if you use a float gauge or Smart Oil Gauge, you’ll be able to determine when your level reaches a quarter tank so that you can place an order. But note that float gauges will are never 100% accurate. They don’t account for the tanks curvature and this can make it look like you’re burning a lot more oil than you actually are.
By following the above example, you can tell when you should order oil by where the float gauge is sitting.
On a 275 gallon tank, the quarter mark is roughly 68-75 gallons. Now, because 275 gallons tanks only have a maximum capacity of 250 gallons, this means that there’s only really 175-182 usable gallons of oil. You can still use the oil below a quarter tank, but try to think of that as your safety net. But, you can calculate your usage based on the above graph. Here’s an example:
Home Size: 2500 Square Feet
Average Outside Temperature: 30 Degrees Fahrenheit
Daily Average: 5 gallons per day
Tank Size: 275 Gallons (True Capacity 250)
When To Reorder: Quarter Tank or 75 gallons
Gallons You Can Use: 175-182 gallons
Days Between Fills: 175-182 gallons/ 5.2 gallons/day= 35 gallons
So if the average exterior temperature stays around 30 degrees Fahrenheit, the average 275-gallon tank in a 2500 square foot home will last you roughly 35 days before you need to fill up again!
Checking When you need Oil
The last thing you want to happen this time of year is waking up to a cold house. That isn’t very fun, I’ve been through it. A Majority of the time as to why this happens is because you’ve run out of oil. If this happens to you, then following our guide on what to do here.
If you’re using the standard float gauge that comes with your tank, then you’ll want to check it at least every two weeks. This is because these gauges aren’t always accurate and you won’t usually be alerted if you’re running low. So it’s important to check frequently.
But using a tank gauge such as the Smart Oil Gauge, will help you immensely! Using one of these gauges will give you the ability to have access to your tank’s level and usage data all the touch of your fingers! As long as you have access to cell service or WIFI, you can access it all with just your smartphone! You can even order oil through the app with our built in FuelSnap integration!
However, if you’re still new to heating oil then you might want to closely monitor your usage. This will give you an idea of how much you’ll need to order, how frequently you’ll need to and what your average usage will be.
Your home’s size will determine how many gallons per year that you burn. This gives you the idea of how many gallons you’ll burn annually depending on your overall usage.
Conclusion
The best time to order oil is at a quarter tank. This is typically when the float gauge is at the 1/4 mark. That’s when you’ll know it’s time to order heating oil. You can always contact local dealers in your area, or use websites like FuelSnap to find out the local pricing per gallon.
You can choose which dealer you want to deliver and how much! That way you can avoid waking up in the middle of the night with a cold house and no oil! By not only being on top of your oil level, but also understanding when you should order will help you so much! This will give you the best structure for using oil in the winter time to help prevent running oil!
Happy Heating,
Hunter
As an Amazon Associate I earn from qualifying purchases.