So you’ve got your Smart Oil Gauge and are not sure where to start, well you’re in luck! In this post, I will go over everything that you need to know about it! Everything that you need will be available here for your convenience. So feel free to bookmark this post so that you have everything you need to know in one place! Now there’s going to be a lot of information here, so I recommend reading through this post multiple times to absorb all of it!
Setting Up the Smart Oil Gauge
The first thing you’ll want to do for the Smart Oil Gauge is set it up. We recommend that you do this process off the tank. This can be done after the gauge has been installed into the tank. However, we find it to be a bit easier to do this process if the gauge isn’t installed onto the tank.
There are two ways to set up the smart oil gauge. The first way is with “Smart Config”. You can do this through the Smart Oil Gauge app. Start by downloading the app. You can download it from both Android and IOS app stores. Once you have downloaded the app, open it up and it will prompt you to a login screen. If you do not already have an account, then you will have to make one. Follow the steps it gives you to create one, then we can go through the setup process.
Smart Config Process
This is the process that you will need to go through if you are doing the in-app setup process. To start this process, go to the screen that says “My Tanks” on the top left. On Android devices, you will need to click the wrench on the top right and select “Connect Sensor”. For IOS users, there is a plus sign that you can press on the “My Tanks” screen.
The first screen you will see is the screen asking for your WIFI network password. Make sure your phone is connected to the WIFI network that you want to connect the gauge to. Once you have verified that you’re on the correct network, type in your WIFI password (hit the eyeball to make sure everything is correct) and hit continue. Follow the Mickey Mouse hand icon and press the tall thin black button twice. The gauge should start blinking twice a second. Select continue and your Smart Oil Gauge will begin it’s configuration process! If all goes well, the gauge will connect you will get a message that says “Configuration Successful”.
If you get a message that says “Configuration Failed” try again and if it still doesn’t work, try doing the Alternate Setup Process, that’s shown below. We have a video tutorial for this process on our YouTube channel. If you need help getting your gauge setup, check it out!

Alternate Update Process
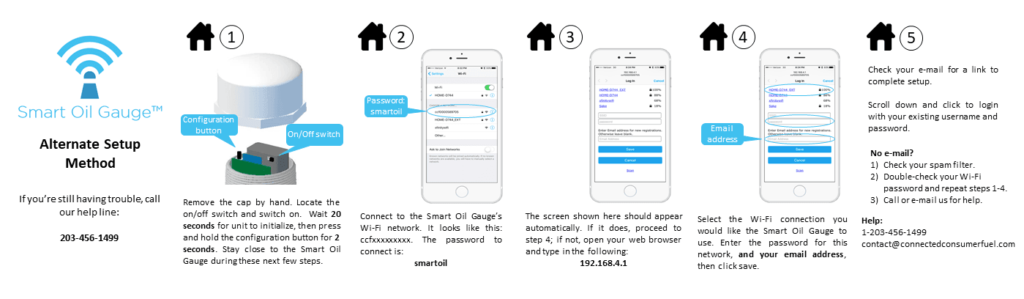
The Alternate Update Process is my preferred way to connect the gauge to your internet. Simply because it is a bit more versatile and can be done on any device! Unlike the smart config, this method can be done on a device that doesn’t have the app installed.
The first thing that you will need to is go to your WIFI settings on your phone. After you’ve done that, make sure that you unscrew the white cap and turn the smart oil gauge on. While the board is booting up, go to your phone’s WIFI settings. Then, press and hold the tall thin black button once for two seconds (try counting one-one thousand, two-one thousand) before letting go. The gauge should start blinking once a second, then if you take a look at your cell phone’s WIFI settings you should see a network that says CCF****** show up. That is your Smart Oil Gauge.
Select that network and it will ask you for a password. The password is smartoil. After using that password it will take you to a login screen (If you’re on IOS). If you’re on Android, after connecting to the CCF network, you will need to go to your web browser (Chrome, Firefox, Opera, etc) and type in the IP address for the gauge. It’s 192.168.4.1, and once you’ve typed that into your web browser, it should take you to the login screen.
Once you are in the login screen, tap on your wireless network on the top left that is highlighted in blue. Your network will autofill the SSID box and you will be defaulted to type in your network password. After typing in your password, type in your email address and hit save. If everything goes well, you will receive a setup email from us to finish setting up your smart oil gauge. Follow those steps and the gauge should link to your account. If you do not receive the email, try going through this process again. If you’d like to see a video tutorial on this, check it out here!
Tank Style and Upload Interval
After you’ve successfully connected your smart oil gauge to your account, it’s time to choose a tank style and set an upload interval. If you went through the alternate setup process, you’ll likely have seen these when setting up the gauge.
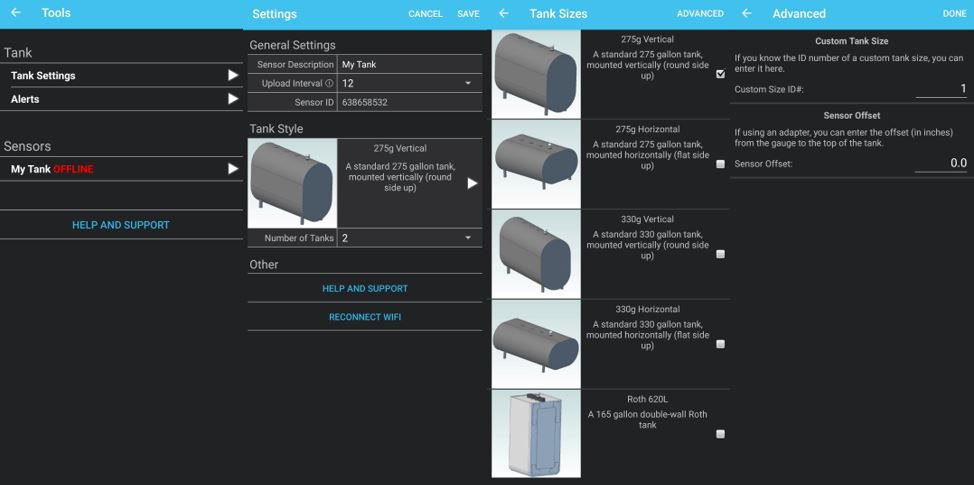
To change these you must first be on the tank detail screen. For IOS users, you will see a gear icon on the bottom left. While for Android users, on the top right, you’ll see three dots that will say configure when you tap on it. Both these buttons will take you to a screen that says tools. There’s a lot to take in here, but to start out, select “My Tank” under sensors.
After selecting your tank, you are brought to your sensor’s general settings. Here you can change your upload interval and tank style. The upload interval is how often the gauge will upload the readings to our servers. The gauge will take a reading every hour and store those readings until it’s next scheduled upload.
The gauge can upload every 1-24 hours, depending on what you set it to. The default for this is 4 hours. While this is not a bad default, we typically recommend setting the gauge to upload every 12 hours. This is the most efficient because it will give the gauge a consistent upload schedule, allowing it to upload twice a day, and will help the gauge preserve the battery life for longer.
Tank orientation is a very important thing to know as well. It’s very important to know your oil tank’s orientation so that you can effectively read what’s in your oil tank. Using the incorrect tank orientation will cause many issues for your gauge. The sensor could tell you that the tank is full when it isn’t, or that you have a couple hundred gallons but you’re actually full. So it’s important to know the exact measurements of your heating oil tank so that your gauge provides you with accurate readings.
Sensor Offset and Custom Tank ID
If you take a look in the above photo, you’ll notice two tabs in the advanced tank settings. These are the Sensor Offset and Custom tank ID. These are features that will often help with tanks that aren’t a standard size or don’t have a big enough fitting.
You will only use the custom tank ID when your tank doesn’t show up as one of the main few that appear on the tank screen. Simply just email us or give us a call with your tank size and dimensions and we will happily program that into our system for you!
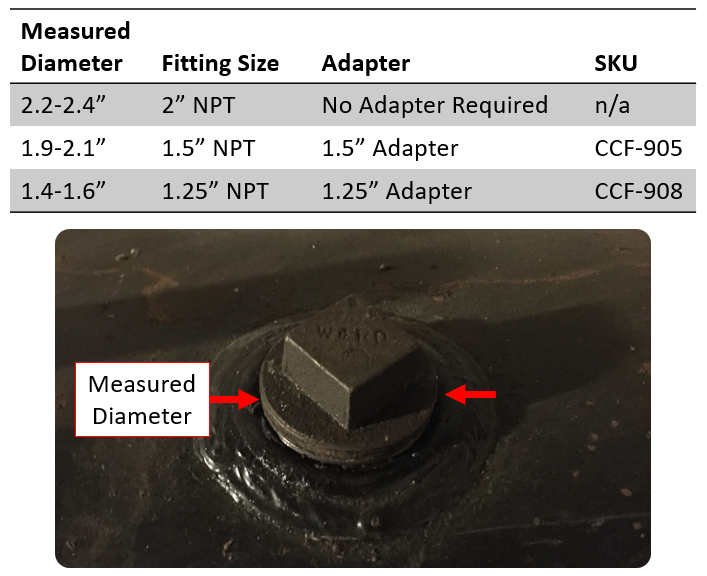
The sensor offset is another tool that you can use for your tank, but it’s a bit more situational. You should only use the offset when you’re using an adapter. Adapters will not be necessary on most tanks, unless you have a tank fitting that will not fit the smart oil gauge. For example, we have several fittings that you can use for various tank and fitting sizes. For Roth tanks, the adapter is a requirement. This is because without the adapter, the gauge will always read full. The other two adapters we have are for 1.25″ NPT and 1.5 NPT fittings. They are used for smaller fittings sizes than the gauge’s 2″ NPT fitting.
Setting Up Tank Alerts
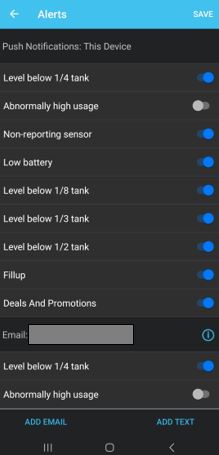
You probably noticed the tab that says alerts in the chart above. That is how you can set alerts for your smart oil gauge. There are a variety of different alerts that you can set for your gauge. You can set them to send you push notifications, emails, texts or all three!
There are many types of alerts that you can set on your smart oil gauge. Here are just a few of them:
- Receiving a Fill
- Reaching Below 1/2 tank
- Reaching Below 1/4 tank
- Abnormally High Usage
- Non-reporting sensor
Those are just a few of the alerts the gauge offers. To get to the alerts page, simply follow the same steps provided above that would get you to the tools section, and select “Alerts” instead of “My Tanks” under sensors. Once in the alerts section, you can choose which notifications you would like to receive via push notifications as well as setting up other forms ways to receive alerts such as email and text.
The Batteries
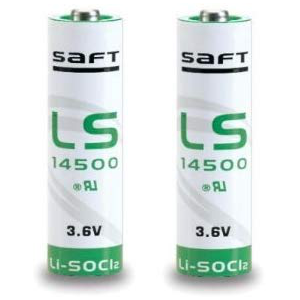
It’s important to make sure that the Smart Oil has the correct batteries installed. The gauge CANNOT use standard Duracell or Energizer batteries. They are simply not strong enough to power the gauge. These batteries can power the LED lights in the gauge, but cannot power the device itself.
The gauge must use the SAFT LS14500 batteries. Any other batteries that are not the SAFT brand of batteries will not work effectively. We have had the most success with the SAFT batteries and we recommend that you use those. If you need to install the new batteries, watch this video tutorial here.
Installation
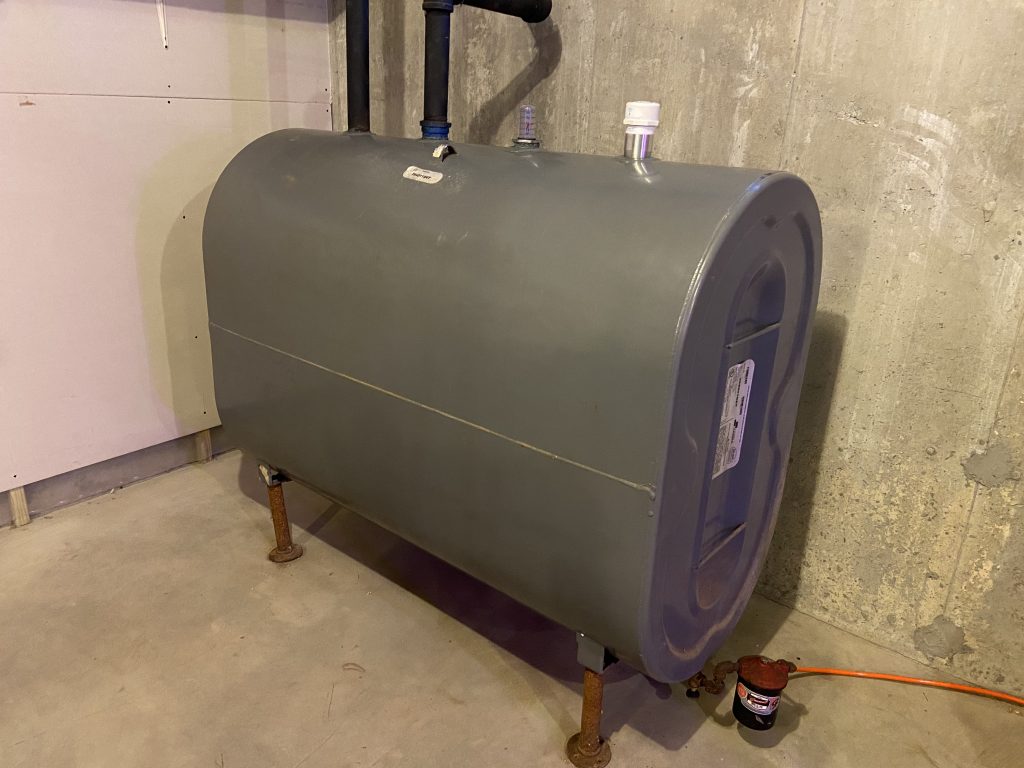
The Smart Oil Gauge Install is relatively simple. All it takes is some pipe dope and a pipe wrench! The install can even by done by yourself! First, put a thin layer of pipe dope on the bottom threads and hand-tighten it into the tank. Then once the gauge is tight, you will need to tighten it down as far as it can go with a pipe wrench.
BE SURE TO DO THIS AFTER YOU SET UP YOUR GAUGE. While doing this process before you set up the gauge is fine, doing it after it’s been setup will make this a lot easier for you. If you need help going through the installation process please take a look at this installation guide right here.
The installation is a little different depending on your tank. If you have a Roth tank, you will need to follow along with the Roth installation process. We have a video tutorial available to you here. Meanwhile, if you have a standard steel oil tank, you’ll need to go through the Steel tank installation tutorial.
Ordering Oil Through the App
One of the most useful features that the Smart Oil Gauge has is being able to order oil through the app. In the “Tank Detail Screen” you will see a big button that says “Check Oil Prices – FuelSnap”. If you click on this, you will be able to order oil through the app.
If you put in the address of your tank into your app, then you will be able to see all the local dealers in your area, based on the address you put into your smart oil gauge. Then, based on your current level in your tank, you will be able to order an amount of oil that would fill up your tank. If you haven’t put your tank’s address into the app yet, simply follow the steps listed to change your upload interval and setup alerts and choose “Tank Settings” instead.
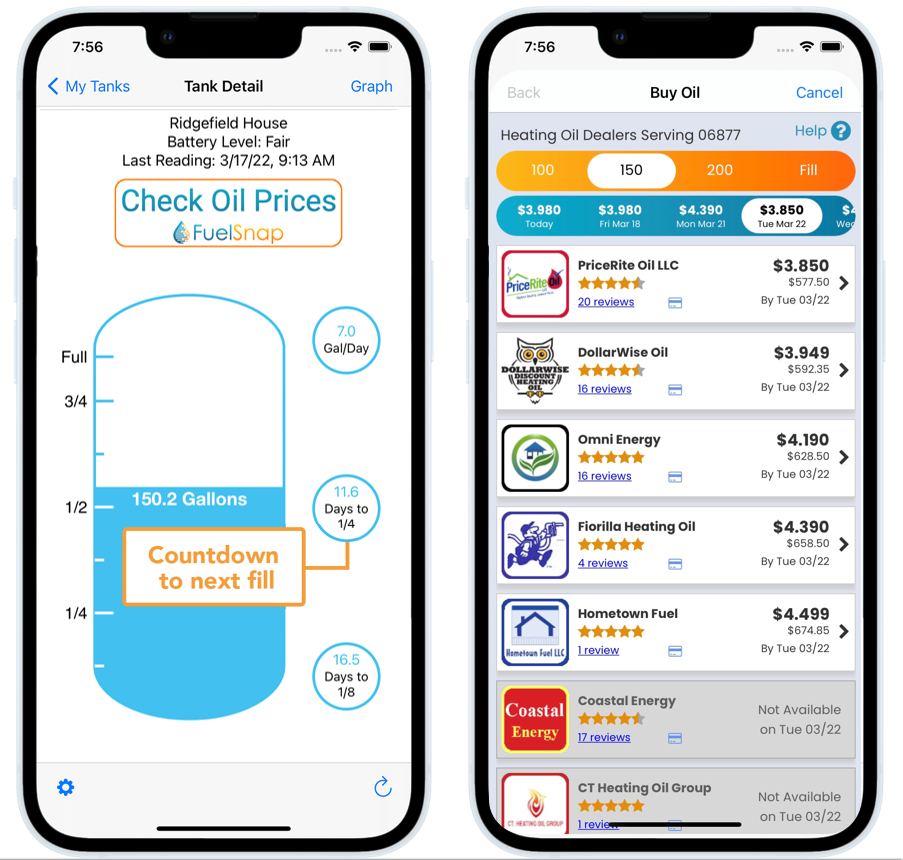
It is good to note that ordering oil through the app is completely optional! If you have a reputable oil dealer that you have been working with for years, then by all means stick with them! However, if you ever find yourself out of oil or low and need some in a pinch, you have access to it right from the app! You can even order oil on our website! Simply go to our FuelSnap website and type in your zip code to get the latest oil prices in your area!
The Tank Detail Screen
Consider this screen to be your home screen. This screen is where you will be able to see your tank’s current level, battery reading, order oil and much more. You will find yourself using this page on the app most often, as it has the most information accessible to you. On the top, you will see a graph and a little droplet with a dollar sign in it. The droplet will take you to the screen that lets you order oil, while the graph gives you a graph of your usage and oil level. Here, you’ll be able to review yearly, monthly, weekly and daily usage data. You will be able to get averages of gallons per day, gallons per hour and a total amount of gallons used during that period of time.
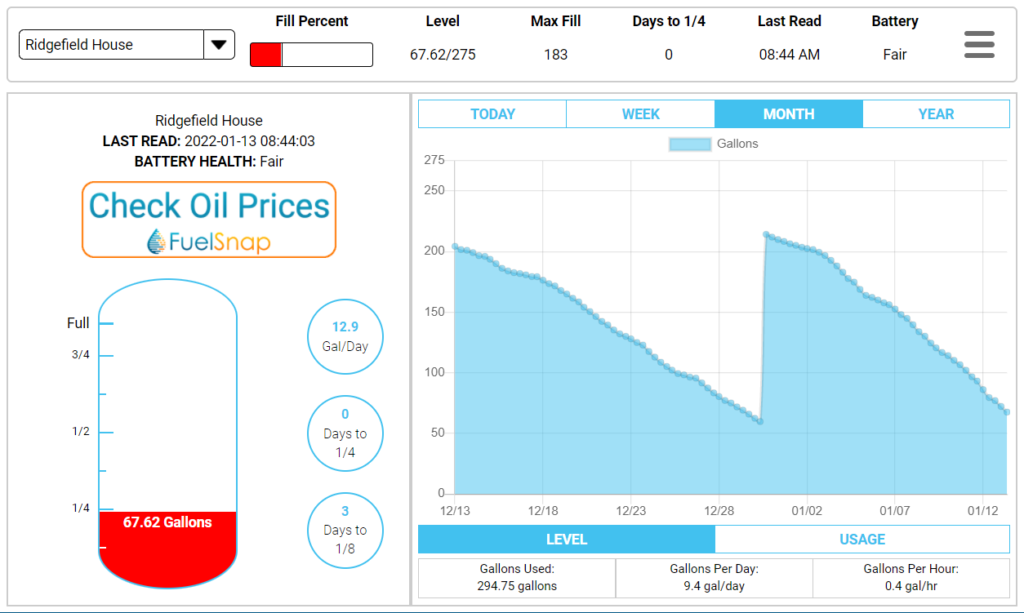
On the tank detail screen, you will see three bubbles. Each bubble is marked with different data points. They are labeled “Gallons per day”, “Days until 1/4″ and Days until 1/8”. These bits of data will populate once you’ve had a full weeks worth of data. They will then give you an average based on your past week’s data. This data changes when you get your next full weeks worth of data. So each week you’ll have different data!
The Smart Oil Gauge’s Blind Spot
A very important note that you should know about the Smart Oil Gauge is the blind spot/dead zone on the top 8″ of the tank. This is very noticeable after a fill and is often mistaken for dealers not giving you your full amount. But don’t worry, if you received oil and your gauge isn’t reading full, it’s likely the blind spot.
But you might be asking, how does the blind spot work? Well it’s pretty simple, when the gauge sends the ultrasonic sensor down to the oil level, it bounces back up to the sensor. But when it arrives back up to the top of the tank, the sensor is still in a sending mode, so the signal bounces off of the top of the tank and back down to the oil where it then goes back up to the sensor and then the gauge will receive that information. So the gauge is basically seeing double than what it should be.
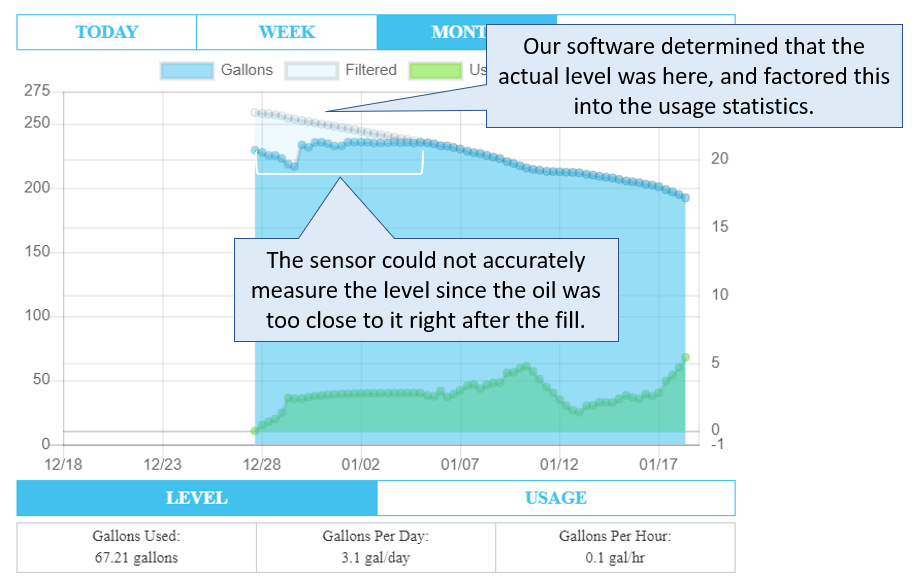
When you receive a fill of oil, the oil gauge will only read the amount that it can physically see. However, the oil level will slowly decline and will eventually clear the blind spot on it’s own. When this happens, you will see a steady decline in oil level on the app as you burn oil. But the gauge will then suddenly spike back up once you clear that blind spot. So until you clear the blind spot on your tank, assume that you have more oil in your tank. If you want to learn more about the blind spot, we have a very in depth write up here that you can refer to.
Conclusion
Now that you’ve read through this article, you now know everything that you need to know about the gauge! You’ve learned everything from how to set it up on the app, to installing on your oil tank! The smart oil gauge will be a handy tool that you can use to monitor your oil level and ensure that you’re burning your oil!
Please feel free to bookmark this post and read it over a few times! There was definitely a lot of information in this article and it makes sense to save it for later and take another look at it! The more you know, the more you’ll be able to understand the gauge a little bit better!
If you ever have any other questions or other issues with the gauge, feel free to reach out to our support line! We are available Monday through Friday EST 8:30am-5pm or at contact@smartoilgauge.com!
Happy Heating,
Hunter

