How Long Will Five Gallons of Oil Last You?

It’s currently early November, which means heating oil is starting to become crucial for us to get through winter! While it’s primarily used for heating during the winter, it’s got a variety of different uses! However, because of the cold temperatures, heating oil becomes very sought after this time of year. This means that heating oil prices are going to be higher, and scheduling deliveries won’t be as easy. So, if your tank’s low, you might be asking, “How Much Will Five Gallons of Oil Last Me?”

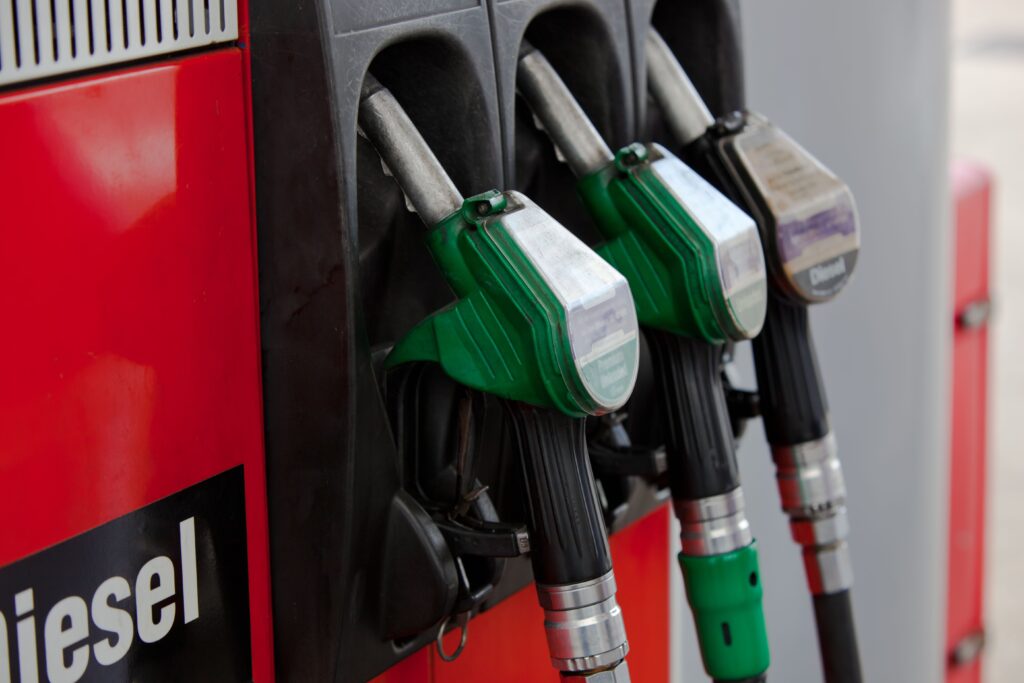
However, if you’re low on oil, then place an order immediately! Getting yourself on your dealer’s schedule so you don’t run out is crucial! If you’re about to run out, or you’ve got less than 15 gallons of oil, run to the gas station and get about 5-10 gallons of diesel. This’ll help hold you over until the delivery arrives.

There are a lot of things that can contribute to your usage. Five gallons is not a lot of oil at all, and during the winter months, you might not even get a full day out of five gallons! But during the summer, you’re going to get a couple of days out of five gallons. But it’s still important to ask yourself the following questions:

  • What’s your Heating Oil being used for?
  • What’s the size of your home?
  • Is your home properly insulated?
  • Are there any drafts in your home?
  • How warm does your home tend to be?
  • What’s the weather like outside?
  • Is your boiler well maintained?

Improving Insulation

Good insulation is one of the best ways to make heating oil last! Well-insulated homes can hold heat for a longer period of time than those that aren’t. One of the best ways to improve insulation is to seal up any drafts in the home. This can include covering up any doors or windows with draft stoppers. On older homes, you can even wrap plastic wrap over your single-pane windows to act as a makeshift second pane! Proper insulation will absolutely decrease your heating oil usage and make it last!
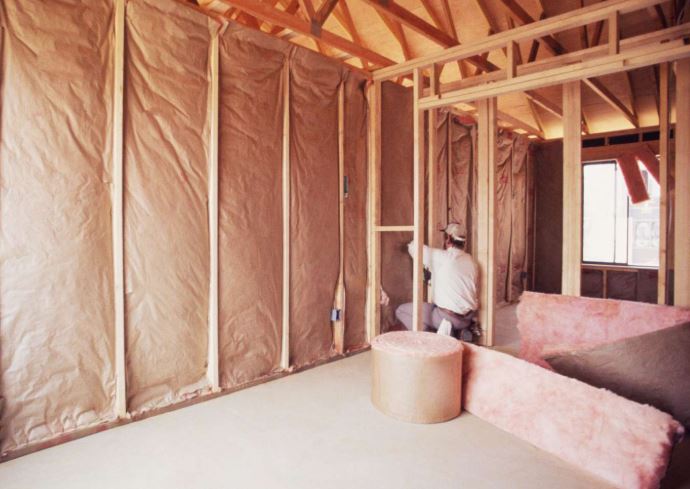
Insulation is important for your home to maintain heat! Usually, insulation is put in when the house is built. But you can always add more to other sections of the home or even the attic!

Sealing Windows with Drafts

If your windows are drafty, then they absolutely could be affecting your usage and will result in higher usage. If the home can’t maintain the heat your system is producing, then your system will work harder to produce more. That heat will then escape your home through the draft, which repeats the cycle. Most older windows are single-pane, and they don’t properly hold the heat in as well. I mentioned this earlier, and while it might seem silly, putting plastic wrap around the single-pane windows will help provide a makeshift dual pane!

While it isn’t a cheap solution, you can always update your drafty windows and replace them with new ones. But replacing your outdated windows with new double-pane windows can be helpful to reduce your overall usage. While newer windows will be less drafty, sometimes newer double-paned windows will be able to trap air inside them! This acts as another form of insulation!
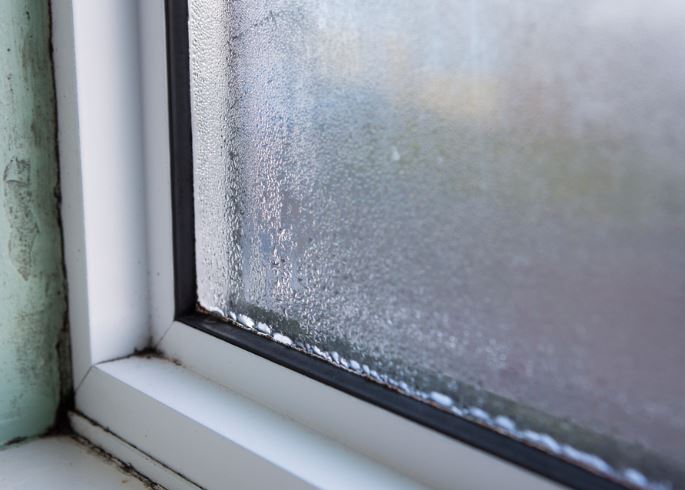
Drafty windows can be a pain! Especially if they’re causing your oil usage to increase!

Using Heating Oil For Your Home

During the colder months of the year, heating oil becomes very sought after. This is because cold weather is more common now. Sure, we might have a warm day here or there, but most of the time, the weather this time of year will be cold. This results in your system working much harder to get the house to a warm and comfortable temperature. Now, if your home is larger, your consumption will be higher as the system tries to heat the overall larger surface area. Your boiler/furnace will work much harder to accomplish this. Higher usage overall will be the result.

The time of year is a major cause for usage. Right now it’s mid-autumn, which means that temperatures are fairly cold outside. Not as cold as winter, but enough for us to want to start using heating oil! But it’s not cold enough to warrant us burning 5-7 gallons like in winter! In the fall, you might see yourself burning between 3-4 gallons a day on average, just to keep us warm! But, during the summer, you might see yourself burning no oil at all! If you use heating oil for hot water, you’ll likely only burn around half a gallon daily.

How Temperature Outside Affects Usage

The temperature outside plays a major role when it comes to heating oil usage. In Connecticut, it typically averages around 30-35 degrees during the winter. Average homes of 2000 square feet will tend to use an average amount of 5-7 gallons of oil daily during the winter. However, during the summer, when temperatures average between 70-80 degrees, you’re only going to use around .5-1 gallons daily. That’s only if you use it for hot water. If not, then you won’t end up burning any oil at all!
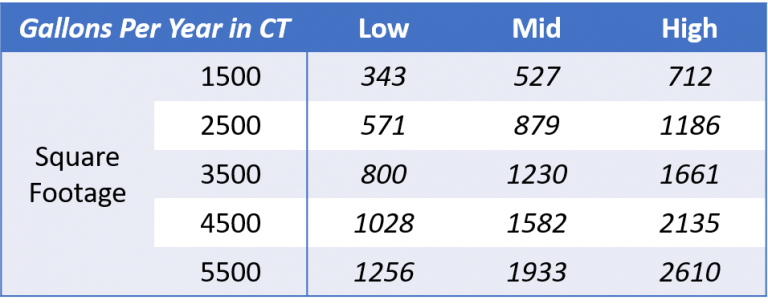
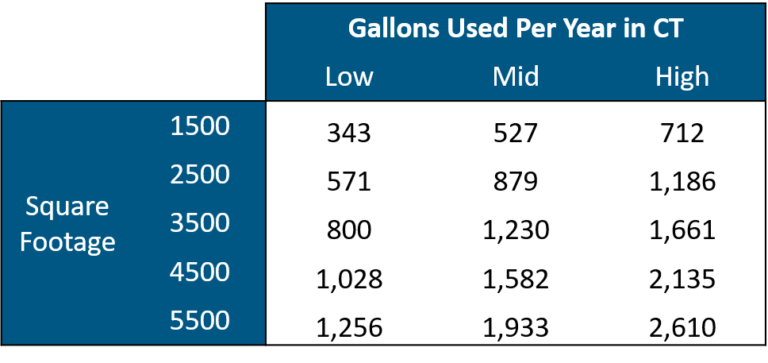
Your Annual heating oil usage is determined by the size of your home as well as the temperature outside!

Looking at the above graph will give you an idea of the average amount of annual oil consumption in Danbury, CT. This is based on low, mid, and high usage. In Connecticut, we often see low temperatures in the winter. The lower the temperature outside is, the higher your usage will be.

Your Thermostat Reduces Consumption

Your thermostat is actually a great tool to use during the winter. You can often set it at a specific temperature to make your usage optimal. Ideally, this tends to be around 70 degrees Fahrenheit. During the winter, this is a perfect temperature that’s not too hot, but also not too cold. This’ll keep you comfortable during this time of year! But if you live with your parents, just make sure you don’t change the temperature for them!

WIFI thermostats are a bit more modern, but boy, are they useful! You can set the thermostat to any temperature you’d like, simply from your phone! Most of them have an app that you can download from your phone’s app store to be able to control the temperature wirelessly! If you’re not home, then you can always lower the temperature in the house so you don’t burn unnecessary oil! However, if you have pets, you won’t be able to lower the heat.

Boiler and Furnace Efficiency

Even if your home has good insulation, that won’t matter if your system isn’t efficient! You should make sure that your system is checked annually to ensure everything is working as it should. Burners tend to have a lifespan of about 30 years. If it’s older than that, it may not be as efficient as you think. Your system might not be as reliable as you think! If your system is older than 30 years, it’s likely not very efficient. While it’s expensive, replacing your boiler or furnace will help increase your system’s efficiency! It’s always good to have an HVAC technician come out and take a look at your system. Their expert opinion will be a great way to make sure your system is reliable!

The Smart Oil Gauge

While all the above-mentioned ways are great ways to mitigate oil consumption, getting a Smart Oil Gauge puts you ahead of the game! You’ll be able to properly keep track of your heating oil consumption and usage. All you’ll need is a stable WIFI connection and the app installed on your phone. After you’ve got your gauge connected to the WIFI, it’ll keep track of your usage and level data based on day, week, month, and year. Similar to a WIFI thermostat, you’ll be able to track your level and usage all on your fingertips! Plus, you will get notified as to when you need a delivery, when you get one, and when your tank level is low! You can purchase one here. The gauge works off WIFI, and as long as the device is set up for the right tank size, the gauge will be able to upload accurate readings.
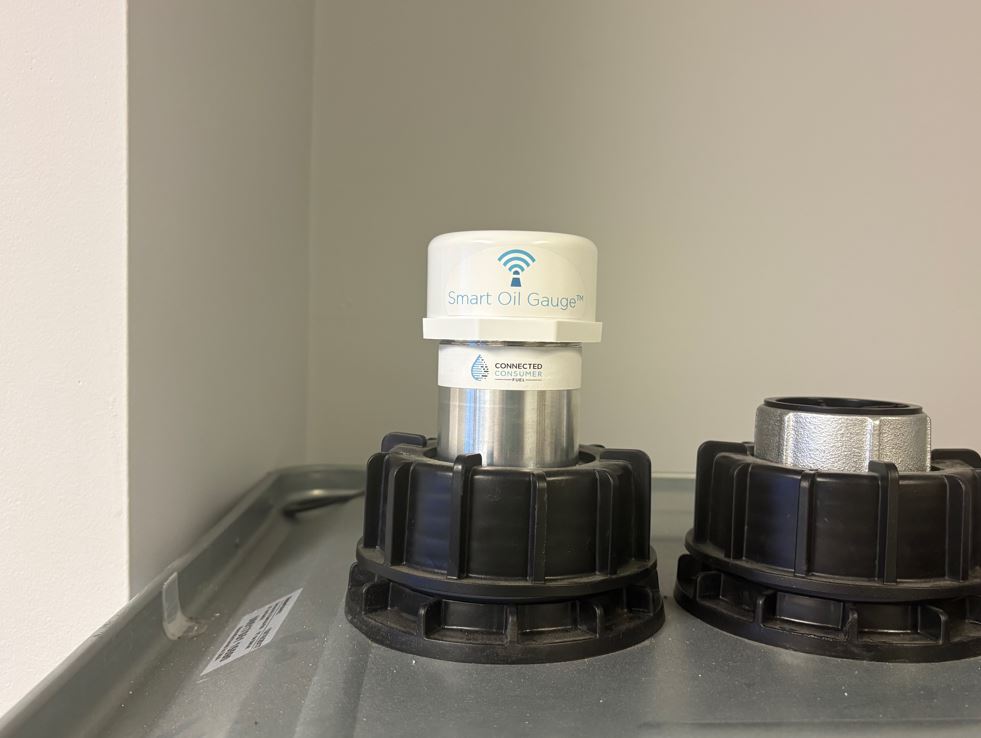
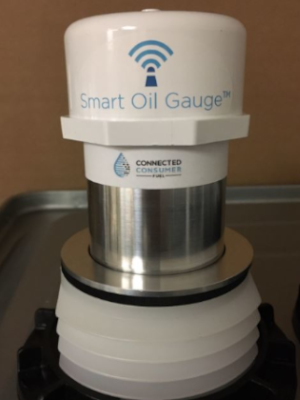
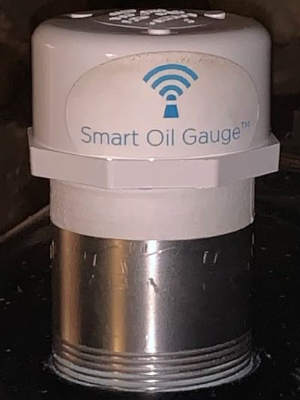
This is a picture of my Smart Oil Gauge! You can see it sitting on my tank. It’ll upload readings of the level and usage to the app on my phone!

So How Long Will Five Gallons of Oil Last you?

Depending on what time of year it is and what your usage is, five gallons of oil could last you either a full day or even a couple of days! However, your usage and insulation play a major role in this! The better your home is insulated, the longer it’ll be able to hold onto the heat your system produces. Covering up any drafts that might be causing heat to leak out of the home is another great way to lower your overall usage.

But ultimately, the best thing to do to determine how long five gallons will last you is to get a Smart Oil Gauge! Each home is different, and what might last me a couple of days might not last you a couple of days! The Smart Oil Gauge will be able to monitor your usage and tank level, so that you know how much oil you have and how long it’ll last you until you run out or need a fill-up!

Happy Heating!

Hunter

The Effect Halloween has on Heating Oil Usage

Halloween is coming up! This means trick-or-treating with your kids, costume parties, and heating oil season! Halloween marks the unofficial start of heating oil season! This is around the time temperatures start to get colder, which causes us to turn on our heating systems and start burning oil! If you haven’t already, now’s the time when you’re going to need to turn on your system. If you’ve got plans for Halloween this weekend, then you might already have started preparing for that! But don’t forget about your heating oil usage, because your upcoming plans might affect your usage!

Outside Temperatures On and After Halloween

While September 22nd marks the official start of fall, the cold temperatures outside start to creep up on you towards mid to late October. Fall last year started pretty warm, but then we got slammed by two major snowstorms in the winter!

Trick-or-Treating in the cool fall air is part of what makes Halloween so enjoyable!

However, temperatures outside on and around Halloween can tend to be a little erratic. Most of the time, the weather will tend to be cool. Between 30 and 55 degrees seems to be the sweet spot. However, if you have plans to go trick-or-treating with your family, keep an eye on the weather! One year when I was a kid, we got completely rained out! Due to these chilly temperatures, you might see yourself starting to burn oil during this time!

Shifting Prices

Halloween is the last day in October, which means that this is when temperatures start to get cold. This is also around the time oil dealers start to increase prices. When it starts to get cold outside, heating oil becomes more in demand than it was in September. You’re going to want to be warm once it starts getting cold out! Oil companies know that, and they will start to slowly increase their prices as we make our way into the winter. Especially around Thanksgiving and Christmas! That’s when prices tend to get the most expensive! But you can always check prices on FuelSnap to know when they’re the cheapest!

Around Halloween, though, is when the prices start to shift. Whether it starts to get cold out is when the prices begin to change. But some Halloweens can be colder than others! Back in 2011, we had gotten a nor’easter on Halloween! Heating Oil was being burned, and we had no power! We had a total of 12-18 inches of snowfall that Halloween. But during the Pandemic, Halloween was a freezing 21 degrees outside!

Do Halloween Parties Increase Usage?

While you might see some drastic changes in usage around Thanksgiving and Christmas, it can vastly depend on what you’re doing. For example, if you’re just going trick-or-treating with your family and then coming right home, your usage might be relatively low. But if you’re having a Halloween Party or Costume party, then your usage might be much higher than it’d normally be based on the number of people coming. The larger the gathering, the more oil you could see yourself using!

Halloween Parties are a tradition, especially if you have kids! So this might be a very heavy day for heating oil for you!

But if you’re having a couple of people over, say a family friend and their kids, or even just some of your kids’ friends for trick-or-treating and a party, your usage could be mild or high! Outdoor activities such as pumpkin carving, apple dunking, or even other general outdoor activities could help mitigate your usage slightly!

Halloween is the Unofficial Start to Heating Oil Season

While there’s no official start to heating oil season, it tends to be between September and October. However, Halloween tends to be the threshold for when prime season begins. This is around the time of year when temperatures get colder, so heating oil prices and usage increase slowly over time before we get into peak season in mid to late November and into December! But Halloween is on the horizon, and temperatures are pretty mild right now. So be sure to enjoy whatever you’re doing this Halloween, and be sure to make the most of it!

Happy Halloween!

Hunter

Smart Oil Gauge: Setting Up the Proper Tank Size

The Smart Oil Gauge is an accurate and reliable wireless tank monitor! It’ll give you accurate readings for both your usage and level data! However, the most important thing to know regarding the Smart Oil Gauge is its tank configuration! If the gauge isn’t set up for the proper tank size, then it won’t be accurate. This is very important for the gauge’s functionality! I’ll be going through how to make sure that the Smart Oil Gauge is set up for the right tank size!

Compatible Tanks

Tank compatibility for the Smart Oil Gauge is very important. The device needs to be on the exact tank size that you have for your level and usage data to be accurate. So if you’re setting up the gauge and you don’t see your tank size showing up on the tank styles, then please contact our tech support, and you’ll be able to get a custom tank ID for your tank size!

The most common tank sizes that the Smart Oil Gauge is installed onto are Granby steel tanks and Roth tanks. However, Roth installations require our Roth Adapter. While most Granby tanks are usually 275 or 330, Roth tanks have a bit more variety. If you look at the label on the side of the tank, you’ll see what size tank it is. This tends to range from 110 (400L) gallons all the way up to 400-gallon tanks! Even if it’s not displayed on the app, we have the custom tank ID programmed for each Roth tank style!

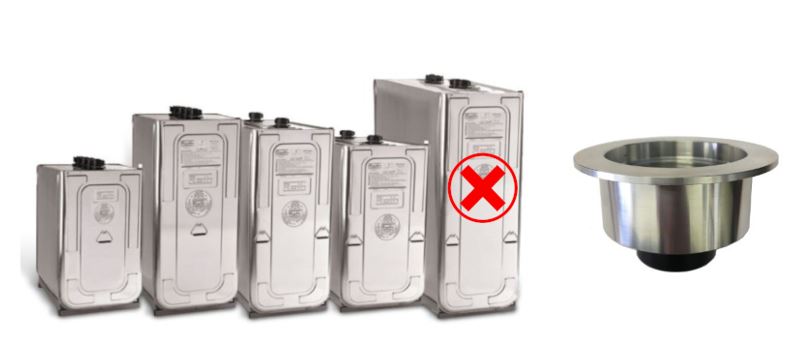
However, the Smart Oil Gauge is not compatible with Roth 1500L (400-gallon) tanks. This is because these tanks have an interior support baffle that prevents the tank from bowing in on itself. The gauge’s signal will bounce off the internal baffle, resulting in being unable to read beyond half a tank!

These are the Roth tanks. The Smart Oil Gauge gauge is compatible with all of them except the 1500L.

Additionally, tanks that are fiberglass or underground are not compatible with the Smart Oil Gauge. Fiberglass tanks are common in Canada. These tanks tend to have a lip on the bottom of the fitting. The Smart Oil Gauge will often catch this lip, causing the gauge to read “Full”. On Underground tanks, due to the tall pipes sticking out of the ground, the Smart Oil Gauge’s signal won’t be able to reach the oil level. This’ll cause the gauge to read only “Full” like on Fiberglass tanks. On underground tanks, it’s best to use a stick measurement, such as a yardstick.

Setting Up the Tank Size

After you’ve determined what size tank your Smart Oil Gauge will be installed on, we’ll need to set it up in the app. The tank sizes available on the app are Granby 275 & 330-gallon tanks. You can configure these in both horizontal and vertical orientations. We also have Roth 620L and 1000L tanks available on the app; the other Roth tank configurations are available here. If you have one of these tank sizes, then great! You can simply choose one of those tanks on the tank style screen! Otherwise, if you contact our support with the dimensions of your tank, we can give you a custom tank size! However, on the top right, you will see an option labeled “Advanced”. This is where you will input the custom tank ID and add an offset if you have the gauge installed into an adapter.

Usually, the tank style selection will come up on the initial setup of the Smart Oil Gauge. However, if your gauge is already configured, then you’ll have to go back to that screen. On IOS devices, in the tank detail screen, you’ll see a little gear on the bottom left. Select that and then click on “My Tank” underneath “Sensors”. On Android devices, it’s three dots on the top right, before you press configure. You’ll then be brought to the same “Tools” screen.

Side note: in this same screen, there’s an option labeled “Upload Interval”. This isn’t related to the Smart Oil Gauge tank configuration. However, this is a setting that will determine how often the Smart Oil Gauge is going to upload to the app. It can be set from anywhere between 1 and 24 hours. The more frequently you have it report, the faster it’ll burn through the battery life.

Tank Orientation

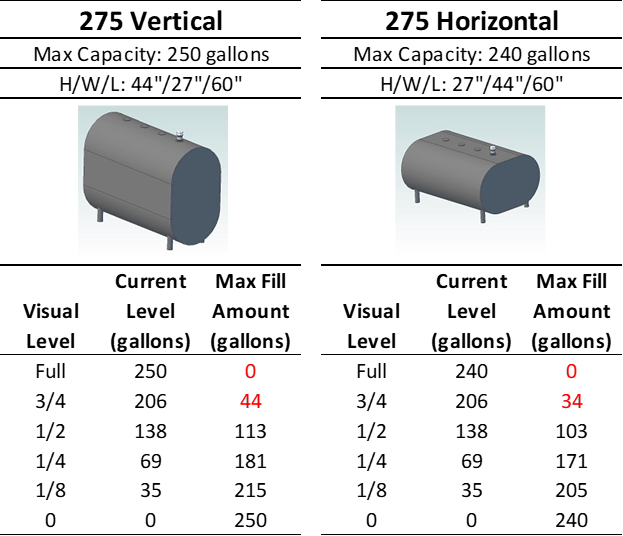
I mentioned earlier that there are both horizontal and vertical tank orientations for Granby steel tanks. This is very important. Horizontal tanks tend to be much shorter, usually a little over two feet tall, but are much wider with a flat top. These tend to look like vertical tanks lying on their sides. Vertical tanks tend to be taller (usually around 5ft tall), with flat sides and a rounded top. I’ve added a picture of a side-by-side comparison for your convenience.

This graph represents the levels of oil based on what the float gauge would read on the cylinder. The Smart Oil Gauge will give you more accurate readings.

If your Smart Oil Gauge isn’t set up for the correct tank configuration, then it’ll be inaccurate. Say, for example, you have a horizontal tank, but the gauge is reading for a vertical tank. Your readings won’t be accurate in terms of usage and level. In the worst-case scenario, the Smart Oil Gauge will read that there’s oil in the tank, but in actuality, you’ve run out of oil! While this doesn’t happen normally, it can happen if you haven’t set the correct tank size or your Smart Oil Gauge. To be on the safe side, feel free to set the gauge up next to your tank! You’ll be able to see exactly what your tank looks like during the setup procedure!

The Importance of your Tank Configuration

The tank you have your Smart Oil Gauge set up for is crucial for its functionality! The gauge won’t be accurate unless it’s set up for the proper tank size! There are a multitude of tank sizes out there, so if your tank’s size doesn’t show up on the app, don’t worry! Simply contact our tech support with your tank’s dimensions, and we’ll go ahead and configure a custom tank size for you! You can reach me at 203-456-1499, option 3, from 8 am-5 pm EST, Monday through Friday.

Happy Heating,

Hunter

Propane vs Heating Oil: Underground Tanks

Both heating oil and propane tanks can be installed underground. However, there are quite a few major differences between these underground tanks. If you’ve got an underground heating oil tank, then you’re likely being advised to remove it. However, sometimes you might be advised to install your propane tank underground. But why is that? There are important things to know, and I’ll be covering all of that here.

Underground Heating Oil Tanks

Underground heating oil tanks started popping up in the 1930s. At the time, they were installed underground for convenience and to save space. However, over time, these tanks became known as environmental hazards. Over time, these tanks began to rust and corrode. This started to cause these tanks to fail, resulting in oil spills and leaks. After the 1970s, these tanks no longer became commonly installed. Some states, such as California and New Jersey, have effectively banned the installation of these tanks! However, other states, such as Connecticut and New York, have very strict restrictions and mandates if you want to install an underground tank.

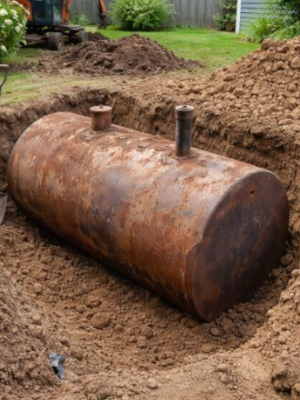
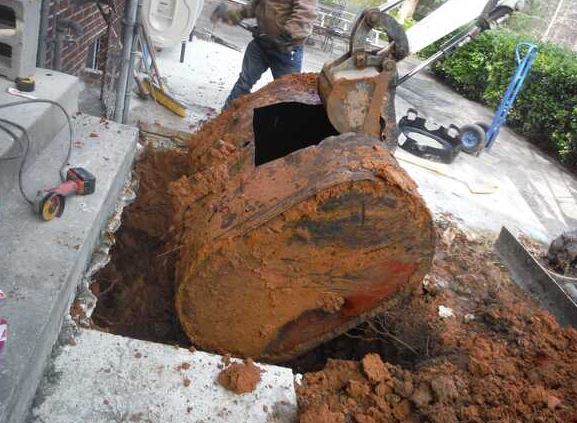
Underground heating oil tanks become more dangerous to the environment as they get older. It’s wise to get them removed ASAP!

Nowadays, underground heating oil tanks are strongly encouraged to be removed! Especially if they’re older than 30 years old! Tanks of that age will be susceptible to failing, which will lead to thousands of dollars in environmental damage! Some insurance companies might restrict coverage for homes with these tanks because of the liability. You might also have a difficult time getting a mortgage on the home for the same reasons.

Removing or Decommissioning Underground Oil Tanks

If you have an underground heating oil tank, then you should absolutely get it either removed or decommissioned. This will ensure that the tank is no longer a threat to the property or the environment around your home.

Getting the tank removed is an expensive process. This requires a licensed and insured tank removal company to come out to your home and remove the tank for you. They will start by digging in the location where the tank is until they’ve reached it. Once they’ve reached the tank, they will check to see if there’s oil in it. If there’s oil in the tank, they’ll drain it. Otherwise, they will remove the tank. While there’s no exact price point, the removal can cost several thousand dollars. In rare cases of environmental damage, you could see it costing much more!

Alternatively, you can get the tank decommissioned. This is a much cheaper option and often will require filling the tank with a stagnant material such as gravel or sand. The tank must first be cleared of any oil or sludge in the tank to prevent any potential tank malfunctions. Then, the tank is filled with gravel or sand. This will tend to cost anywhere between $1,500 and $3,500.

Underground Propane Tanks

Now, underground propane tanks are much different than underground heating oil tanks. Firstly, there are specific tanks for underground installations. Underground propane tanks are designed to be more heavy-duty than above-ground propane tanks. They’re just as safe to use as well! But to do this, you must own your propane tank. Most propane dealers require that you have your tank installed above ground if you’re renting it. But if you own the tank, you can install it where you wish!

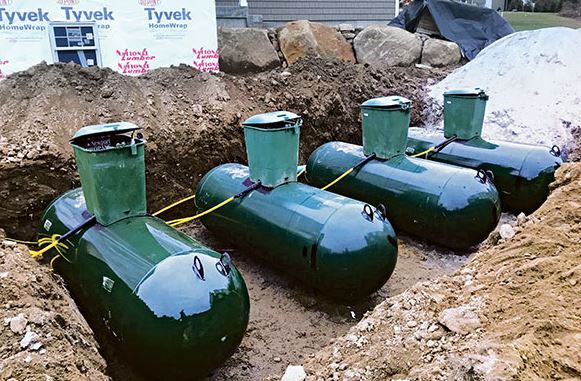
This is what underground propane tanks look like! There is a cover that sticks out of the ground. That’s how they can be accessed and filled by your provider.

Unlike underground heating oil tanks, underground propane tanks are not considered environmental hazards. This is often because they have not only a protective coating on the tank, but propane is a gas. So if there was a leak, it would not cause damage to the soil or water nearby! But similarly to an underground oil tank, they have a 20-30 year lifespan. That being said, it’s also crucial that these tanks are properly maintained to prevent cracks and leaks. Anode testing is a way that propane technicians test the tank to ensure that it isn’t corroding.

Safe Propane Tank Installation

While underground propane tanks are generally safer than underground heating oil tanks, they still must adhere to the propane tank installation requirements. Like all propane tanks, these tanks must be installed at least ten feet away from the home and away from the driveway or vehicle traffic. Doing so will ensure the safest location for the tank’s installation.

Now, specifically for underground propane tanks, these tanks should be away from any tree roots and shouldn’t be installed near roots. Roots can sometimes scratch the exterior coating of the tank, which could result in faster wear and tear of the tank. In other concerns, sometimes roots can damage or even pierce the tank!

What’s the Verdict?

There’s a stark difference between an underground tank for heating oil and a propane tank. Propane tanks tend to be much safer to use underground than heating oil tanks.

Underground heating oil tanks should be removed ASAP, and you should avoid installing a new one. Especially if your tank is 30 years or older! Depending on which state you live in, it might be outright banned! These tanks can become environmental hazards over a long period of time. Filling these tanks with gravel or sand is another great way to prevent them from becoming problems if you don’t wish to remove them.

Underground propane tanks are a bit safer to use. However, they must be properly maintained over the course of their 30-year lifespan. Properly maintained propane tanks will last a while! Just make sure you follow the guidelines for their installation and ensure that these tanks are safe to be installed and used!

Happy Heating!

Hunter
Heating Oil: How Much You’ll Burn in a Day

Prime heating oil season is just around the corner! Which means high usage is becoming the elephant in the room! Our last winter was brutal. We had a total of two major snowstorms and 54 total inches of snowfall in Danbury! We also saw a surge in the price of heating oil because of the war with Iran. At the time of writing, heating oil is sitting at $4.09 a gallon, while gasoline is sitting around $3.55 a gallon. But you might be asking yourself how much you’ll burn on a day-to-day basis. This is an important question to ask yourself, and the answer is good to know as well!

The winter brings peak heating oil season and high usage! You’ll often be burning more oil than you would during the summer!

How much you’ll be burning is different than what your family or neighbor might be burning. But I’ll be sure to break all that down for you! However, if you did run out of oil, you’re going to want to run to the gas station to get about 5-10 gallons of diesel. If you’ve got an oil delivery coming soon, then you’re going to want something to hold you over until you get your delivery. If you ran out of oil, you’re going to want to check out this blog post here.

The Biggest Contributors to Your Heating Oil Usage

There are a lot of things that contribute to your heating oil usage. However, some play a bigger part in it than others do. Below, I’ve compiled a list of all the major contributors to your heating oil usage and consumption.

  • Temperature Outside: The biggest and most important factor for high usage is the temperature outside. The colder it is, the more heat your home is going to try to produce. For example, you’ll likely be burning more oil when it’s 25 degrees out, compared to when it’s 50 degrees out!
  • Temperature Inside: While it might not seem like it, your home’s internal temperature will affect your heating oil usage. Ideally, the most comfortable setting for your home is usually around 70 degrees Fahrenheit. Setting the temperature higher, to say 80 degrees, puts more pressure on the system, causing it to try to produce more heat. This’ll ultimately result in more oil consumption.
  • Home Size: Your home’s size plays a crucial role in your daily consumption. The larger your home is, the more space that the system needs to heat. With more space, there is higher consumption. If your home is only a single-floor house, then it’ll burn much less oil than a home that’s two floors. The same can be said for a smaller home versus a larger home.
  • Good Insulation: If your home is well insulated, then you won’t have to worry too much about high usage! Your home’s insulation will determine how well it can maintain the heat your system produces. If your house is very well insulated, then you’ll likely have lower usage. But if your insulation isn’t up to date, then you might have higher usage. Your home’s insulation will determine how well you can keep heat in the home!
  • System Age: The age of your system definitely plays a role in its efficiency. If your system is newer, then it’s going to have good efficiency. Systems that are older than 30 years tend to be less efficient than newer systems. A brand new furnace tends to be well worth the money in the long-term.
  • What You Use Heating Oil For: What you use your heating oil for will affect how much oil you use. For example, if you’re using heating oil for just hot water and have propane or electric heat, then your usage will be significantly lower than someone who uses heating oil for both heat and hot water. Using heating oil for heat and hot water will, unfortunately, cause you to burn much more oil than if you’re using it for just one or the other.

Impact of Outside Temperature and Size of the Home

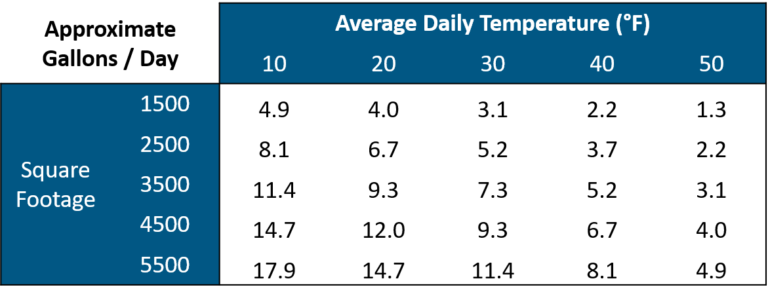
I briefly mentioned these above, but they’re so important for usage data that I figured I’d go a bit more in-depth. The size of your home and the temperature outside are probably the most important factors for consumption. The graph below gives you a combined average of usage based on square footage and outside temperatures. While yours might be different, you can get a general idea of how much oil you’ll be burning. But if the temperature is colder outside, you might see yourself burning a little bit more. The same can be said about having good insulation. If you’ve got good insulation, your home will burn much less oil.

During the winter in the Northeast, you’ll burn 5-7 gallons of oil on average. But this is just the average. This isn’t always the exact amount you’ll end up burning during the winter. Each winter is different and results in different usage data!

Now, let’s figure in the size of your tank. Most homes in the Northeast have a 275-gallon tank. Whether or not that’s a Granby or Roth tank, it’s going to be roughly the same. On all tanks, the top couple of inches are left open for airflow. So on both tanks, your true capacity is 250 gallons. If we calculate a full tank with an average usage of 7 gallons per day, that’s roughly 38 days before your tank goes empty! That’s a little bit over a month! This is why it’s so important to find out how much oil you’re burning daily! When your tank gets to about a quarter, you’re going to want to order a fill-up!

Annual Heating Oil Usage

A large majority of those in the Northeast will only use heating oil during the winter. During the summer, your system will most likely be turned off. However, if you use heating oil for hot water as well, then you’ll have some very minor usage during this time! But this only tends to equate to less than a gallon of oil per day.

However, as you probably know, wintertime sees a massive spike in usage. As mentioned previously, the home size and outside temperature will be the primary factors in this. While the outside temperature determines how high you turn your system up, the size of the home influences the amount of space your system tries to heat. During the winter, your system will absolutely be working harder than during the summer.

Tracking Your Consumption with a Smart Oil Gauge

To better understand how much you’re using and when you should order, a Smart Oil Gauge is the perfect way to do that! All you need is a stable WIFI connection for the gauge to connect to. Then, once you set the gauge up, you’ll be able to keep track of your usage through our app. The gauge also gives you the added benefit of telling you how many days until you reach 1/2 tank and 1/4 tank. The gauge then uses these statistics to tell you when and how much oil you should order. The app also offers FuelSnap integration. This integration will allow you to use your Smart Oil Gauge to calculate how much oil you need to order and by when!

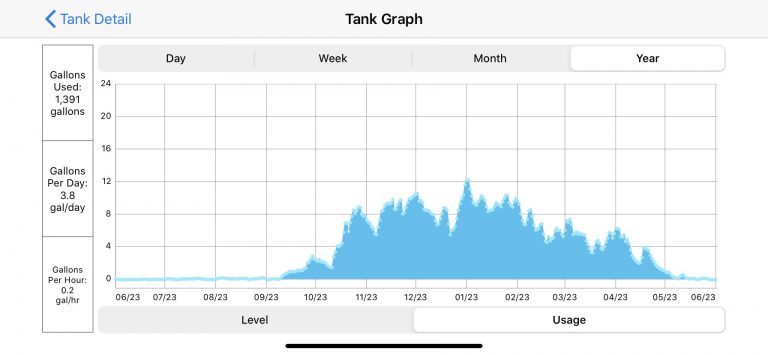
Yearly usage on the Smart Oil Gauge app will tend to look like this. You can see that from September until May, heating oil is used pretty often! December and January, you’ll tend to see peak usage!

The Graph in the app will show you level readings and usage data for daily, weekly, monthly, and yearly periods! However, the app only displays data from the previous year. If you want to export data from a previous year, you must log on to the website and export the data to a Microsoft Excel sheet!

Your Monthly Usage

Depending on how big your house is and how cold it is outside, you might burn an average of 5-10 gallons of fuel daily during the winter. Now, while many factors can make this more or less, they tend to vary. Insulation is big on keeping homes warm. But some homes might have poor insulation, which will result in high usage! But with tools like the Smart Oil Gauge and even your float gauge, you can easily track your usage and schedule a delivery within minutes! Plus, it’ll give you a better understanding of your daily usage!

Happy Heating!

Hunter
The Best Ways to Save on Heating Oil Costs

Winter is slowly creeping up on us! Which means oil prices are going to go up as the weather gets colder and more people need heating oil! During the winter, heating oil prices tend to be at their most expensive. Winter also brings the need to order more frequently, which hurts your wallet! But you’re here to save on heating oil costs! So in today’s blog, I’ll make sure you’re prepared for what’s to come by giving you a list of things that you can do to save some money on heating oil!

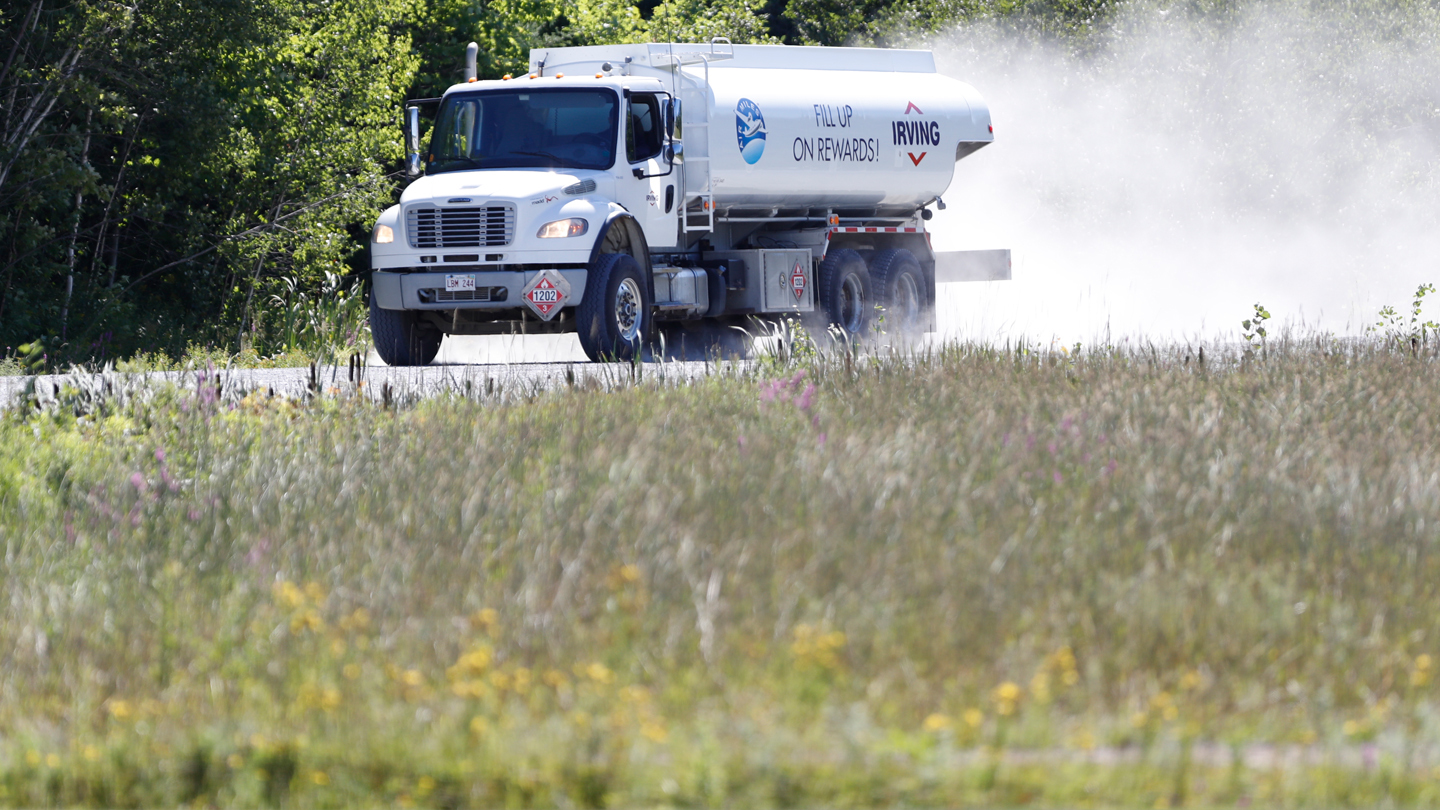
Heating Oil trucks will come out and deliver frequently in the winter! However, make sure that you’ve got an order on the schedule first!
  1. Canceling Your Automatic Delivery Plan: This might sound strange at first. But the reason for this actually makes complete sense! While it might not seem like it, Automatic Delivery is actually costing you more money in the long run! When it comes to automatic delivery, dealers will tend to charge more per gallon. On average, canceling your automatic delivery plan will save you roughly 50 cents per gallon! This can save you hundreds of dollars every year! Call-by delivery is much cheaper. You can go through the dealer directly, or you can order on our FuelSnap website!
  2. Covering Up Drafty Windows and Doors: Drafty doors and windows are a primary cause of high energy use. These can be really bothersome when it comes to the amount of oil you burn. Drafts will let out the heat that your system is working so hard to create! Covering them up with draft stoppers or plastic wrap on windows will help prevent the hot air from leaving your home!
  3. Fill Up Your Tank During the Summer: This is actually the ideal time to fill up your heating oil tank. During the summer, heating oil prices are at an all-time low. So be sure to take advantage of the low prices! You’ll be able to fill up your tank for much less than you would during the winter! However, you can keep an eye on your level and usage with a Smart Oil Gauge!
  4. Avoid Ordering During the Holiday Season: You should avoid ordering oil during Christmas and New Year’s. The reason for this is that this is when oil is in the highest demand. Prices are high, and delivery availability is low. You should order and fill your tank before the Christmas season! Family gatherings and holiday parties are the number one reason for ordering during this time frame!
  5. Make Sure Your Home Is Well Insulated: Ensuring your home is well insulated is crucial for being able to have a warm home during the summer. Insulation helps the house maintain the heat inside it. This’ll result in lower usage, as the house is better able to maintain the heat.
  6. Getting a WIFI Thermostat: Wi-Fi thermostats are incredibly useful and are an amazing tool to be able to lower your heating oil usage. They’re incredibly useful and will help you be able to better manage your home’s temperature. Most of these thermostats have apps that allow you to control them. This means that you can lower the temperature when you’re away to prevent unnecessary oil usage or raise the heat wirelessly! With one of these, you’ll be able to control your heating oil usage!
  7. Upgrade Your System: This might not apply to everyone, but if your system is old and hasn’t been updated, then it’s a good time to upgrade it! Making sure that your system is up to date is great because it’ll help ensure that your system is functioning properly! Plus, newer systems are more efficient! Which means that it takes less oil to heat the home! You can contact a local HVAC company and see what they recommend for a system upgrade!
  8. When You’re Not Home, Turn Off Your Thermostat: Turning off the thermostat when you’re not home is a great way to lower heating oil costs. The reason being you won’t be burning unnecessary oil when nobody is home! However, if you have pets, then this won’t be an option for you! They’ve got to stay warm too!
  9. Disable the Heat in Rooms that are Unoccupied or Empty: Turning off the heat in rooms that aren’t occupied or rooms that aren’t currently being used is a great way to save on heating oil costs! Make sure that when doing this, you close any vents or radiators in these rooms. Heat won’t be able to enter the room when this is done!
  10. Set up and install a Smart Oil Gauge: Smart Oil Gauges are one of the best tools that you can have on your heating oil tank! They can track usage and level data to ensure that you won’t run out of oil! This is all at the touch of your fingertips through our mobile app! You can also receive alerts when the tank is low and when you get a fill-up! You can purchase one on our website here.
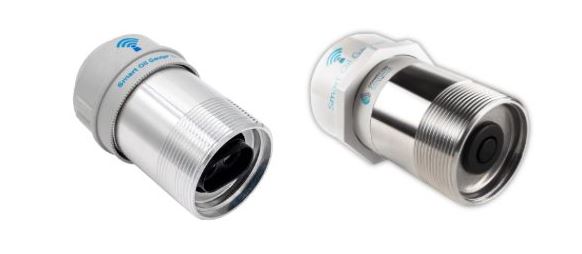
These are the two types of Smart Oil Gauge! The one on the left is the Duo, and the one on the right is the standard model. They both work great to track your heating oil usage and level information!

Concluding Thoughts

Heating oil can be expensive, especially during the winter! But if you follow these ten steps, you’ll become a master at getting the most out of your heating oil! You’ll know the ins and outs of how to prevent your oil from escaping through those drafty windows or burning more than you need to!

Ordering during the summer is especially useful with the lower prices! Canceling your automatic delivery plan is great, too, because it gives you the freedom to order from whoever and wherever you want!

But don’t forget, this is all up to you! If you like having your automatic delivery plan, then don’t cancel it. However, what you choose to do with your heating system is in your hands!

Happy Heating!

Hunter
Heating Oil Vs Propane: What You Should Know

In the Northeast United States, heating options are quite limited. However, natural gas is increasing in popularity. It’s cost-effective and reliable, making it an excellent choice to heat with! However, unlike the two titans of the industry, Heating Oil and Propane, it can’t be installed in a pre-existing home or neighborhood. This makes it unavailable to most of the general public.

But in small apartments, condos, and places with mild winters, you’ll see electric heat and heat pumps being more common. Electric heat can be expensive, but in places where winters are milder or with smaller spaces, it won’t be as bad. Otherwise, your options are left to Heating Oil and Propane.

Heating oil and Propane are the most popular forms of heating across the East Coast. They’re both fuels that get delivered to your home in a liquid state before it’s converted to heat and pushed throughout your home. Despite these two having some similarities, there are some differences. But what are they exactly? I’ll be covering exactly what you need to know below!

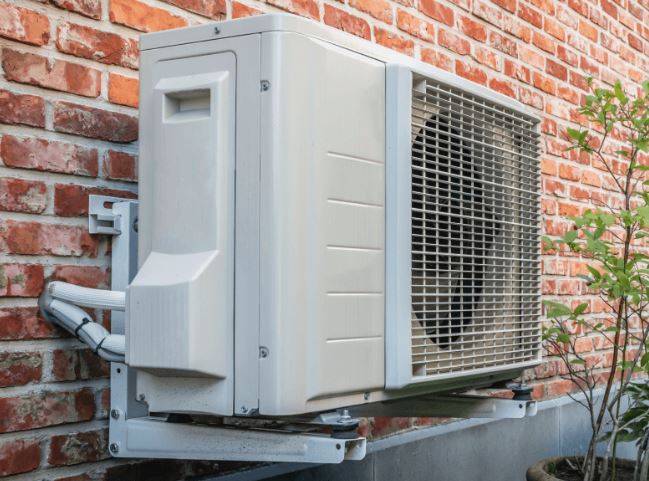
Outdoor heat pumps look like this! They’re increasing in popularity and are cost-effective!

Switching: When you Should Make it

When it comes to making the switch to either Heating Oil or Propane, it boils down to when your home needs a new boiler or furnace. The most expensive component tends to be the system. When changing out your current system for the other, here are some things that you’ll need to know.

  • Tank: The tank is the most important component of your system. Regardless of whether you own it or are renting it, you should know where it is and what its capacity is.
  • BTUs per Gallon and System Efficiency: Knowing the difference between the two fuels, BTUs and System Efficiency, is important for functionality. For example, propane tends to be more efficient. However, it produces fewer BTUs per gallon than heating oil.
  • Shopping Flexibility: If you like to be in control of when you receive your delivery, then this is important. You don’t want to run out while waiting for a delivery!

What are the Differences?

The biggest difference between the two types of tanks is the cost. Propane tanks are often much more expensive than heating oil tanks if you buy them outright. At the time of writing, you can buy a standard heating oil tank at Home Depot for around $1k, depending on the model. However, propane tanks tend to be a bit pricier at $1.5k for an average tank. While the prices are similar, a heating oil tank is the cheaper option.

How they’re stored is another major difference. Heating oil tanks can be placed indoors or outdoors. They also tend to be more compact, preventing them from taking up a lot of room. However, propane tanks tend to be big and bulky. Plus, if you’re renting them, then you’re required to have them installed above ground, outside. But if you own them, you can install them underground without posing a threat to the environment.

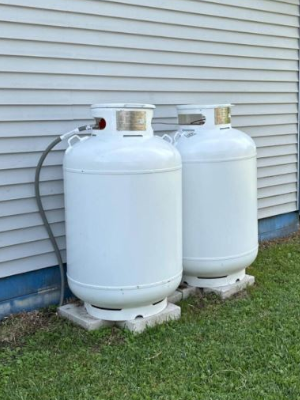
Propane tanks will tend to look like this. They’re installed above ground outside if they’re rented by an oil company.

The Owner of the Tank

Tank ownership is a big part of owning a heating oil or propane tank. When it comes to heating oil, you’ll typically own your tank. Meanwhile, with propane, the provider tends to own it. This means that they’re in control of when you get a delivery!

When making the switch from heating oil to propane, the provider will tell you that it’ll save you money, but that’s just not true! Renting the tank from the provider will prevent you from ordering from anyone else! You’ll have no freedom when it comes to ordering! In most states, it’s illegal to fill another provider’s tank. This means in an emergency situation, you won’t be able to order from someone else if you need to! If you want to change providers, you’ll either have to buy out your tank, buy your own, or contact another provider to put their tank in!

However, when it comes to heating oil, you’ll always own your tank! You can buy it directly from the manufacturer or a storefront such as Home Depot or Lowe’s. But you get the added benefit of having the freedom to order from whoever you want! So it’s best to own your tank regardless of whether you heat with heating oil or propane!

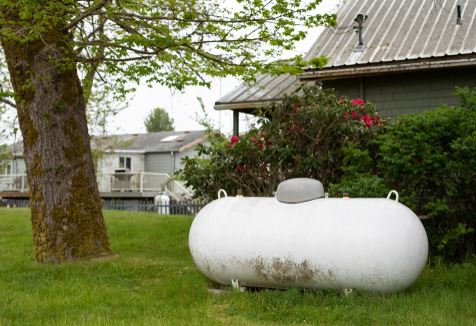
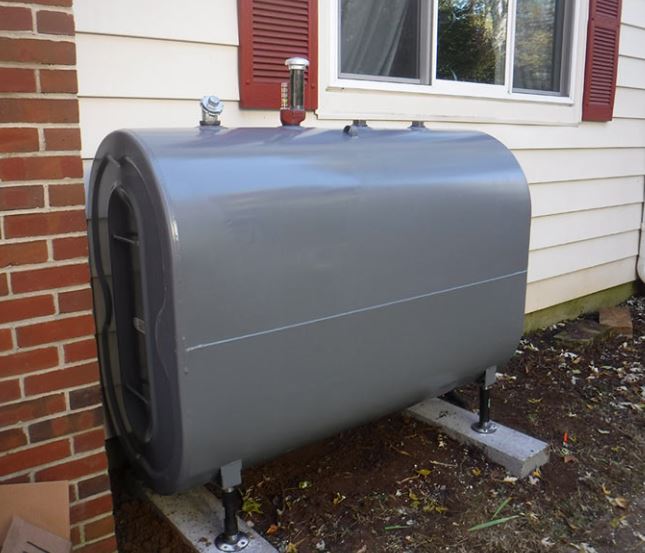
Standard oil tanks will look like this. Typically mounted on the side of the house, in the basement, or in the garage.

Which is More Efficient?

With how current prices are for heating oil, it might seem that propane is the better option to go with. However, just by looking at the price per gallon, you’re omitting two of the most important factors. These factors are BTUs (British Thermal Units) and Efficiency. BTUs determine how much heat is produced by a gallon of the desired fuel. For example, heating oil produces 138,000 BTUs per gallon! However, propane will only produce 91,000 BTUs per gallon. That is significantly less than what heating oil produces!

While BTUs are a major factor when it comes to heating, efficiency is important as well. Most modern-day boilers and furnaces tend to be 95% more efficient when compared to older furnaces. Propane furnaces will convert 95% of the propane into heat. Meanwhile, heating oil will only produce 85-90% heat from the boiler/furnace. Using 85% in our calculation below, we’ll get the following:

Propane: 91,000 x .85 = 77,350 Effective BTUs per gallon

Heating Oil: 117,300 x .85 = 117,300 BTUs per gallon

If we’re doing a comparison side by side, you’ll want to take a look at how many gallons of propane it takes to produce the same amount of heat as heating oil. This will be based on one gallon of heating oil. Heating oil produces 117, 300 effective BTUs per gallon, while propane only produces 77,350 effective BTUs per gallon. Using the following, you’ll be able to determine how many gallons of propane it takes to produce the same amount of BTUs as a gallon of heating oil.

117,300 / 77,350 =1.51 gallons of propane

As you can see, heating oil produces more BTUs per gallon than one gallon of propane! You’ll need a gallon and a half of propane to match the amount of heat that Heating Oil Produces!

Flexibility to Order From Who You Want

The nice thing about heating oil is that you have the freedom to order from whom and where you want to. Signing up for automatic delivery is a start. However, note that when you sign up for automatic delivery, you’ll end up paying a premium price per gallon. Call-by is much better in terms of placing orders. There are no hidden fees, and using reliable websites such as FuelSnap, you’ll end up getting some great prices!

Price shopping when it comes to propane is VERY hard. This is because most of the time, a propane tank is going to be rented from the provider. There’s a small percentage of propane tank owners who own their tanks. If you’re one of them, congratulations! But unfortunately, you won’t be able to do much shopping around.

However, with heating oil, the market is much more competitive. Due to this, prices tend to be a bit more sporadic than with propane. Dealers are constantly competing with each other to get customers on their schedule, so it’s advantageous to have the best price in the area. This gets them more orders and more new customers! Heating Oil tanks also get the bonus of utilizing the Smart Oil Gauge!

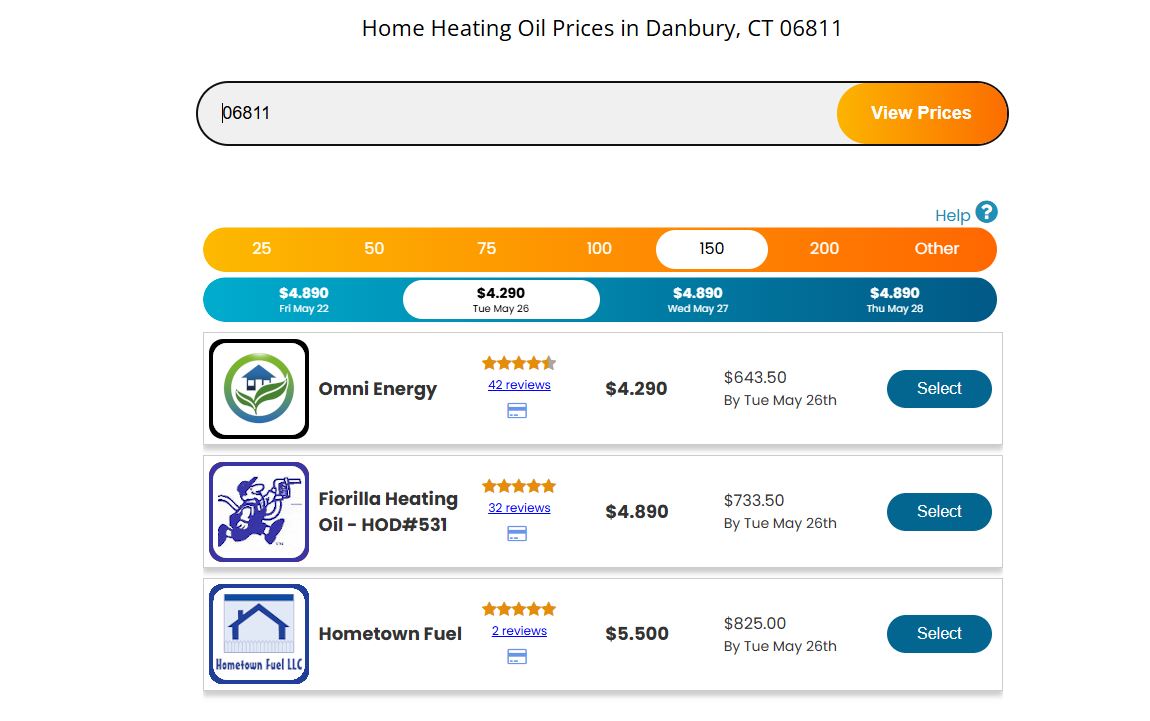
At the time of writing, these are the current oil prices in Danbury.

The Bottom Line

When it comes to which is better, heating oil is the clear answer. It burns much hotter, and you own your tank, which makes shopping around a breeze! Plus, with cheaper tanks and competitive pricing, you’ll be able to get a fill-up for a good price and not be restricted by the dealer!

However, that’s not to say that propane is without its merits. It’s versatile and is often used for more than just heating! If you find yourself needing to use propane for cooking, electric, and more, then this is your answer! Just be aware that you’ll likely have to rent from your provider!

At the end of the day, which you choose to use to heat with is up to you. They both have their positives and negatives and will both provide you with ample warmth and will be effective long-term heating solutions.

Happy Heating!

Hunter
How to Avoid Running Out of Oil

With the heating oil season just over the horizon, it’s important to keep in mind how much oil you’ll use during the winter. But it’s also a good idea to start checking heating oil prices regularly! At the time of writing, oil prices have spiked due to the war with Iran! Heating Oil is at about $4.25- $4.50 per gallon! This is due to the price of crude oil, and it’s incredibly expensive to fill up a tank with oil! Especially with prices where they are now, it’s crucial to be on top of your usage and keep track of your oil level! So the question stands: “How do I avoid running out of oil? Well, don’t worry, I’ll be answering all the important questions below!

Filling up regularly will help prevent runout! The last thing you want is to wake up to a cold house!

Heating Oil Tank Capacity

The maximum capacity of a standard heating oil tank is around 275-330 gallons. But it’s a good thing to know that these tanks will rarely be filled to their true capacity. The reason for this is that dealers will fill up until the whistle stops. This’ll actually make the true capacity different. On a 275, it will be 250 gallons, while on a 330, it’ll be around 315 gallons. Your capacity will have some effect on how much and how frequently you order oil. Ideally, you’ll want to order oil when your tank gets to a quarter. On a 275-gallon tank, this is around the 75-gallon mark, while on a 330-gallon tank, it’s closer to 95 gallons.

You should NEVER let your tank’s oil level get below 1/8. The reason for this is that this is around the time your system might start to catch sludge. On Roth tanks, this isn’t a problem. However, on standard steel tanks, sludge can be sucked into the feedlines. When this happens, your lines will get clogged, which will cause the system to shut down, resulting in no heat! On a 275-gallon tank, the 1/8 mark is about 35 gallons. But if your tank’s feed lines are top-fed, then this will be the point at which you run out of accessible oil.

What Happens When You Run Out?

When you’re running out of oil, the first thing that’ll happen is that you’ll have no heat. No heat means waking up to a cold home, which isn’t a fun experience! However, it’s important to note that waking up to a cold home doesn’t always mean you’re out of oil. It could mean that there’s a faulty part in the boiler/furnace or the feed lines are clogged! It’s always good to check! One time, my boiler’s starter wasn’t working properly! We had heating oil, but the starter wasn’t working, so my family and I were freezing!

When you run out of oil, you’ll want to run and grab some diesel. This’ll hold you over until your delivery of oil arrives.

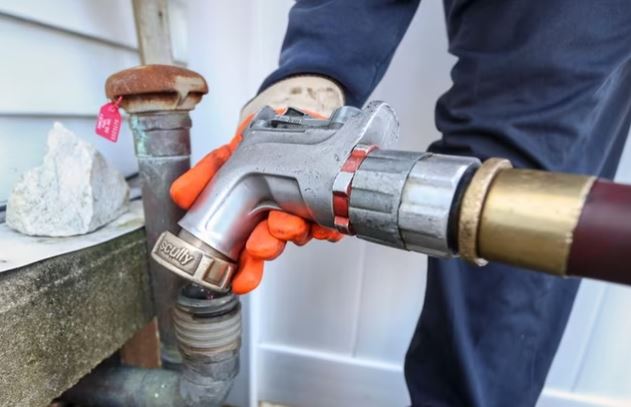
If you’ve run out of oil, the very first thing you should do is contact a local oil dealer to place an order! Try to see if they can put you in for an emergency delivery. Once you’ve placed the order, go to the gas station and get about 5-10 gallons of diesel. This should hold you over until your delivery arrives. If you need the step-by-step guide to this, you can check out what to do here.

How Long Will a Full-Tank Last?

If you know what size your tank is, then you’ve got a baseline. You’re going to have an easier time figuring out how much a full tank of oil will last you. However, a Smart Oil Gauge will make the process of finding this out much easier for you! In my articles on Spring and Winter usage, I calculate specifics on how much you’ll expect to burn if you’re interested!

However, if you haven’t guessed by now, winter sees the most heating oil usage by far! Primarily due to the cold weather outside, you’ll find yourself burning around 5-7 gallons a day! Sometimes even more if you have a large house and use it for both heat and hot water. You might see yourself ordering oil more frequently during this time! Typically, you’ll need to order oil every month or so, depending on how much you’re using.

But on the flip side, during the spring and summer months, you’ll end up using significantly less oil! During this time of year, oil usage is going to be at a low. So you might only see yourself burning less than a gallon a day. Running out of oil is very unlikely during this time. But even so, don’t let your guard down!

Your average daily usage is going to be different depending on the size of your home and what the temperature outside is.

Final Thoughts

Avoiding running out of oil is fairly easy. So long as you’re on top of your heating oil usage and tank level. Make sure that when your tank starts to get low, you order at a quarter tank. This gives you enough time to get the delivery before you run out! You can use a website like our FuelSnap website to get the best prices on heating oil in your area! With the combined use of the Smart Oil Gauge and FuelSnap, you’ll get a leg up on other homeowners!

Making sure that you’re on top of your level and usage is crucial to make sure you’ve got oil in your tank. Keeping an eye on this will prevent you from running out as long as you’re on top of it!

Happy Heating!

Hunter
Smart Oil Gauge: The Installation Process

Making sure that your Smart Oil Gauge installation is correct is crucial for its functionality. Depending on your tank, the installation process is different and can sometimes be confusing with all the different adapters! The Duo and Standard models also have slightly different installations. Granby tank installations will end up being different than Roth installations. But before you install the Smart Oil Gauge, you must set it up and connect it to the app first! This will make the install process much easier!

What’s Required for Installation?

When it comes to installing a Smart Oil Gauge on a standard steel Granby tank, there are a couple of things that you need! Firstly, you will obviously need the gauge! Then, you’ll need a pipe wrench and pipe dope. Those can be purchased at Lowe’s, Home Depot, or on Amazon. DO NOT USE TEFLON TAPE! Finally, if you need an adapter, you’ll need that too! Don’t worry, I’ll touch more on that later in this blog.

However, for Granby double-wall tanks and Roth double-wall tanks, you will simply need the Smart Oil Gauge and the Roth adapter! I’ll touch more on those Roth adapters later, but the installation on these is a little bit simpler!

Steel Tank Installations

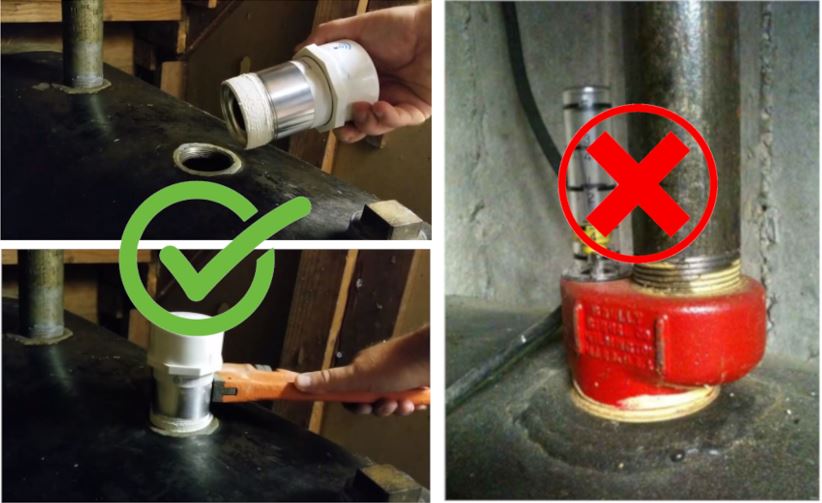
These types of tanks are the most common. Most homes in the United States that have heating oil will use a standard Granby tank, regardless of if its 275 or 330 gallons. If you don’t have an adapter for the standard Smart Oil Gauge installation, then all you need to use is the pipe wrench and pipe dope. Simply apply a thin layer of pipe dope onto the bottom threads and then hand-thread it into the tank as far as you can. Then, you’ll want to use your pipe wrench and thread it down all the way until you cannot thread it anymore. You can watch our video instructions here.

This is an example of installing the gauge onto the tank. You cannot install the Smart Oil Gauge onto a combined fitting with the vent pipe.

However, if you’re using an adapter, then you’ll want to thread the gauge into the adapter WITHOUT pipe dope. Then, put a thin layer of pipe dope on the bottom threads of the adapter. Once you’ve done that, use the pipe wrench to tighten the gauge and adapter onto the tank.

Granby and Roth Double Wall Tanks Installations

I mentioned this briefly, but when installing the Smart Oil Gauge onto a tank that’s either a Roth or Granby double-wall, you will just need the adapter and the device. You CANNOT install the Smart Oil Gauge onto the tank’s fitting that comes with the tank. The reason for this is that the gauge sends its signal in a cone shape, not straight down. The tank’s fitting doesn’t accommodate the gauge’s signal. Without the adapter, the Smart Oil Gauge will only read full.

For this installation, you DO NOT need to use Teflon tape or pipe dope. You can simply hand-thread the gauge into the tank and then remove the existing tank fitting from the tank. Then, put the Smart Oil Gauge and the adapter onto the white fitting in its place. You can watch an installation of this process here.

Smart Oil Gauge Adapter Compatibility

There are a couple of adapters for the Smart Oil Gauges, so it can be a little confusing which one you need for your setup. The standard Smart Oil Gauge has three adapters, while the Duo only has two.

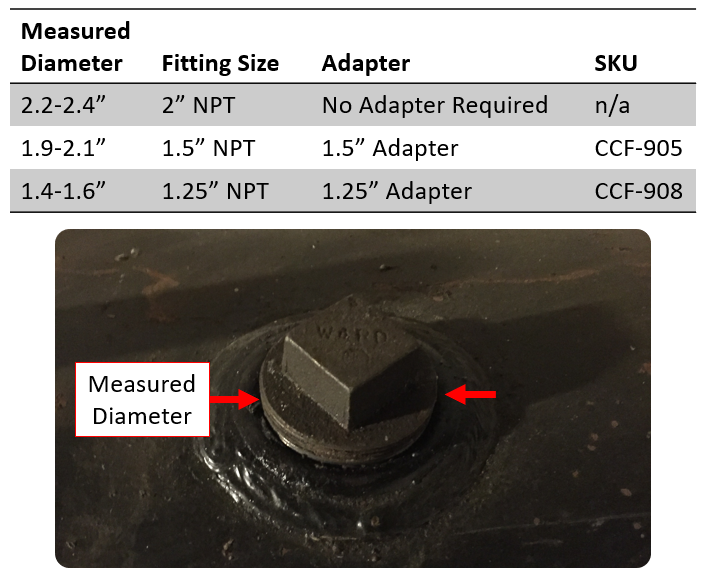
The three adapters for the Standard Smart Oil Gauge are the 1.25″, 1.5″, and Roth adapters. The 1.25″ NPT adapter is used on tanks that have a 1.25″ fitting. This adapter is only usable with the standard Smart Oil Gauge. The Duo is not compatible with a 1.25″ fitting. Each of the adapters have their own SKU. CCF-905 is for the 1.5″ NPT, CCF-906 is for the Roth, and CCF-908 is for the 1.25″ NPT adapter. You can use the graph below to get a better idea of which one you need.

Using the above graph will help you understand which adapter you need!

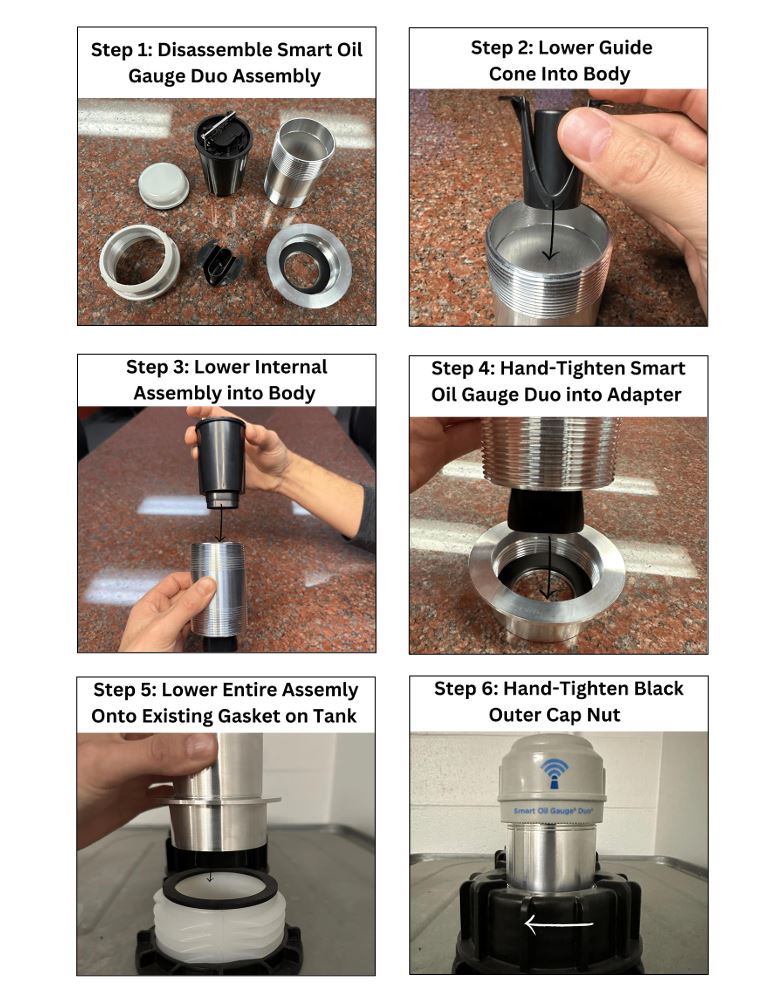
Now, Smart Oil Gauge Duos only have two adapters. These are the CCF-905DUO and the CCF-906DUO. These are the 1.5″ and the Roth adapters, respectively. The Duo cannot be used on tanks with 1.25″ NPT fittings. This is because these fittings are too small for the sensors of the Duo to fit through the hole. But one thing you need to know about the Roth adapters is that you have to slide the guide cone into the body of the gauge first. Without doing that, the Smart Oil Gauge won’t be able to be read properly.

The Smart Oil Gauge installation must look like the one above. This will ensure that the gauge is reading correctly!

Non-Traditional Tank Installations

While Roth tanks are easy and Granby tanks are straightforward, non-traditional tanks will tend to be a little tricky. While most standard tanks are oval-shaped, these tanks tend to be more rectangular, cylindrical, and cube-shaped. However, as long as the tank has a fitting that’s 2″ NPT, you shouldn’t have any trouble installing the gauge onto the tank! These tanks will often have a 2″ NPT fitting, but in rare cases, they don’t. So make sure that your tank has one of these fittings!

However, if your tank fitting is larger than 2″ NPT, then the gauge won’t be able to be installed on this tank size. We don’t sell adapters that are larger than 1.5″ NPT. The Smart Oil Gauge cannot work with any of the off-the-shelf adapters. Standard off-the-shelf adapters don’t accommodate the Smart Oil Gauge’s ultrasonic signal, so the readings might not be accurate. The adapters we provide are specifically made for the gauge and to accommodate its signal. Adapters that are off the shelf do not.

What Can’t the Gauge be Installed onto?

While the Smart Oil Gauge can be installed on most tanks, there are a couple of tanks for which the gauge cannot be installed. The major tanks that the gauge cannot be installed on are Roth 1500L, Underground tanks, and fiberglass tanks. I go a bit more in-depth as to why that is in this article.

The Smart Oil Gauge can’t be installed on fittings that are raised, T-pipes, or extension pipes. Raised fittings will make it harder for the gauge to get the signal beyond the fitting, which will ultimately make the gauge read “Full” all the time. The same can be said for T-pipes and extension pipes. While the extension pipe raises the gauge higher than it should, on T-pipes, the gauge won’t even be able to see the oil!

Conclusion

Depending on your tank size and style, your Smart Oil Gauge installation will be different! Which is perfectly fine! As long as you are following the steps in the gauge’s instructions as well as the tips and tricks in this blog post, you’ll be able to install the gauge without any issues!

Just make sure that when you’re installing the gauge, you have all the necessary tools and equipment! Don’t forget to get the gauge set up in the app first before you go ahead and install it! That’ll make the process so much easier to get it set up and installed!

Happy Heating!

Hunter
Preparing Yourself for Heating Oil Season

It’s officially August! Which means Heating Oil Season and Winter are just around the corner! Winter is peak season for heating oil, and now that it’s August, there’s a lot for you to do before winter is in full swing! Like every winter, you shouldn’t go in unprepared!

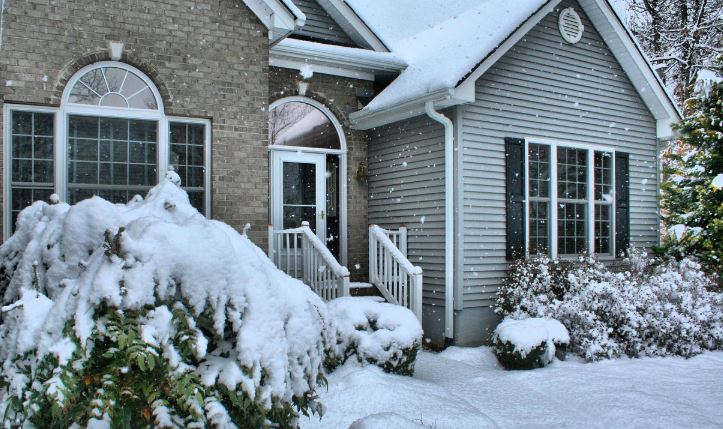
Fall and Winter are just around the corner! Which means soon your home will look like this!

Changing Out Your Air Filters

Forced air is an increasingly popular form of heating. If you use this, then now is the best time for you to change out your air filters. Ideally, these should be changed out every couple of months! However, if you have pets, then these should be changed out more frequently! But during the summer months, especially, they’ll get much dirtier. This is often due to collecting allergens, pet hair, dust, and dander! Changing out these filters is crucial to maintaining a healthy home, especially if you live with people who have allergies!

However, what’s the process for changing them? If you follow the steps below, you’ll understand exactly what you have to do to replace them!

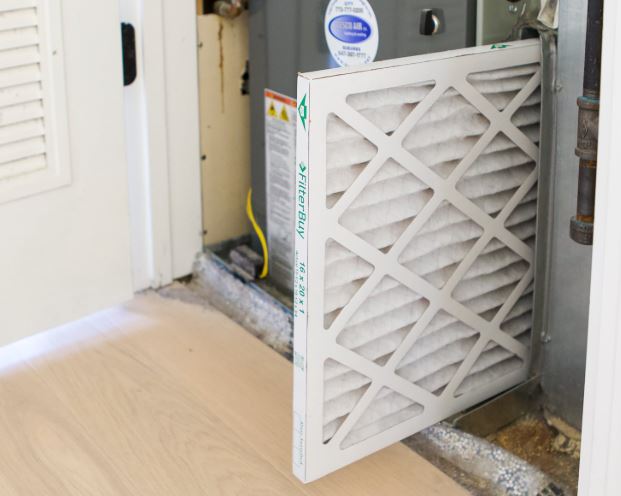
  1. The first thing you should do is turn off the furnace. This is crucial because your furnace might turn on if you’re changing out the filters! You don’t want that to happen!
  2. Then, you’ll want to remove the side door to the furnace to access the filters. After doing this, snap a quick picture of how they’re installed currently. This will help you make sure the new ones are installed correctly after you’ve taken the old filters out!
  3. Find out what size your filters are. If you haven’t done this before or are unsure as to what size filters you have, you’ll want to get this information. The most common size for these filters is 25x20x1. But if you don’t have any replacements, you can stop by the hardware store and pick up some.
  4. Once you have the replacement filters, you’ll need to replace them! The replacements should have arrows showing how they’re installed. Follow those so you can install them properly!
  5. You’re all set! Just close up the furnace door and turn it back on!
Changing out your filters is pretty easy! Just make sure you turn off your furnace when you do it!

Gathering Firewood

If you’ve got a fireplace or wood-burning stove at home, then you might know that you have to gather firewood. My family and I have a wood-burning stove, so typically we start to gather firewood around May-June. The earlier you gather it, the better, because it gives the wood time to try out before you burn it! But if you start stocking up now, then you’re still on the right track! Sometimes the cold weather doesn’t start until late September, early October anyway!

If you don’t have a lot of time to gather firewood on your own, then buying pre-cut wood is an option! However, it tends to be a little bit more expensive. You’ll be able to find them at places such as Home Depot, Lowe’s, Tractor Supply, and even some gas stations! But if you’re like my family and have been doing this for a while, you’ll have a log splitter! This speeds up the process of cutting up wood! Rather than relying on an axe. These machines streamline the process!

But if you have the time, gathering and splitting your own wood will save you so much money! Some woods, however, will tend to burn better than others. Oak, for example, is the most popular for burning. It’s not messy, and it takes some time to burn. However, pine is very sappy and can take a bit longer to dry out. Birch, on the other hand, burns quickly, and it doesn’t last very long. However, this makes it an excellent fire starter!

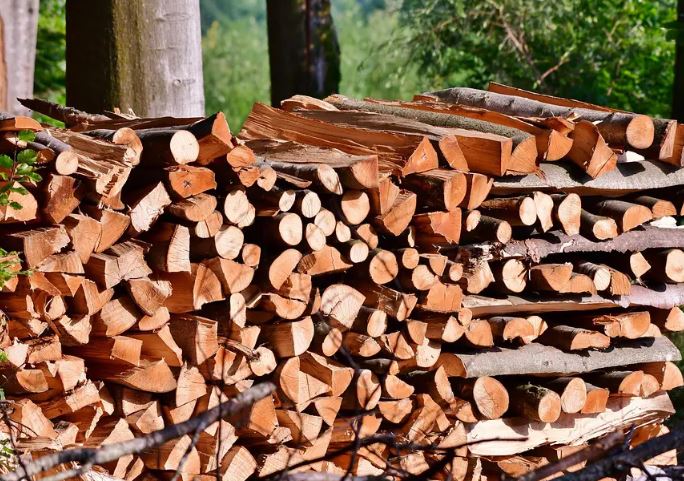
Stocking up on firewood is a great way to prepare your furnace and wood burning stove for the long winter ahead! This’ll also lower your heating oil usage if you have both!

Heating Oil Tank Inspection

As the years go by, your heating oil tank will get older. This often makes it susceptible to general aging over time. The tank itself will experience wear and tear as it gets older. For this reason, regular tank inspections are important for your tank. While this process doesn’t take a long time, it’s crucial for your system’s functionality and your safety.

In this section, I’ll be covering a brief explanation of what’s involved in a tank inspection. But if you want a more in-depth explanation, check out this article here.

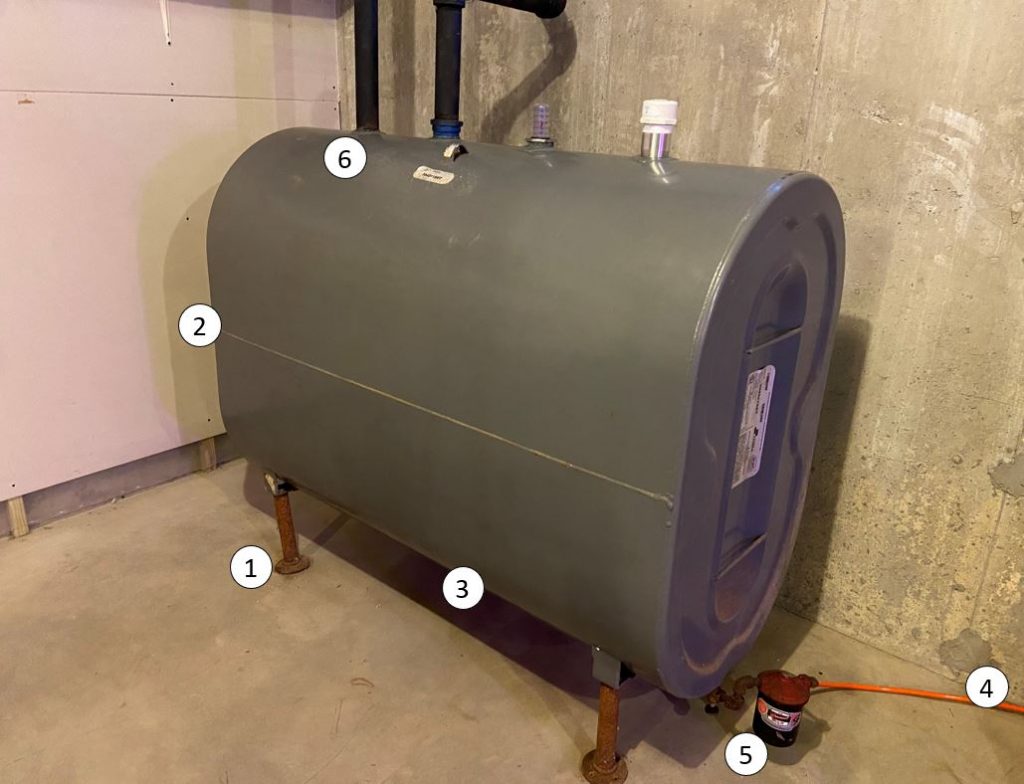
  1. Inspect the Legs to make sure that they’re sturdy. Also, make sure that there’s leaks in the tank.
  2. Make sure there’s no rust on the seams of the tank.
  3. Check the bottom and sides of the tank for any signs of leaking oil.
  4. Make sure that the oil lines have no leaks.
  5. Check the oil filter to ensure it’s not leaking.
  6. Check the top of the tank and fittings for any damage, rust, or cracks.
These are the key points you’ll need to look at when getting a tank inspection!

System Tune-Up

Annual system maintenance is important for your heating oil system to function as intended. Making sure your system is properly maintained is a requirement to ensure that the system itself doesn’t shut down when you need it. If it’s been a while since your last system service, or you need one, contact your local HVAC technician. They’ll be able to do all the required service and maintenance to make sure that your system is in tip-top shape! But keep in mind the price. Usually, system maintenance will cost around $300-$400 on average.

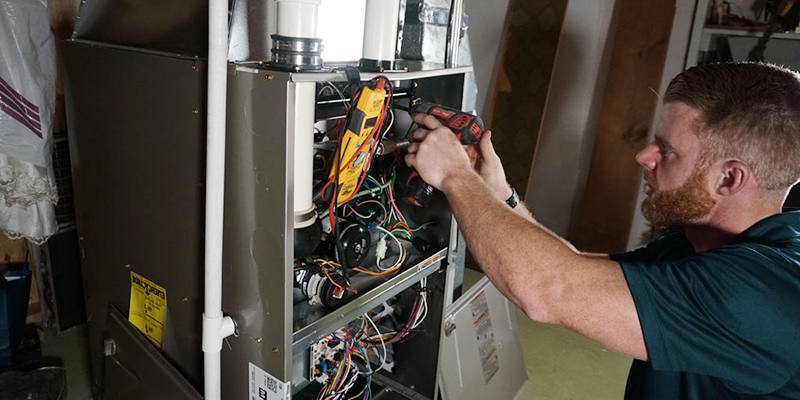
System tune-ups are crucial for your system. They ensure your system is working as it should!

However, when you contact your HVAC company, see if they offer a maintenance contract. These service/maintenance contracts will help you stay on top of your system’s maintenance. This’ll ensure that your system is in good shape for when you need it. Some HVAC companies will actually give you a discount when you sign up with them! It’s a good thing to ask!

Fill-Up Your Heating Oil Tank

Now that it’s getting to the end of summer, it’s a good time to fill your oil tank. Making sure that you have a full tank of oil will be very helpful when winter comes. Filling up your tank of heating oil will make sure your tank is ready to go when the temperatures start dropping! If you’re getting low now or are sitting at around half a tank, now’s a good time as any to order oil. It’s always a good idea to go into heating oil season with a full tank!

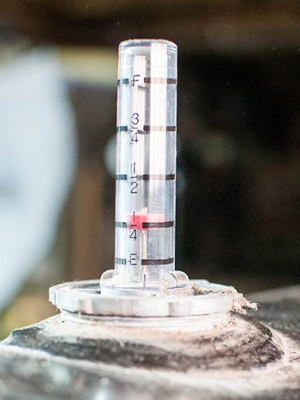
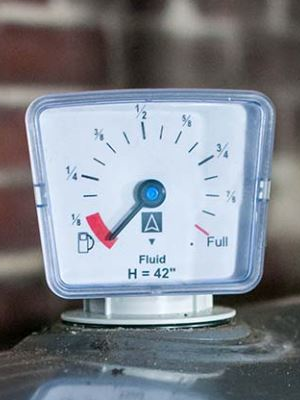
Your tank gauge is another important tool for you when it comes to monitoring heating oil usage and level. Most tanks come with a float gauge. However, the Smart Oil Gauge is another useful tool to track your data. You’ll have access to everything that you need at the touch of your fingers! You’ll even be able to order oil with our FuelSnap integration. FuelSnap lets you get the best selection of dealers and prices in your area!

Getting a fill-up now of all times is a great idea! This’ll make sure that you’re all ready for heating oil season!

Closing Thoughts

There are plenty of things that you need to do before heating oil season arrives. If you have the above-mentioned available to you, you’ll be fully prepared for the winter! Make sure you’re prepared when going into heating oil season and winter! You won’t want to be blind sided by a snowstorm or cold weather and not be prepared. If you’ve got a wood-burning stove or fireplace, stock up on firewood. If you’ve got a heating oil system, make sure that you get your tank filled and your system serviced!

As temperatures get lower and lower, we’re going to slowly start turning on our systems. Winter is around the corner, which means we’ll need to be warm for the cold months to come! Do not be un-prepared for what’s to come!

Happy Heating!

Hunter