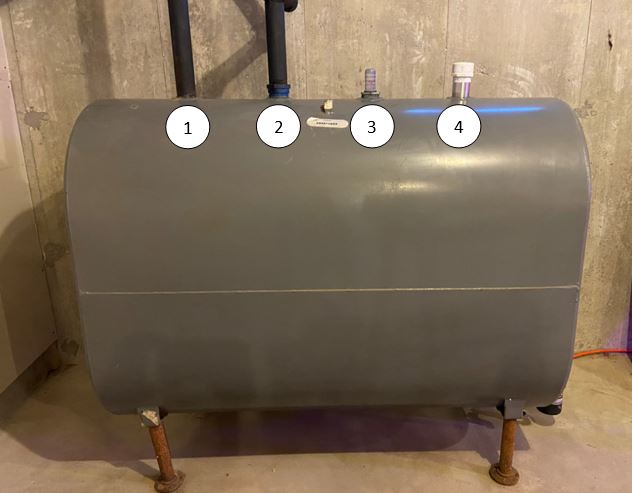
Using a Smart Oil Gauge on your heating oil tank is incredibly useful. It’ll be able to tell your usage as well as when you’ll need to order oil! Most heating oil tanks will have four fittings on the top of the tank. One occupies the fill pipe, another the vent pipe, and lastly, the float gauge. This will usually leave an extra fitting open for the Smart Oil Gauge!
However, on some tanks, there is one less fitting, or the feed lines are actually on the top of the tank. In an event like this, you might be confused on what to do. It’s important that your gauge is installed correctly. So in this article, I’ll be going over what exactly you should do if your tank only has three fittings.
What’s On a Heating Oil Tank?
Most Heating Oil tanks will have four openings available. They usually look like this:
- This is the Fill Pipe. This is where the driver will pump oil into the tank. The fill pipe normally leads outside where the driver can access it with the truck.
- This is the vent pipe. Air will enter and leave the tank through this pipe during fill-ups and when oil is being used up. This pipe also leads outside and is sometimes right next to the fill pipe.
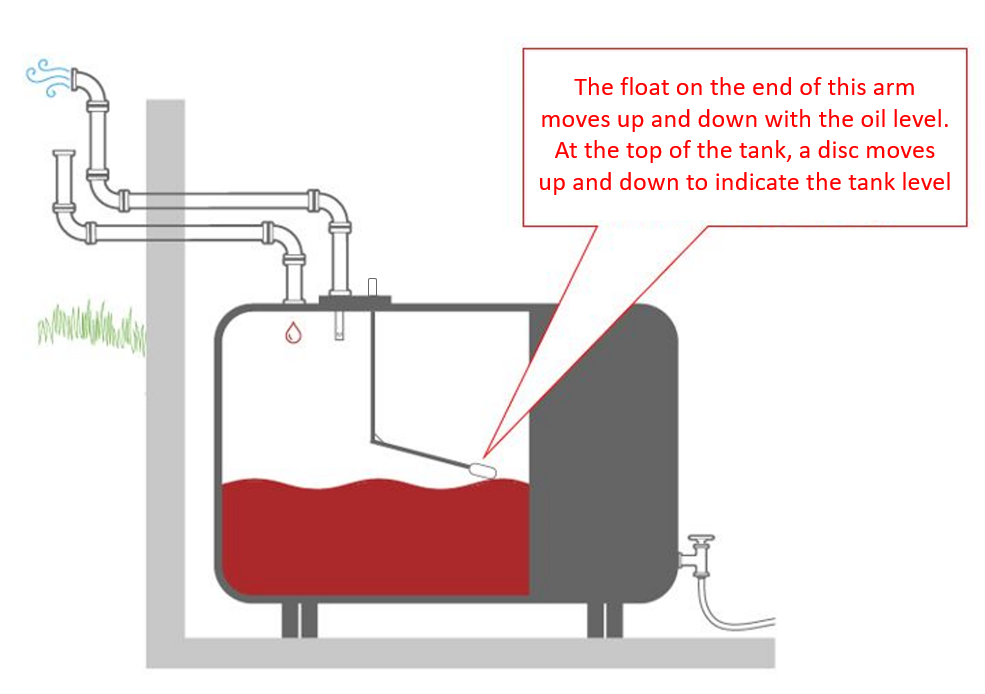
- The float gauge is what is installed on this fitting. This gauge gives you an estimate for how much oil is in the tank. It’s a little cork bobber on the end of a metal arm that floats on the surface of the oil.
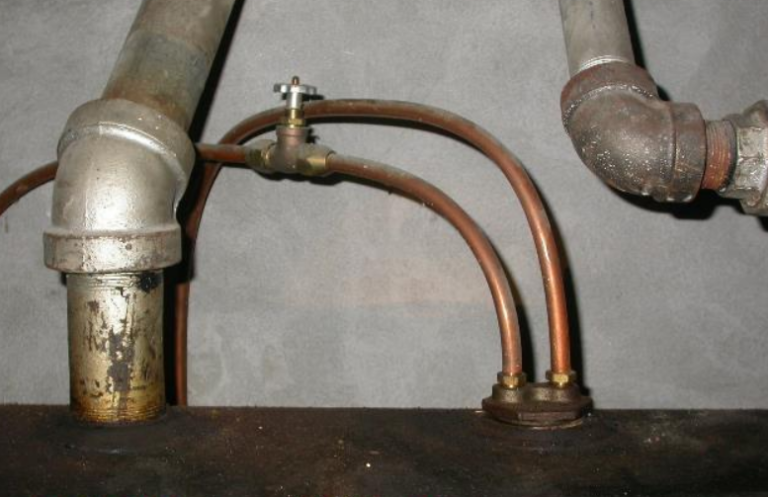
- The extra opening is normally the last opening that isn’t occupied or is occupied by something else. If you have a dual tank system, then you’ll find that the connecting pipe will normally connect both your tanks. Now, if you have feed lines that are top-fed, then they’ll likley be in this fitting as well.
Where to Install the Smart Oil Gauge on Three Fitting Tanks
If your tank only has three fittings on the top of the tank, then there are two ways you can go about installing it. Which of these two ways depends on how your tank’s setup.
Fitting Layout #1: Float, Fill and Vent
If your tank has the above-mentioned setup, then you’re going to have to remove the Float Gauge if you want to use the Smart Oil Gauge. However, that being said, replacing the float gauge can be a little annoying sometimes. But if you follow along my guide on how to remove the float gauge, then it’s simple! Just be sure you don’t simply unscrew it. That can cause the arm will then collide with the side of the tank and possibly damage itself or the tank.
Fitting Layout #2: Float Gauge/Vent Combo, Fill Pipe and Feed Lines
While in most heating oil tank configurations, the feed lines tend to be installed on the bottom, occasionally they will be on the top of the tank. But, with Roth tanks, the feed lines are always on the top of the tank. That means for Roth tank installations of the Smart Oil Gauge, you’ll have to uninstall the dial gauge and install the Smart Oil Gauge in that fitting. As for Granby tanks, the feed lines will occasionally be on the top. When this happens, your only option is to take out the float gauge and install the Smart Oil Gauge there. But another important thing to know is that with top-fed feed lines, they don’t always reach the bottom of the tank. This leaves roughly 30 gallons of oil that the system can’t draw from. It’s almost like a straw that can’t reach the bottom of a cup.
Your other option is to move the feed lines to the bottom of the tank. DO NOT attempt this on your own. You MUST have a skilled and qualified technician do this for you. Otherwise, you can break your tank, damage your system, and cause oil to leak throughout your home. The average homeowner is not capable of doing this. The technician creates a vacuum that will prevent all the oil in the tank from spilling out. Doing this on your own is not feasible. Now, this is usually a last resort when it comes to using the Smart Oil Gauge. However, if you like the float gauge on the tank and want the best of both worlds. then this is the right move for you.
What to do if you Have Three Fittings?
Using a Smart Oil Gauge for your heating oil tank is a great way to monitor your usage and heating oil level. A lot of our clients have gone to great lengths to get the Smart Oil Gauge installed on their tank. You can also use it with your float gauge if you have enough fittings! But with only three fittings on the tank, you’ll have to remove the float gauge. You can read through our guide on that here.
Relocating your feed lines is also an option. However, this isn’t easy to do and requires an HVAC technician to do it for you. A qualified technician is the best way to get this gauge set up on the tank for you! You can typically call to schedule an appointment for them to do this. Or the next time they’re doing some tank work, you can ask them!
Happy Heating,
Hunter

